Seller Initiated Campaigns
09/24/2024
In this article, we will explain how you, as a seller, can initiate Affiliate Partner campaigns in the Seller Centre, enabling you to collaborate with TikTok Shop Affiliate Partner (TAP) agencies.

Originally, Affiliate Partner agencies have been able to create campaigns for specific set of sellers or all sellers. Sellers would then register for the campaign, adding their products, commission rates, and sample quantities. The Agency would handle finding creators to promote these products by sharing product links with creators to include in their showcases.
However, due to demand from sellers, we have now also introduced 'Seller Initiated Campaigns', which will allow you to initiate the campaign request and in turn, agencies can then accept to join these campaigns. Seller initiated campaigns will:

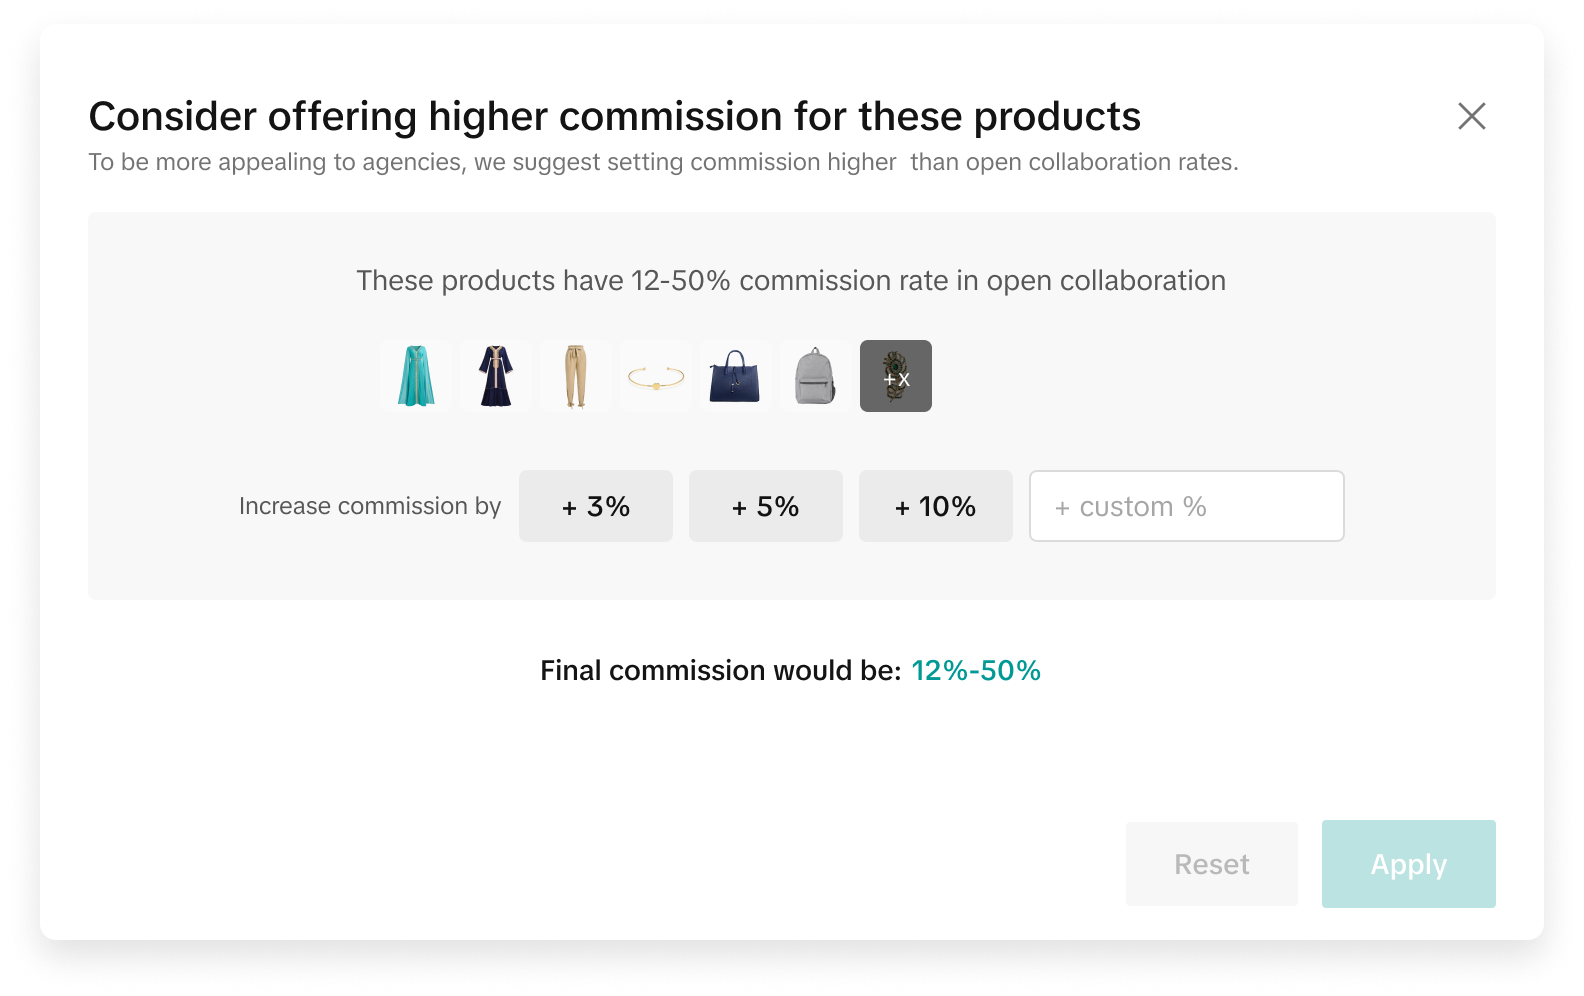 Please note on the agencies end, they will be able to compare the commission rate outlined in this section to the open plan commission rate.
As such, we would recommend adding a higher commission rate than the one listed on your products for open plan collaboration.
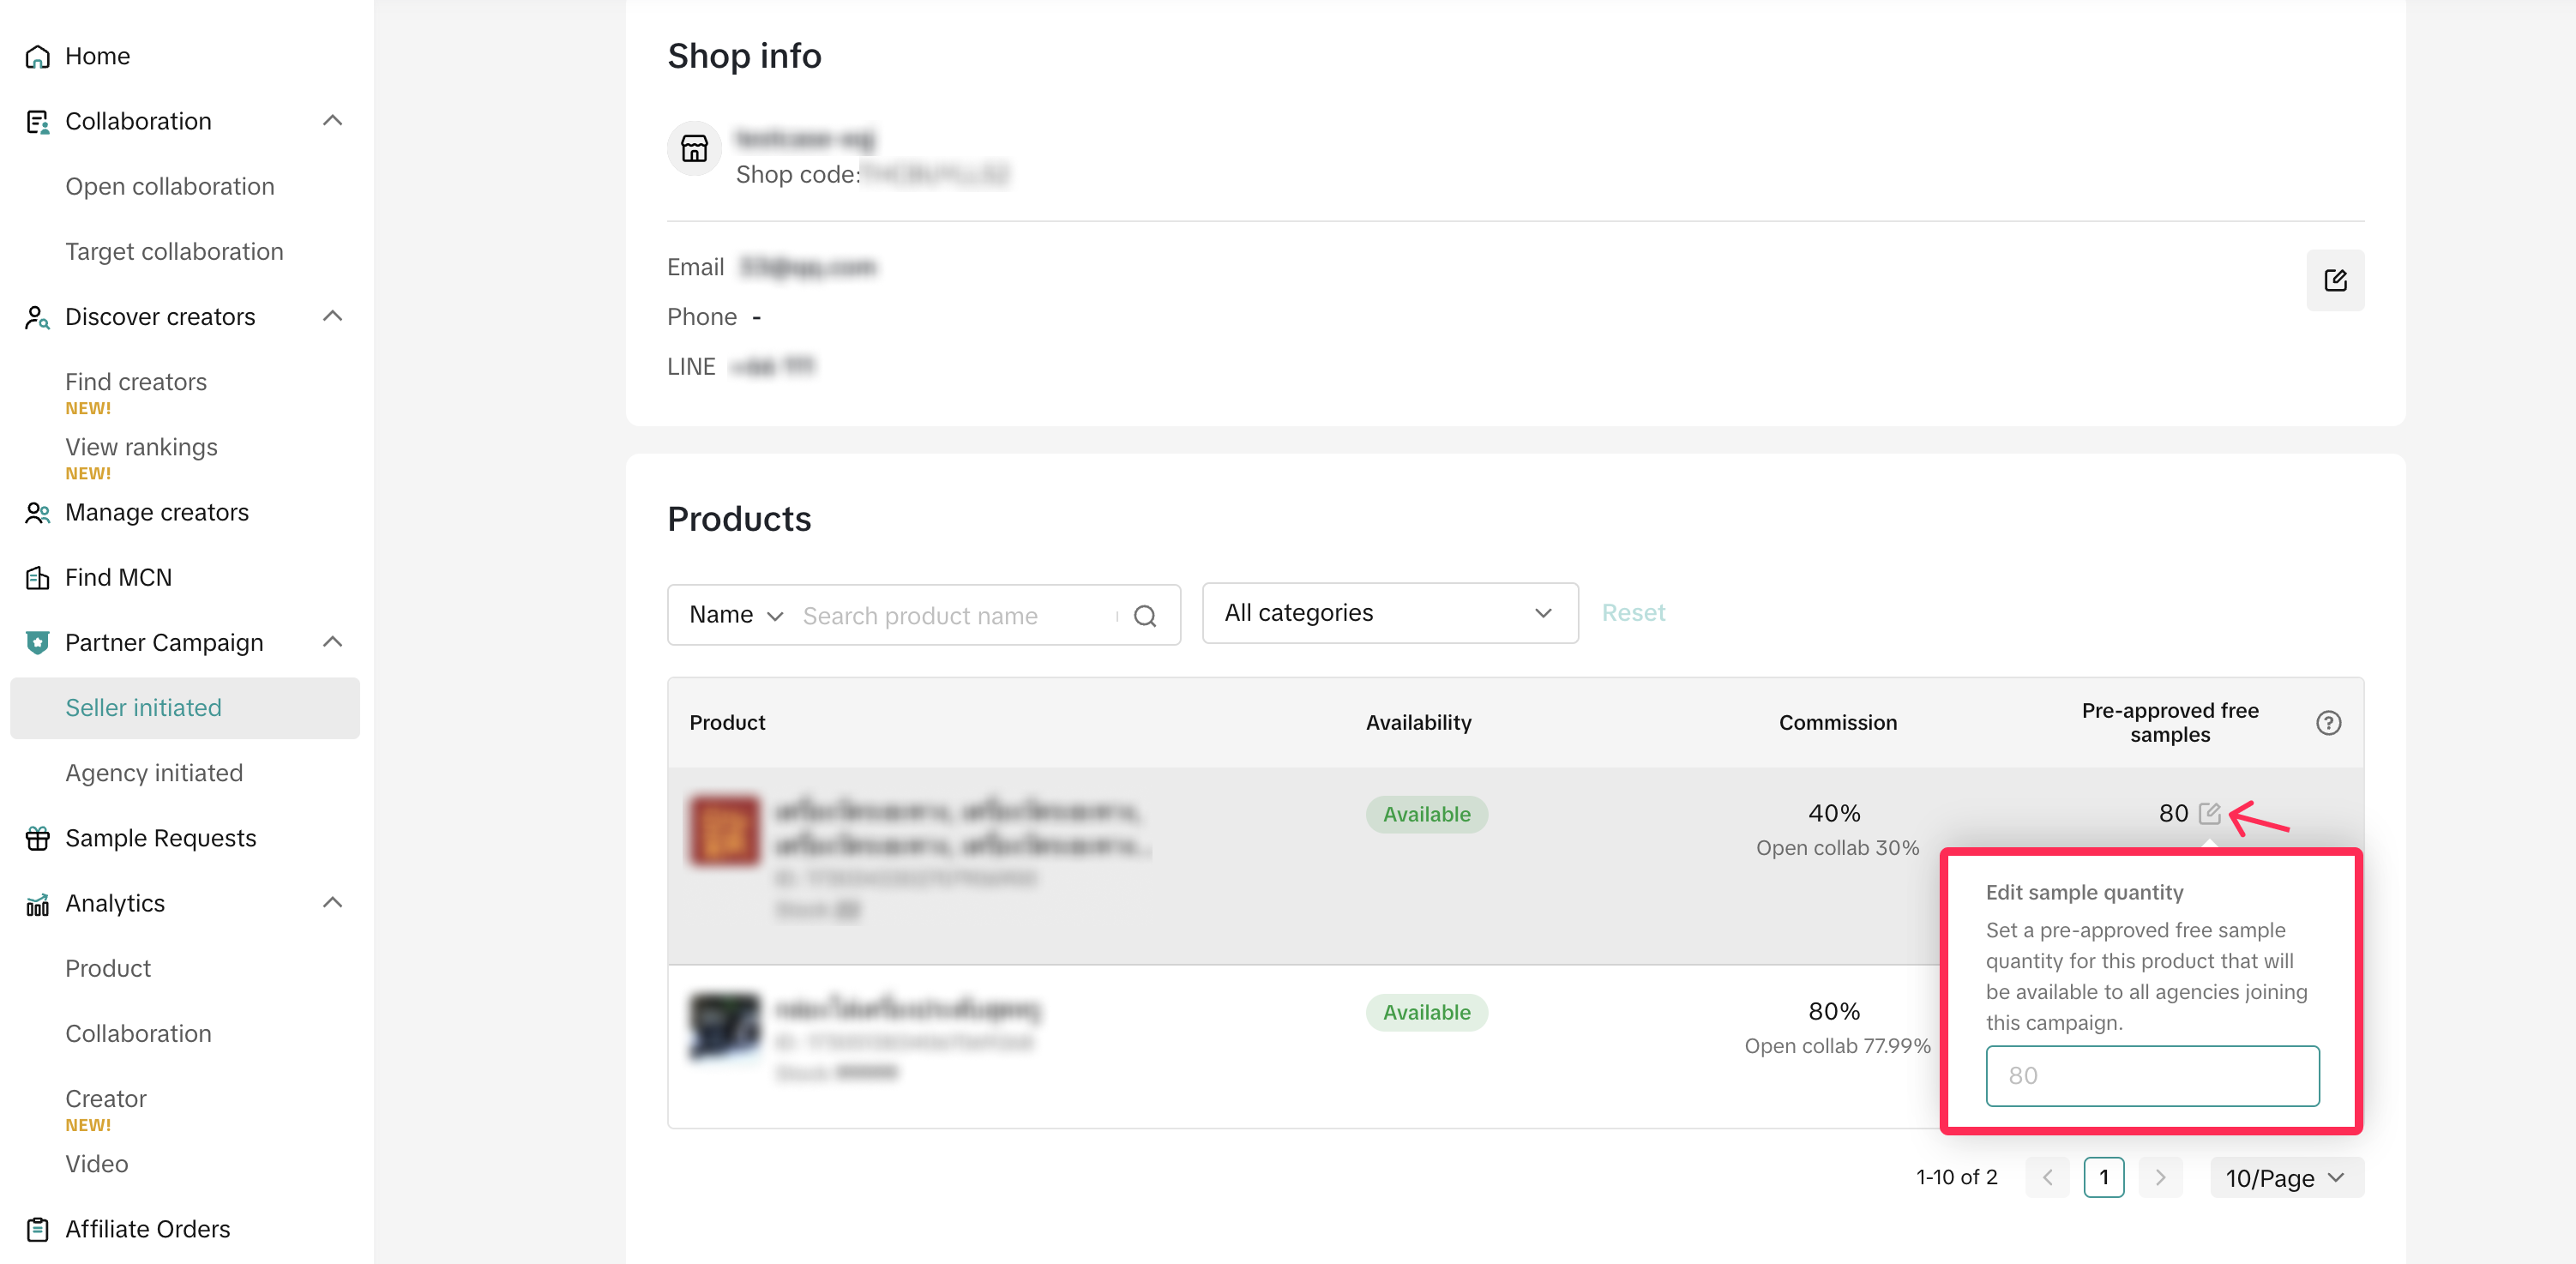
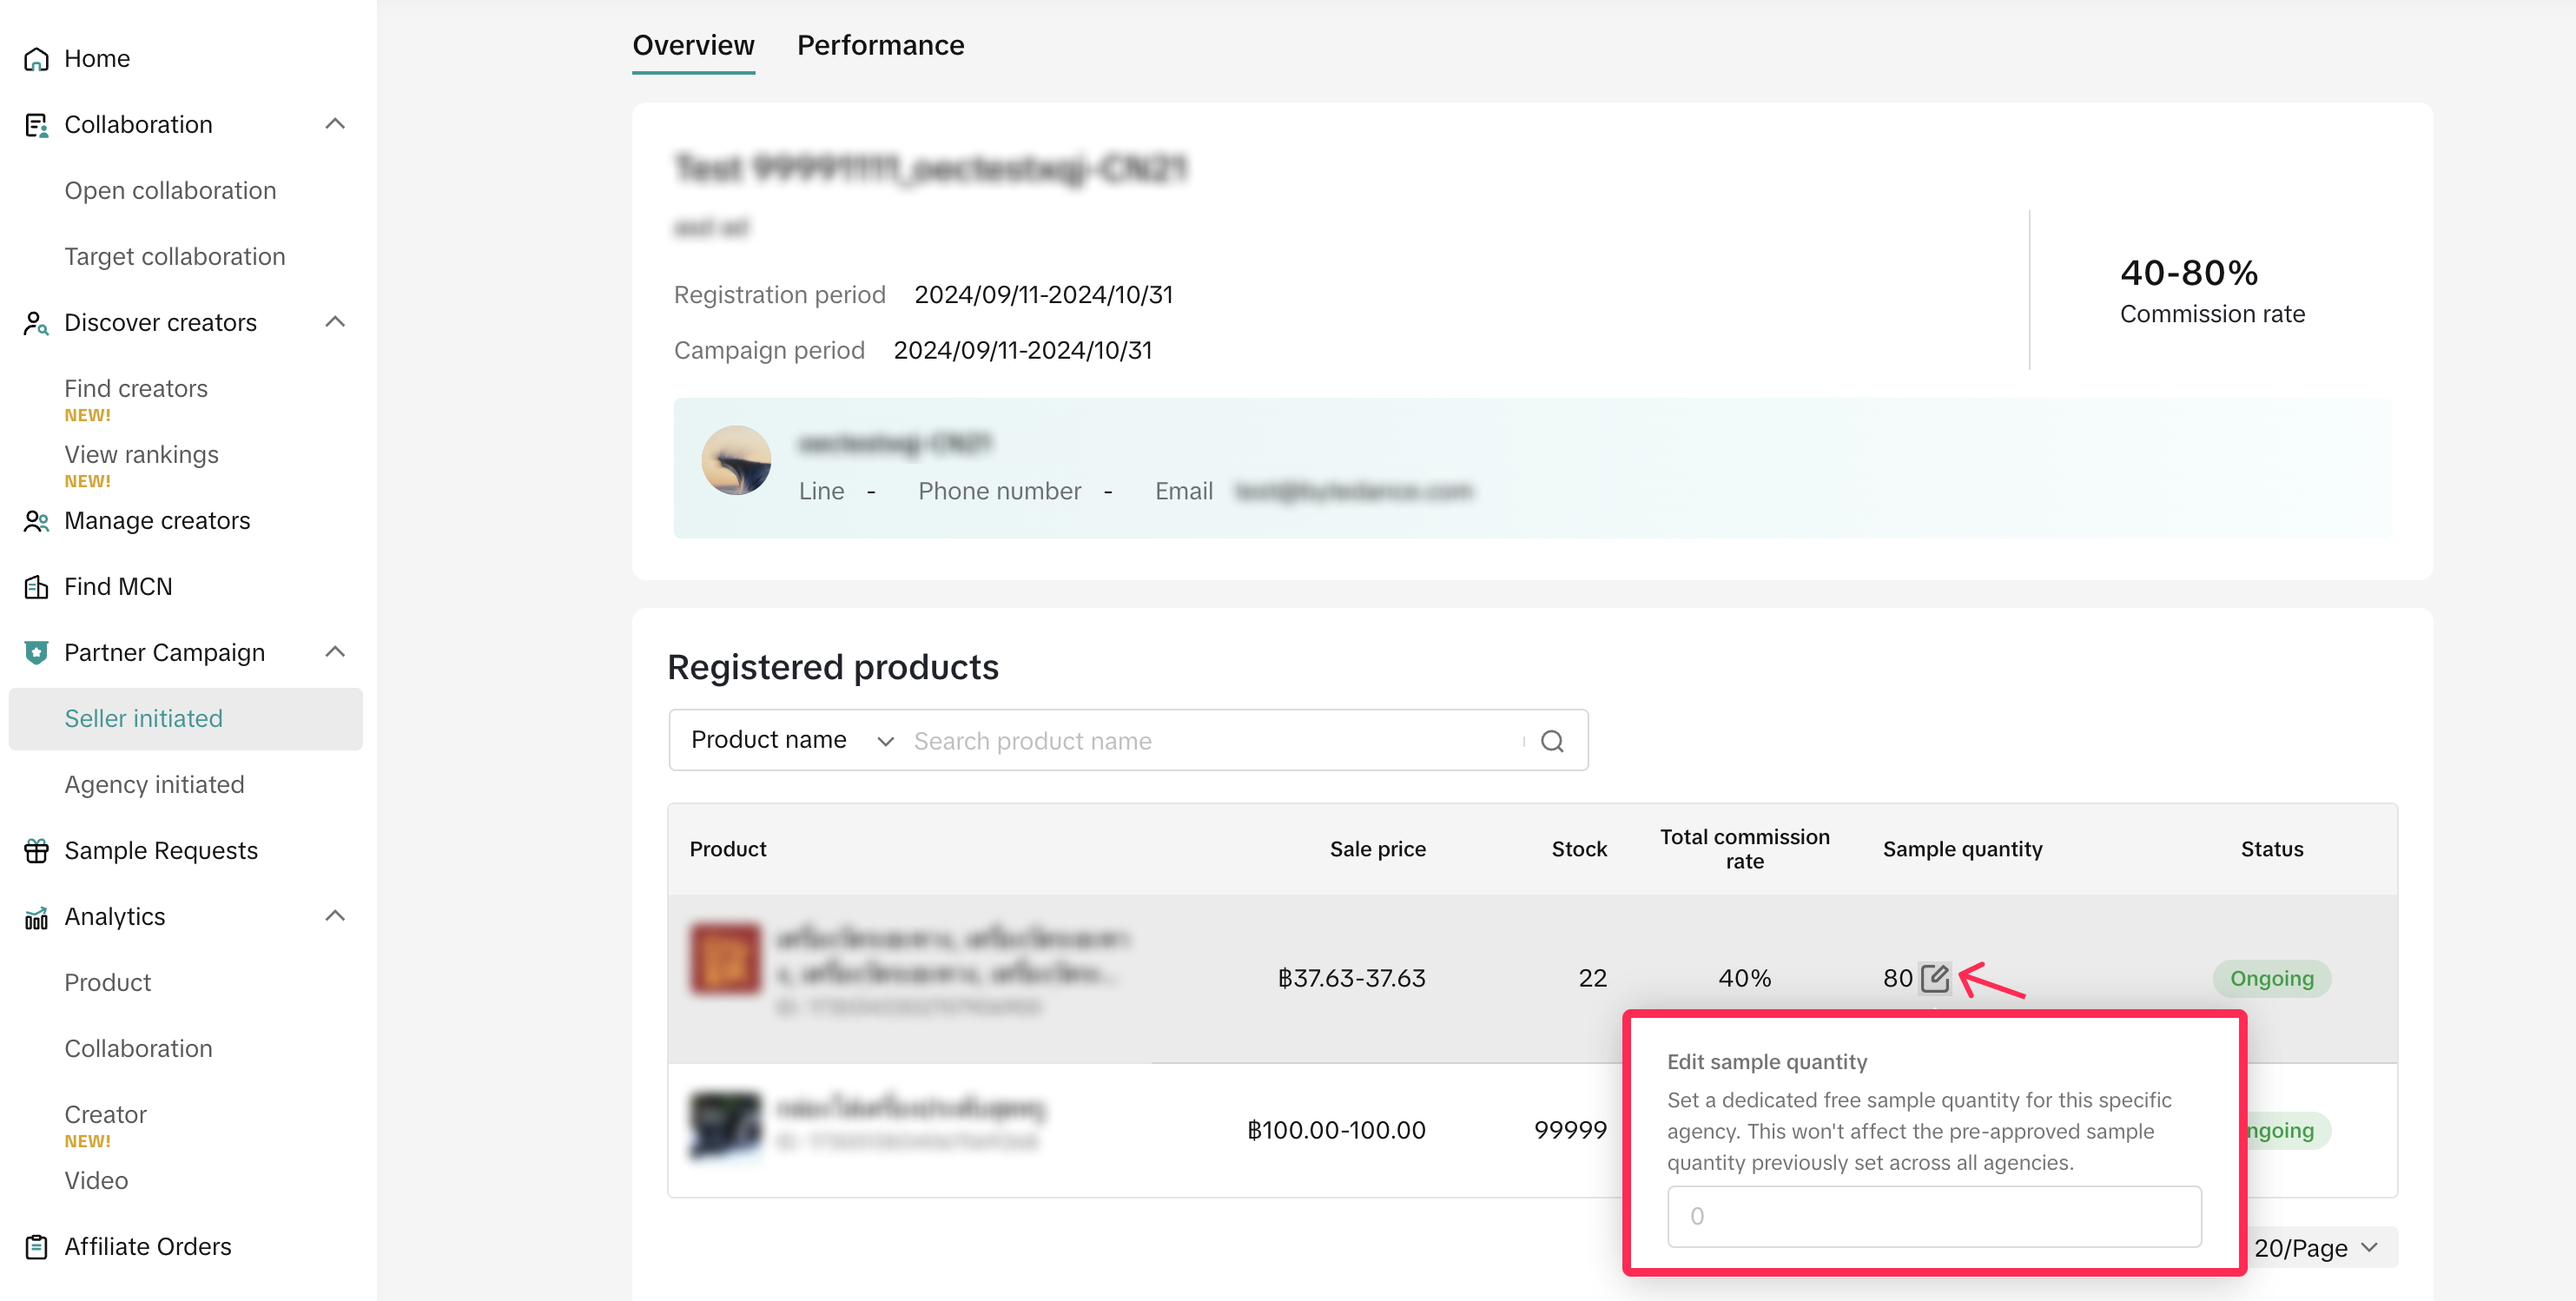
 If you want to adjust the free sample quantities for campaigns or agencies afterwards, you have two options:
Once a campaign is active, information you can edit will be limited to campaign period, request open period and increasing free sample quantity only.
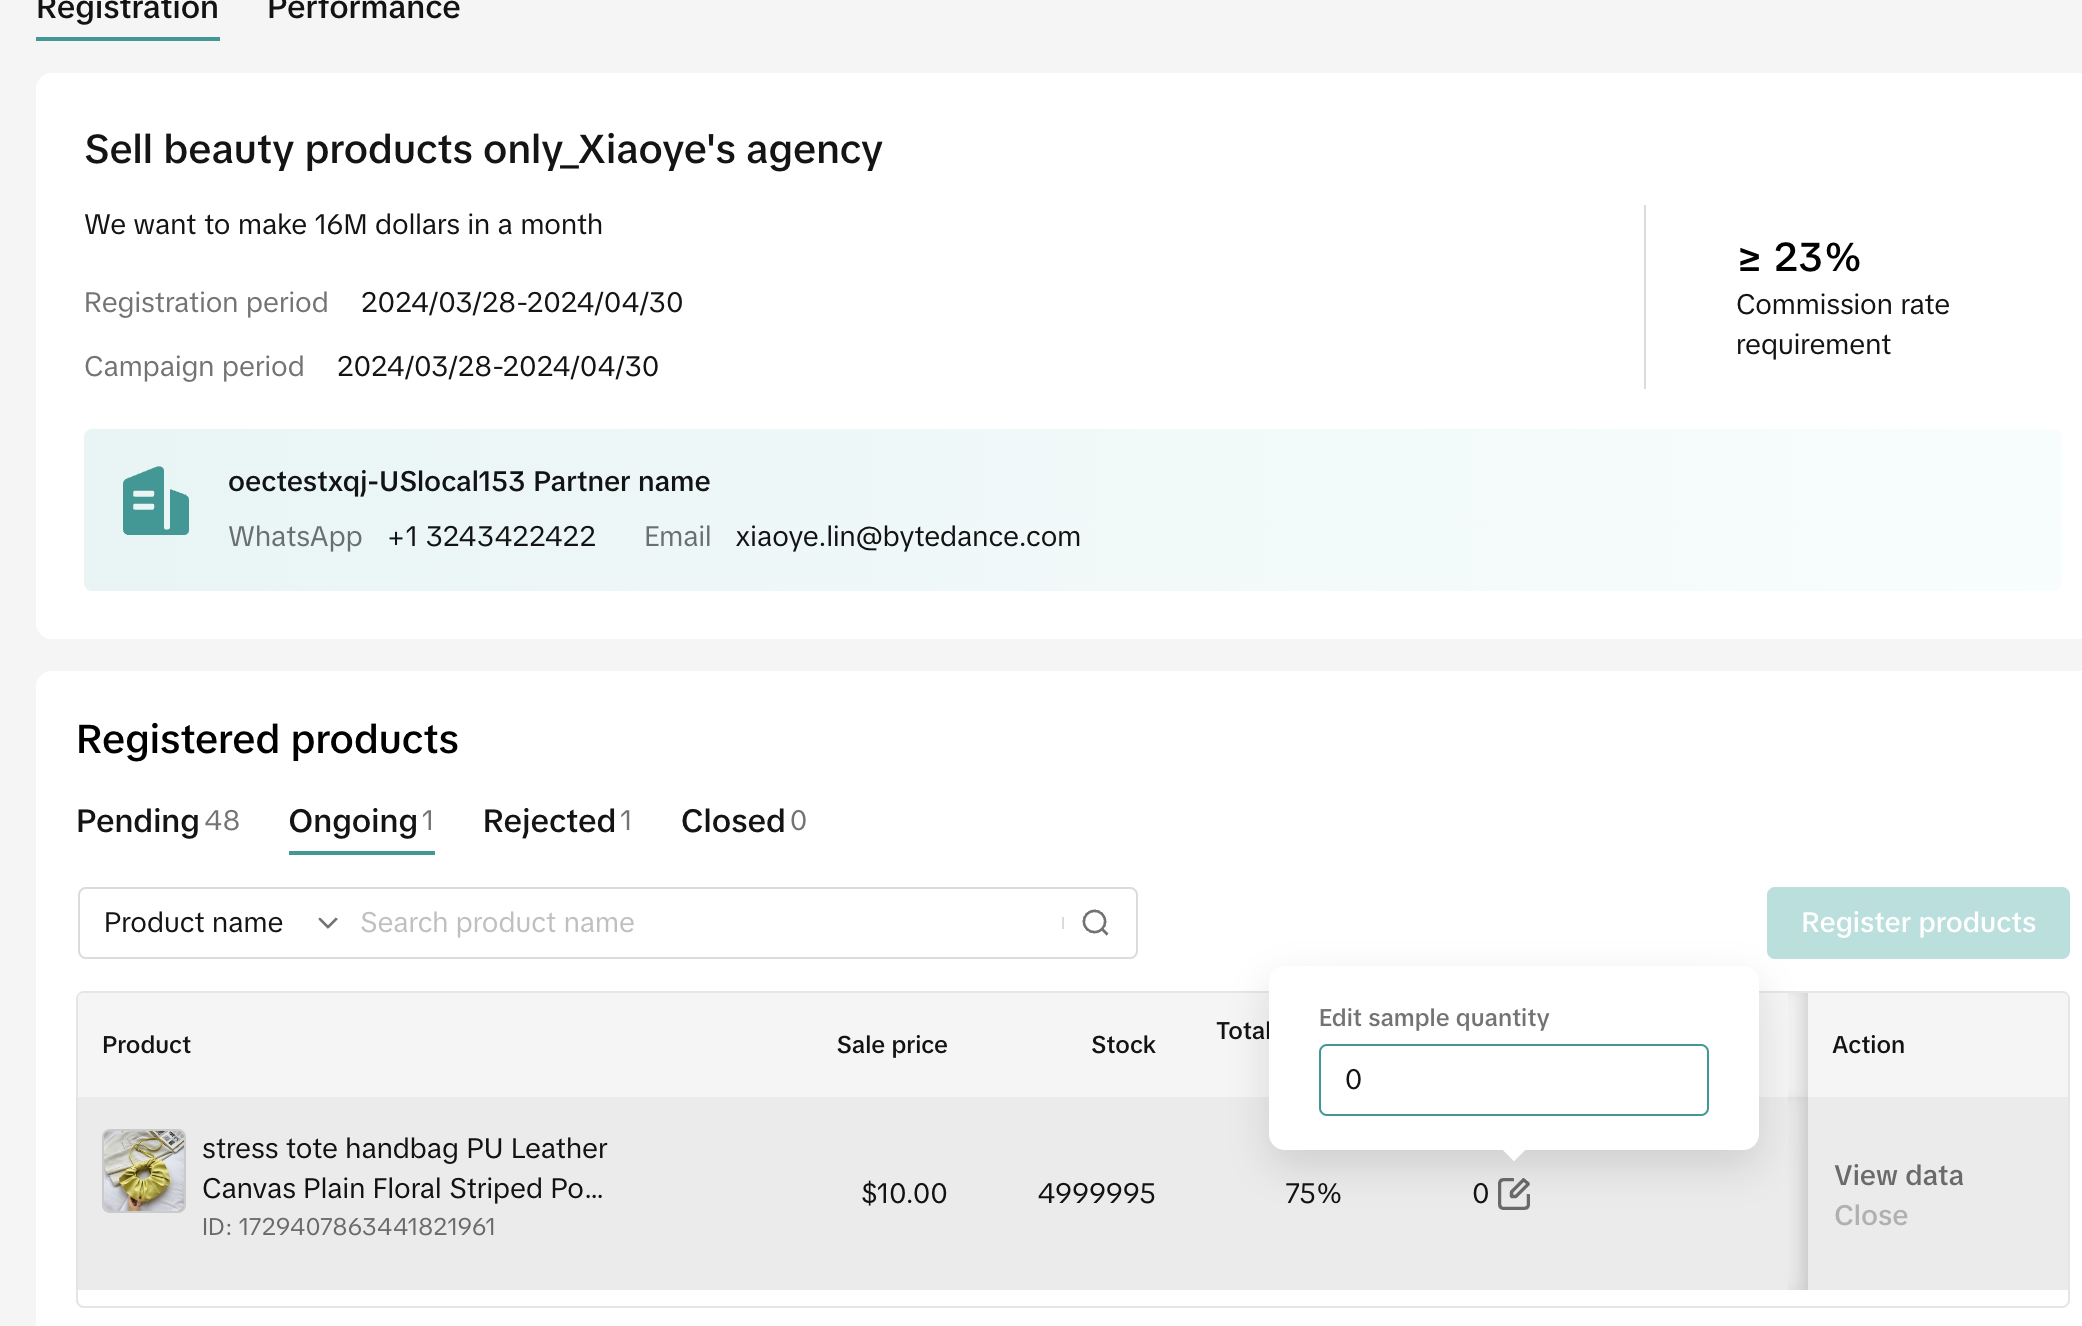
For example:

What are Affiliate Partner campaigns?
Affiliate Partners are 3rd party agencies that can start a match-making process between sellers and creators by setting up Affiliate campaigns. These campaigns allow sellers to add their products, therefore helping them to expand their affiliate sales channels, whilst the Agency is responsible for ensuring that creators promote the product in the campaign effectively.Originally, Affiliate Partner agencies have been able to create campaigns for specific set of sellers or all sellers. Sellers would then register for the campaign, adding their products, commission rates, and sample quantities. The Agency would handle finding creators to promote these products by sharing product links with creators to include in their showcases.
However, due to demand from sellers, we have now also introduced 'Seller Initiated Campaigns', which will allow you to initiate the campaign request and in turn, agencies can then accept to join these campaigns. Seller initiated campaigns will:
- Simplify how sellers engage with and solicit help from agencies.
- Enable sellers to specify desired content requirements, product selection, and campaign objectives.
- Facilitate more efficient matchmaking and collaboration between sellers and agencies.
- Campaigns open to all agencies
- Invite only campaigns where you can only invite up to 20 agencies to your campaign

How do I access seller initiated campaigns?
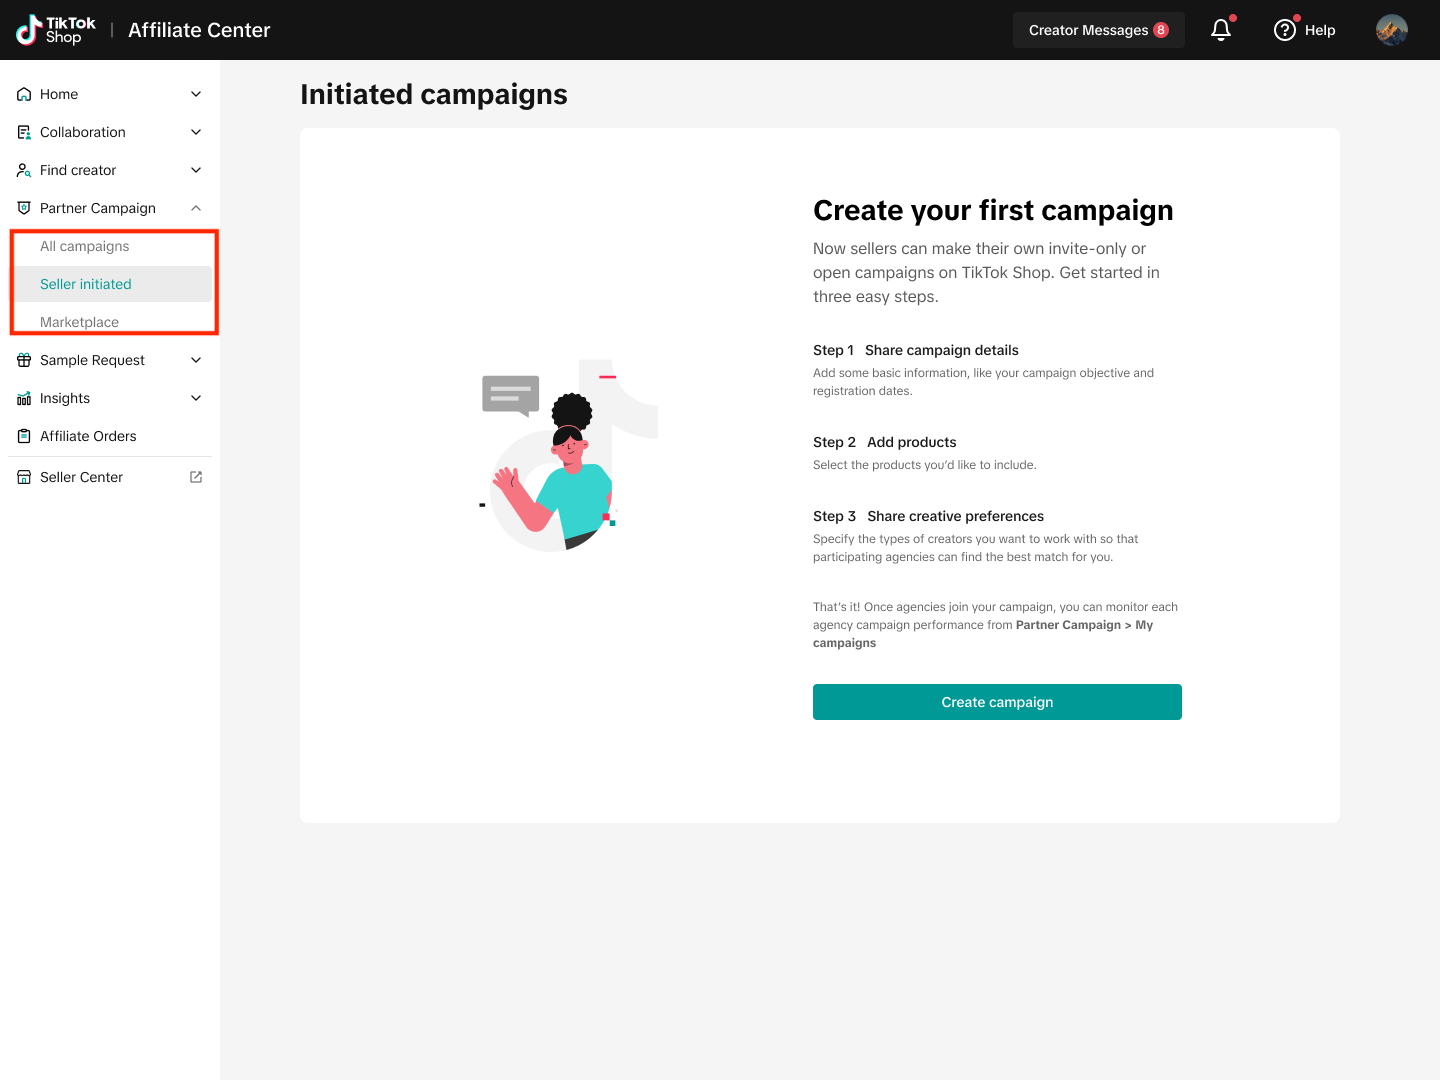
Seller initiated campaigns can be accessed by all sellers on the Seller Centre by navigating to: Seller Centre > Affiliate Centre > Partner Campaigns > Seller InitiatedUnder [Partner Campaigns] you will now see 3 different tabs:- All campaigns - This will display all your campaigns and will list the Agency initiated campaigns that you have registered for and campaigns initiated by you (seller initiated campaigns).
- Seller Initiated - This is where you can go to create and manage campaigns initiated by you.
- Marketplace - This will display all the campaigns that are open to you and that you can register for. The campaigns listed here are initiated by Affiliate Partner agencies.

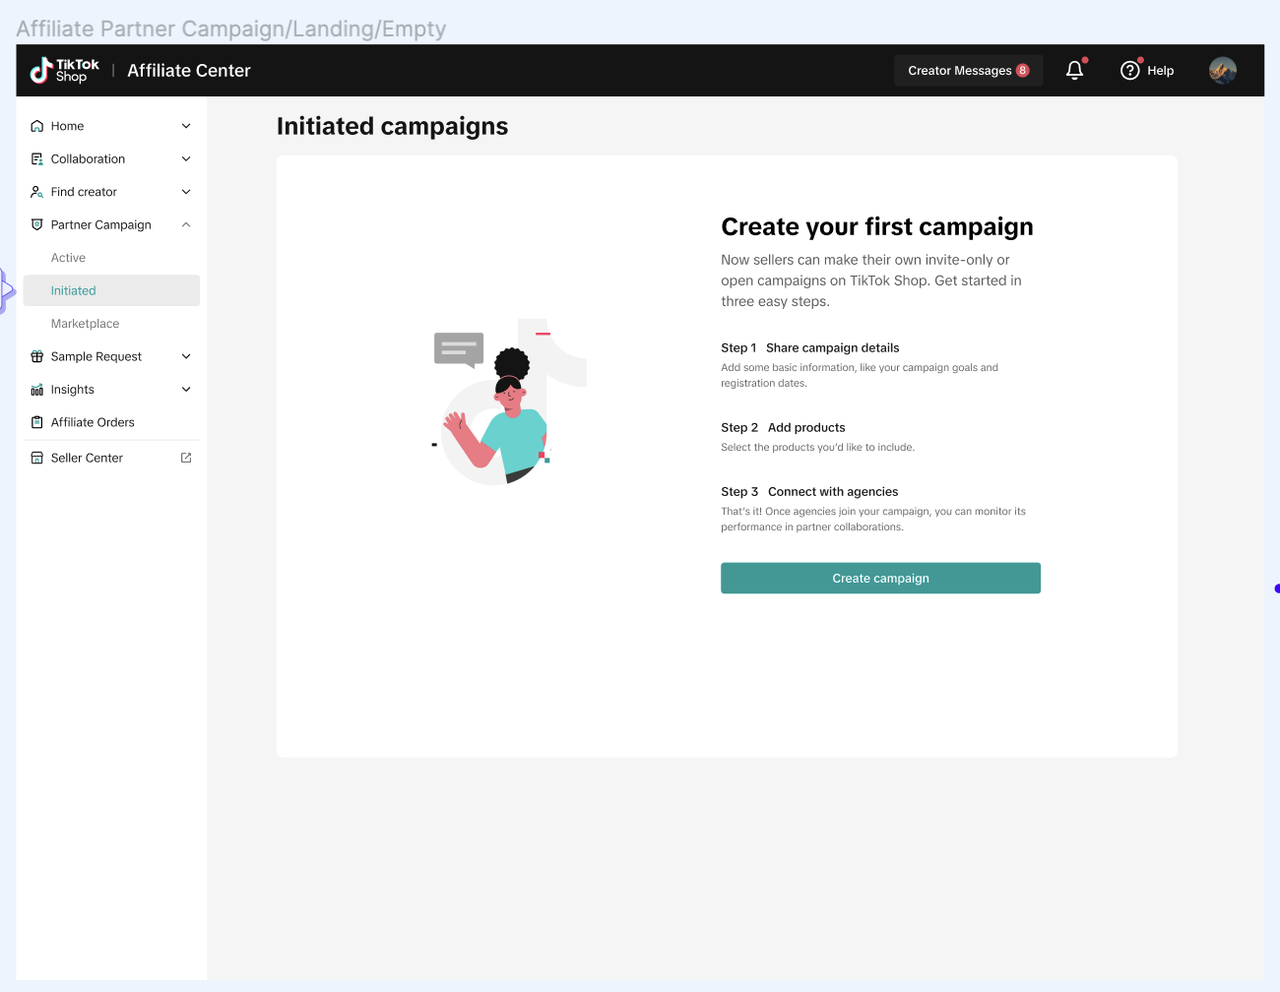
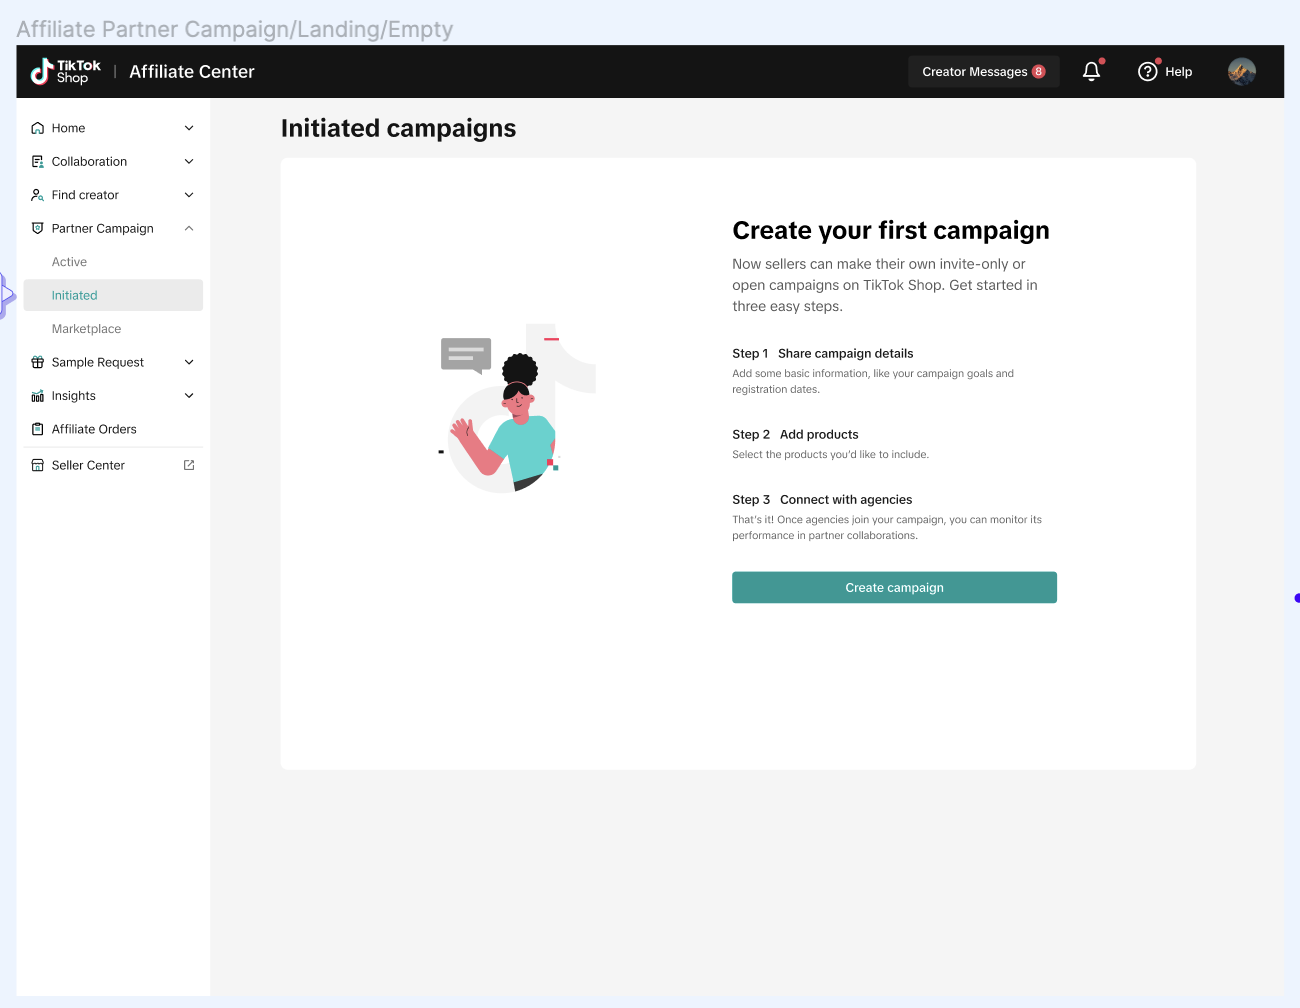
- When you first access the [Seller Initiated] tab, you will see a prompt asking you to create your first campaign.

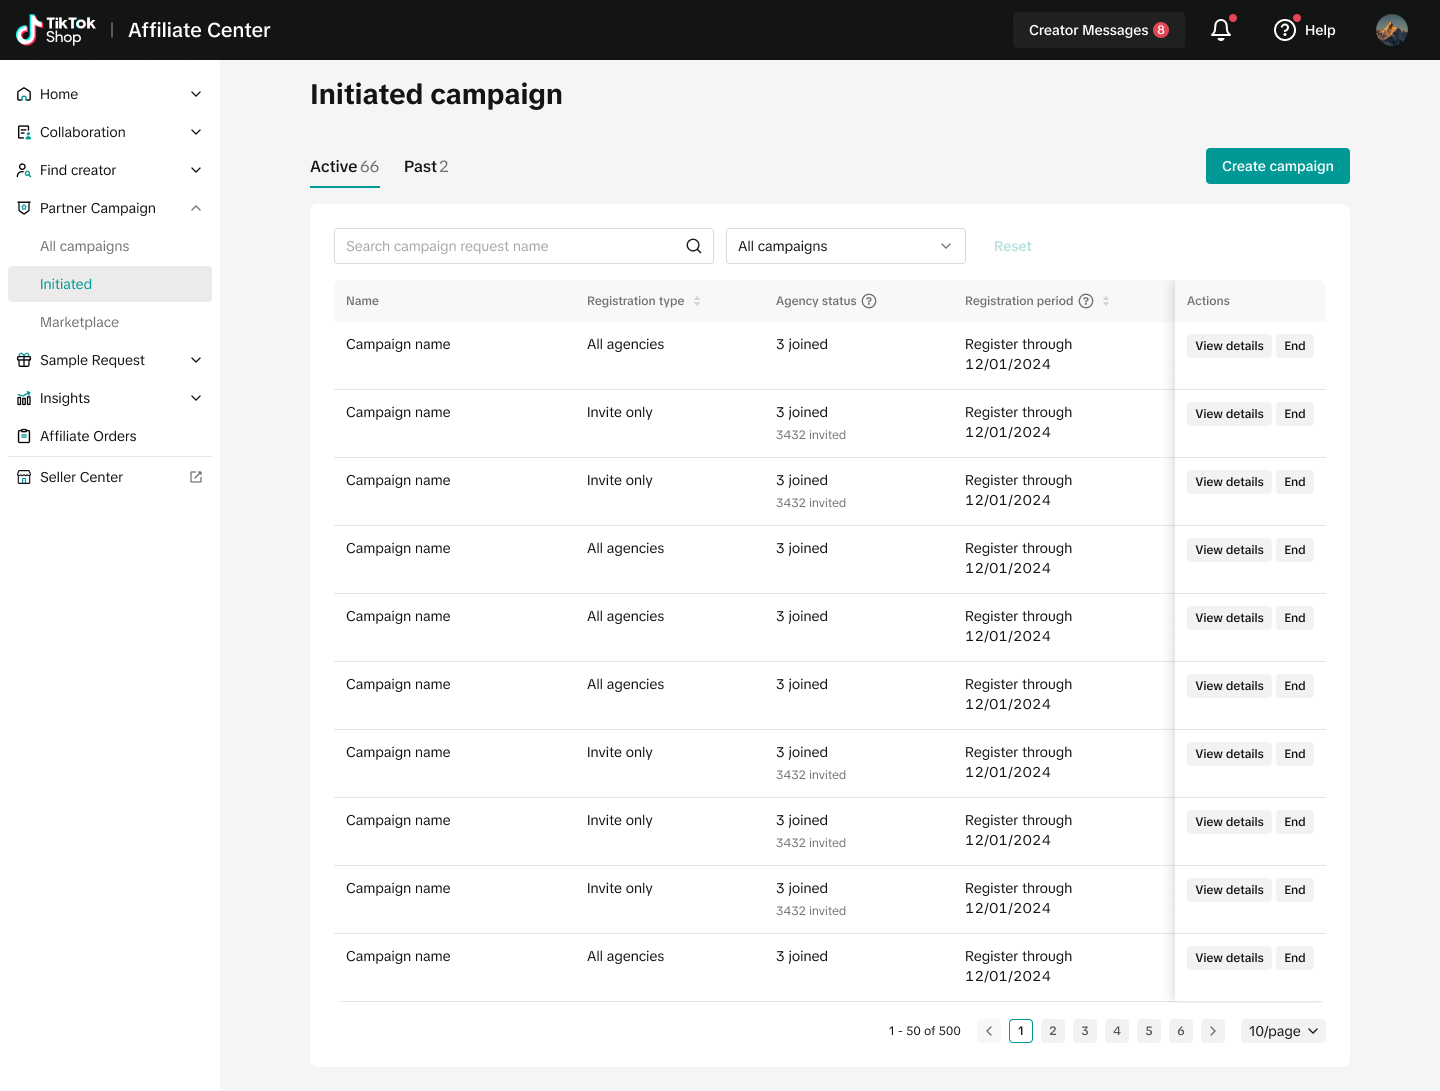
- However, once you have created at least 1 campaign, you will notice that the page has 2 headings:
- Active: This is a list of your ongoing campaign requests and includes all campaigns where the registration period has not passed
- Past: This is a list of all your campaigns where the registration period has ended

- Under [Active] you can also find a Search Box where you can search by your campaign name and there is also a filter available where you can sort your campaigns by:
- Most recent creation date (most recent registration start date)
- Earliest registration end date (registeration period ending soonest show first)
- Registration type (all agencies first, then invite-only)
- Registration period
- Campaign period
- Phone number
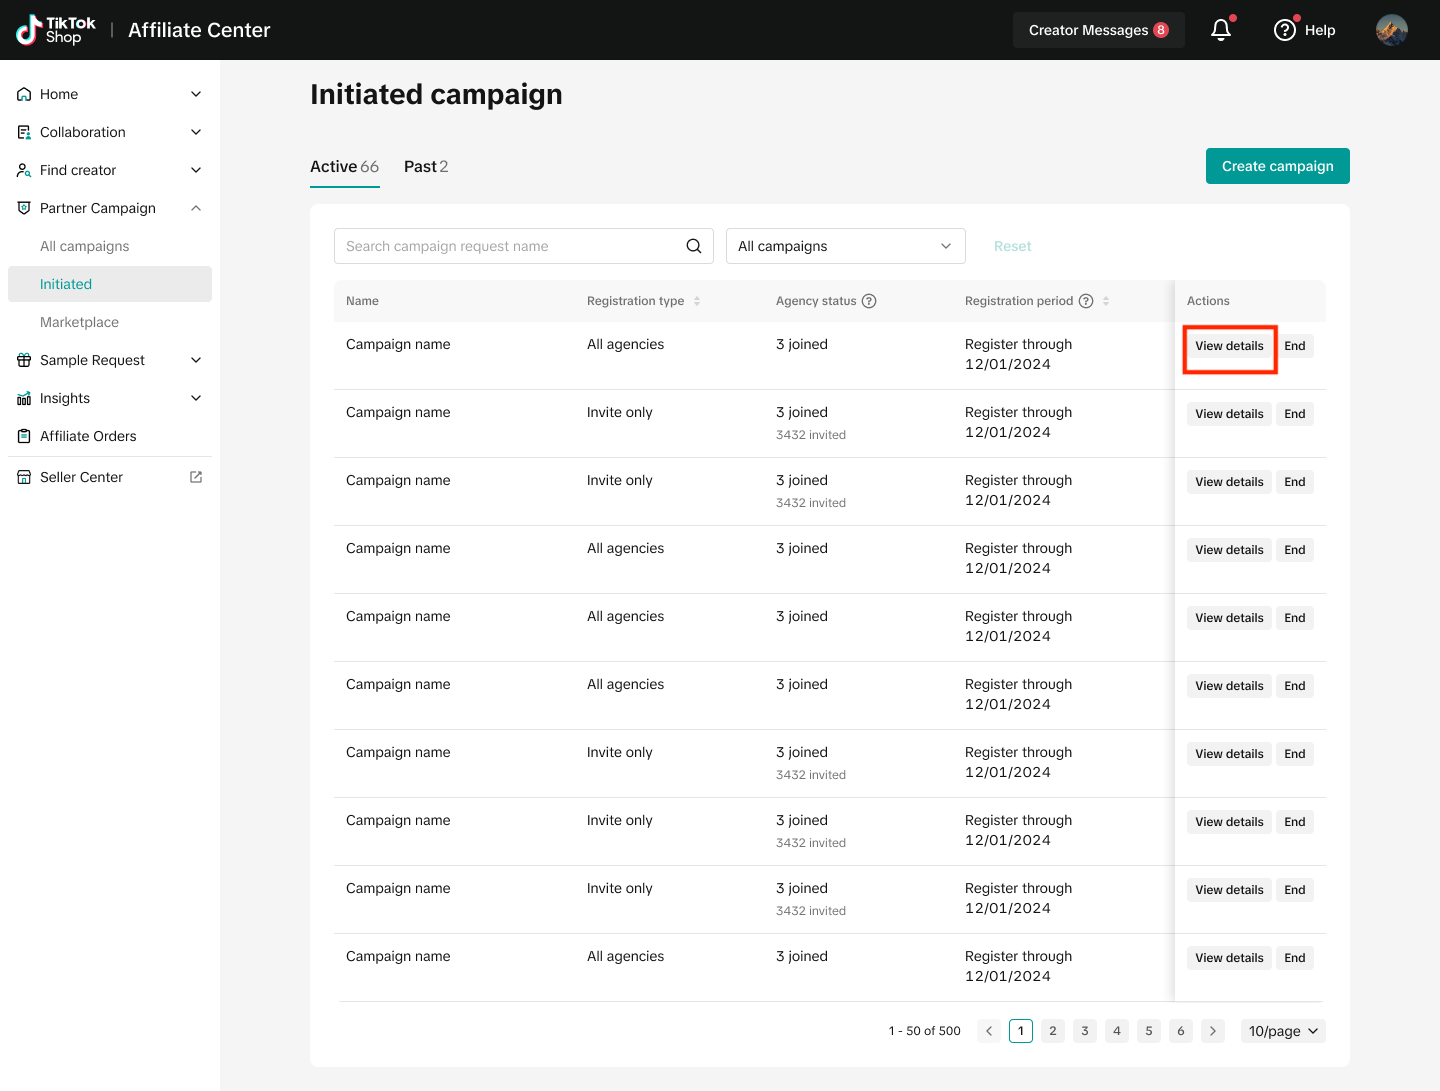
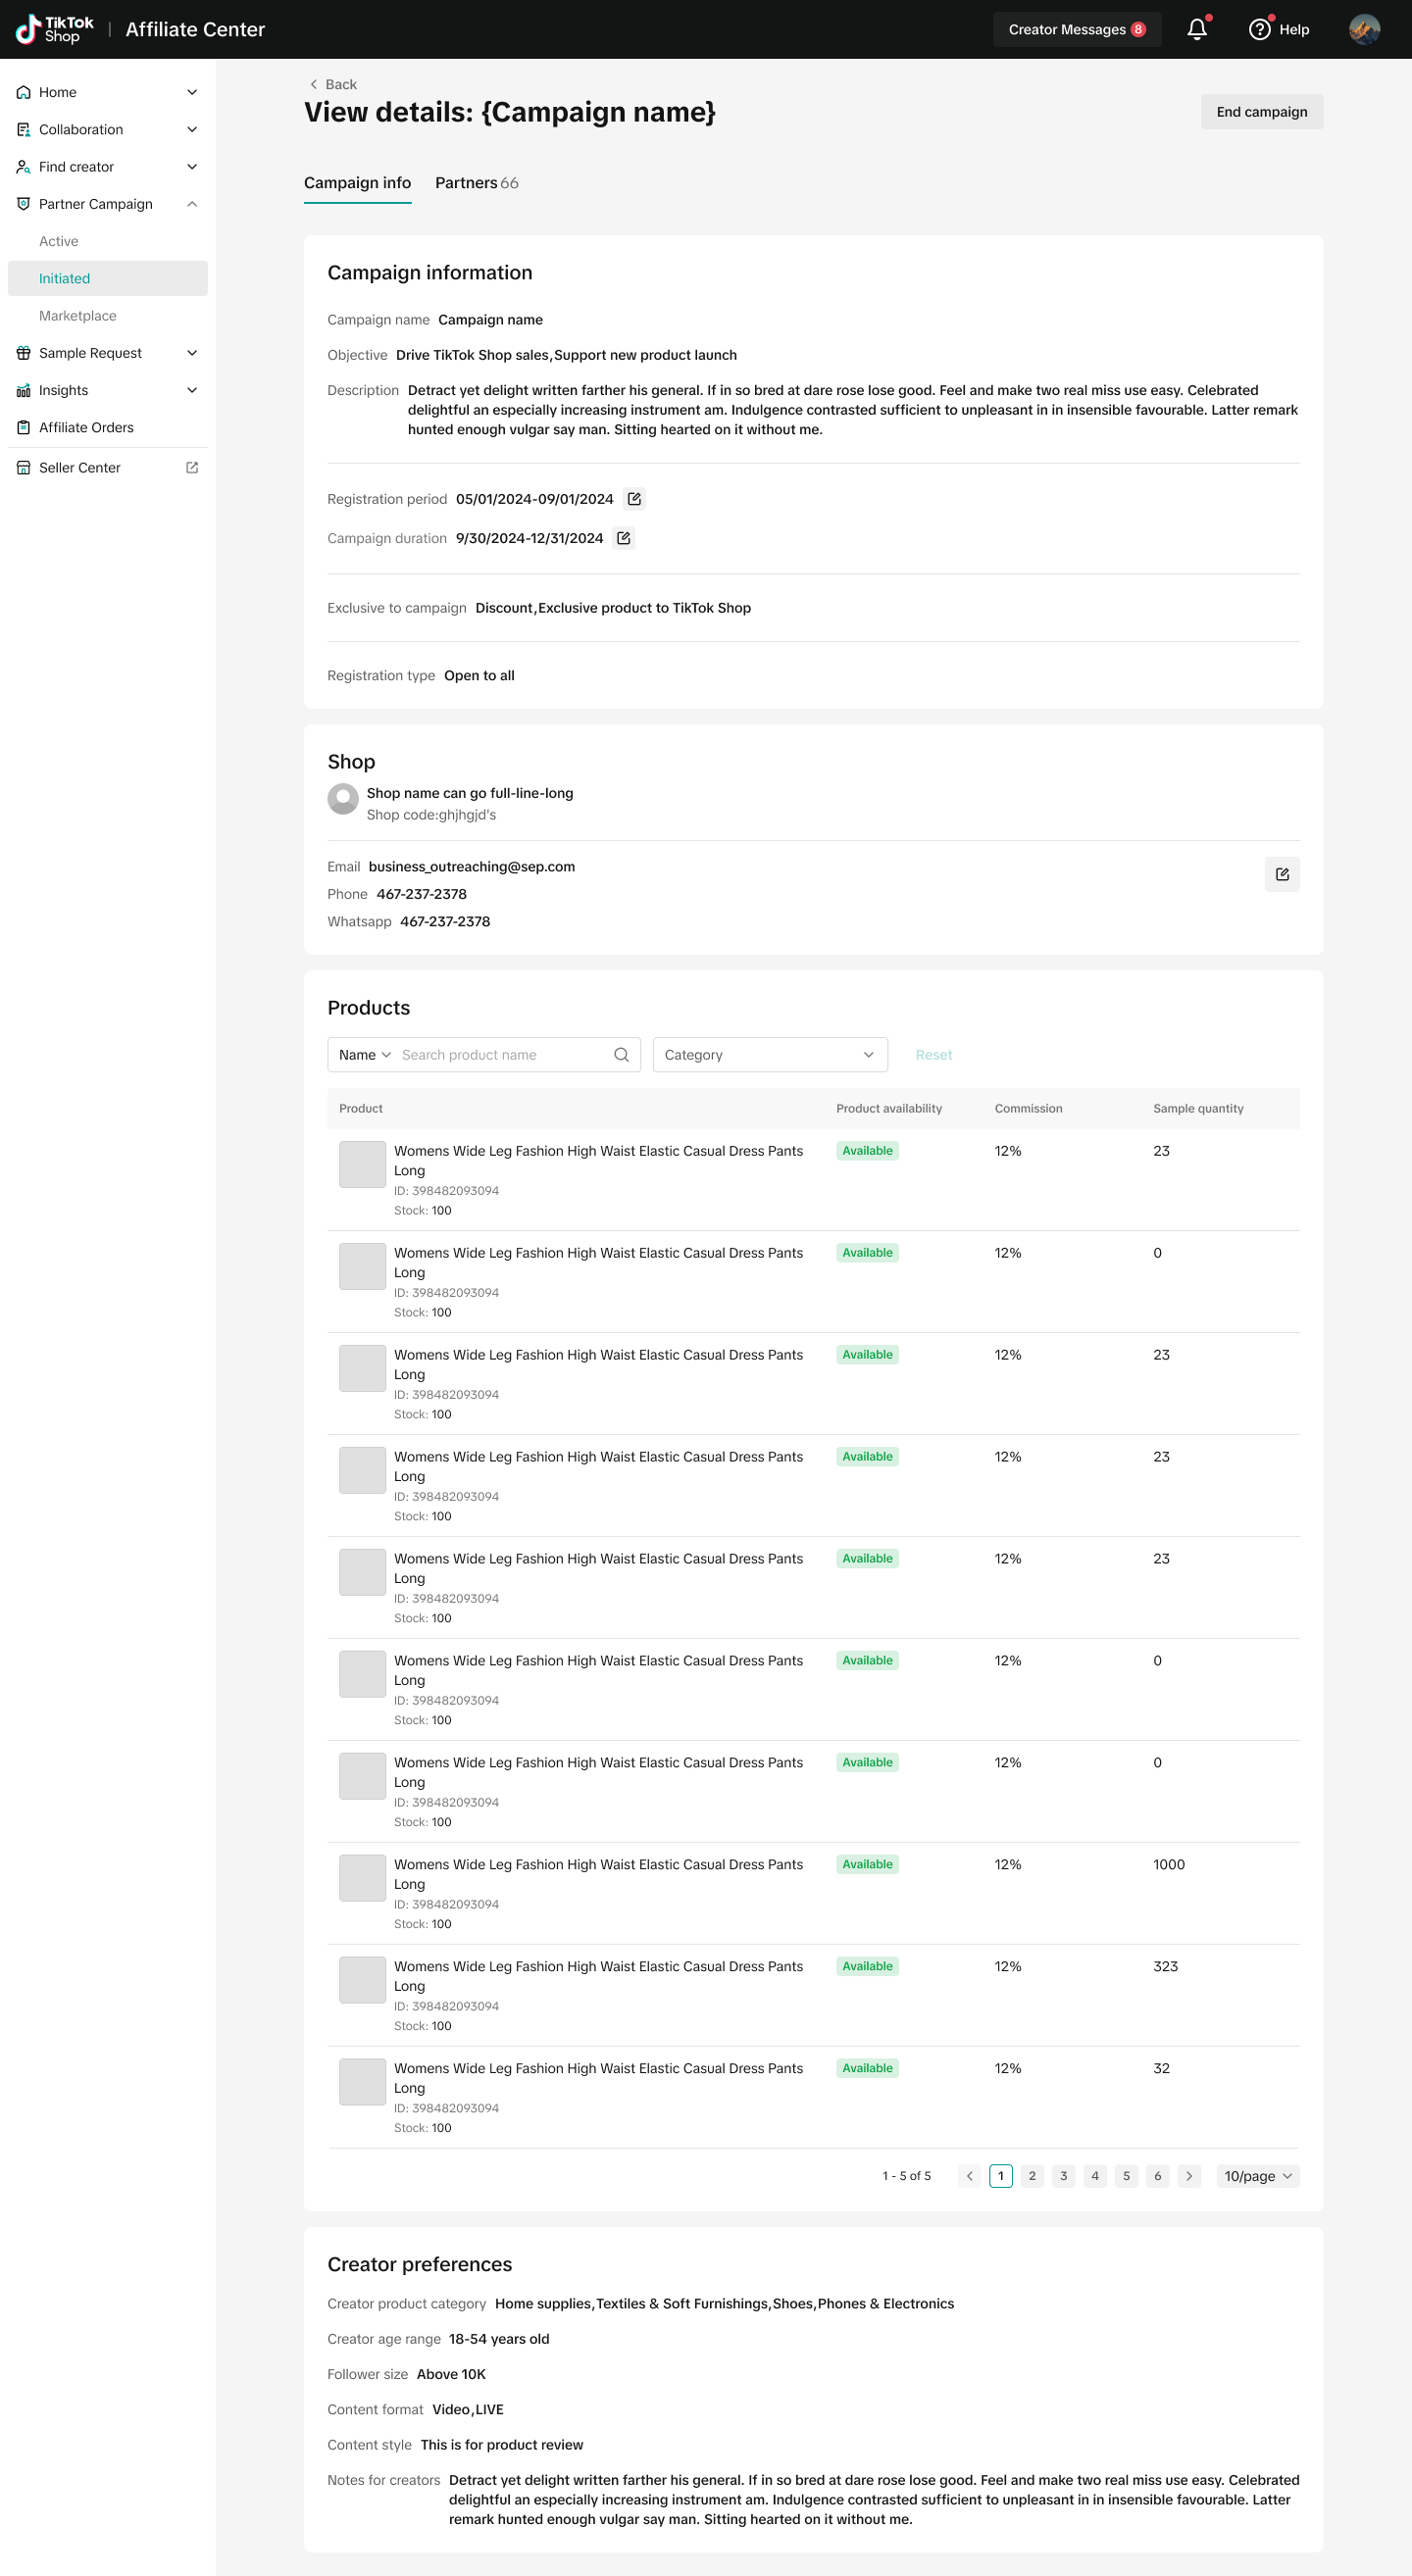
- To view the campaign details, simply click on [View details] which will take you to a page which will list all the information you included when you initially set up the campaign.


- On the [View details] page, you'll notice a heading called [Partners] and here you can find a list of all agencies that have accepted to join your campaign.
How to initiate a campaign?
Go to: Seller Centre > Affiliate Centre > Partner Campaign > Seller Initiated campaigns- When you first access the [Seller Initiated] tab, you will see a prompt asking you to create your first campaign.
- Press [Create campaign] to get started.

- Now, you'll need to fill in the campaign details and this will include 4 different sections as outlined below.
Filling out the campaign information
Below we have outlined in detail, the information that you will be required to fill out as you set up your campaigns.Add details
- This is where you will outline the objective for your campaign and include information that will be visible to agencies when they are reviewing your campaign. This information will help them decide if they wish to participate in the campaign, so it's important to ensure all the information is accurate.
Explanation | UI | |
Campaign name | This is the name of the campaign you wish to use and will be visible to all agencies who view/register for your campaign. | 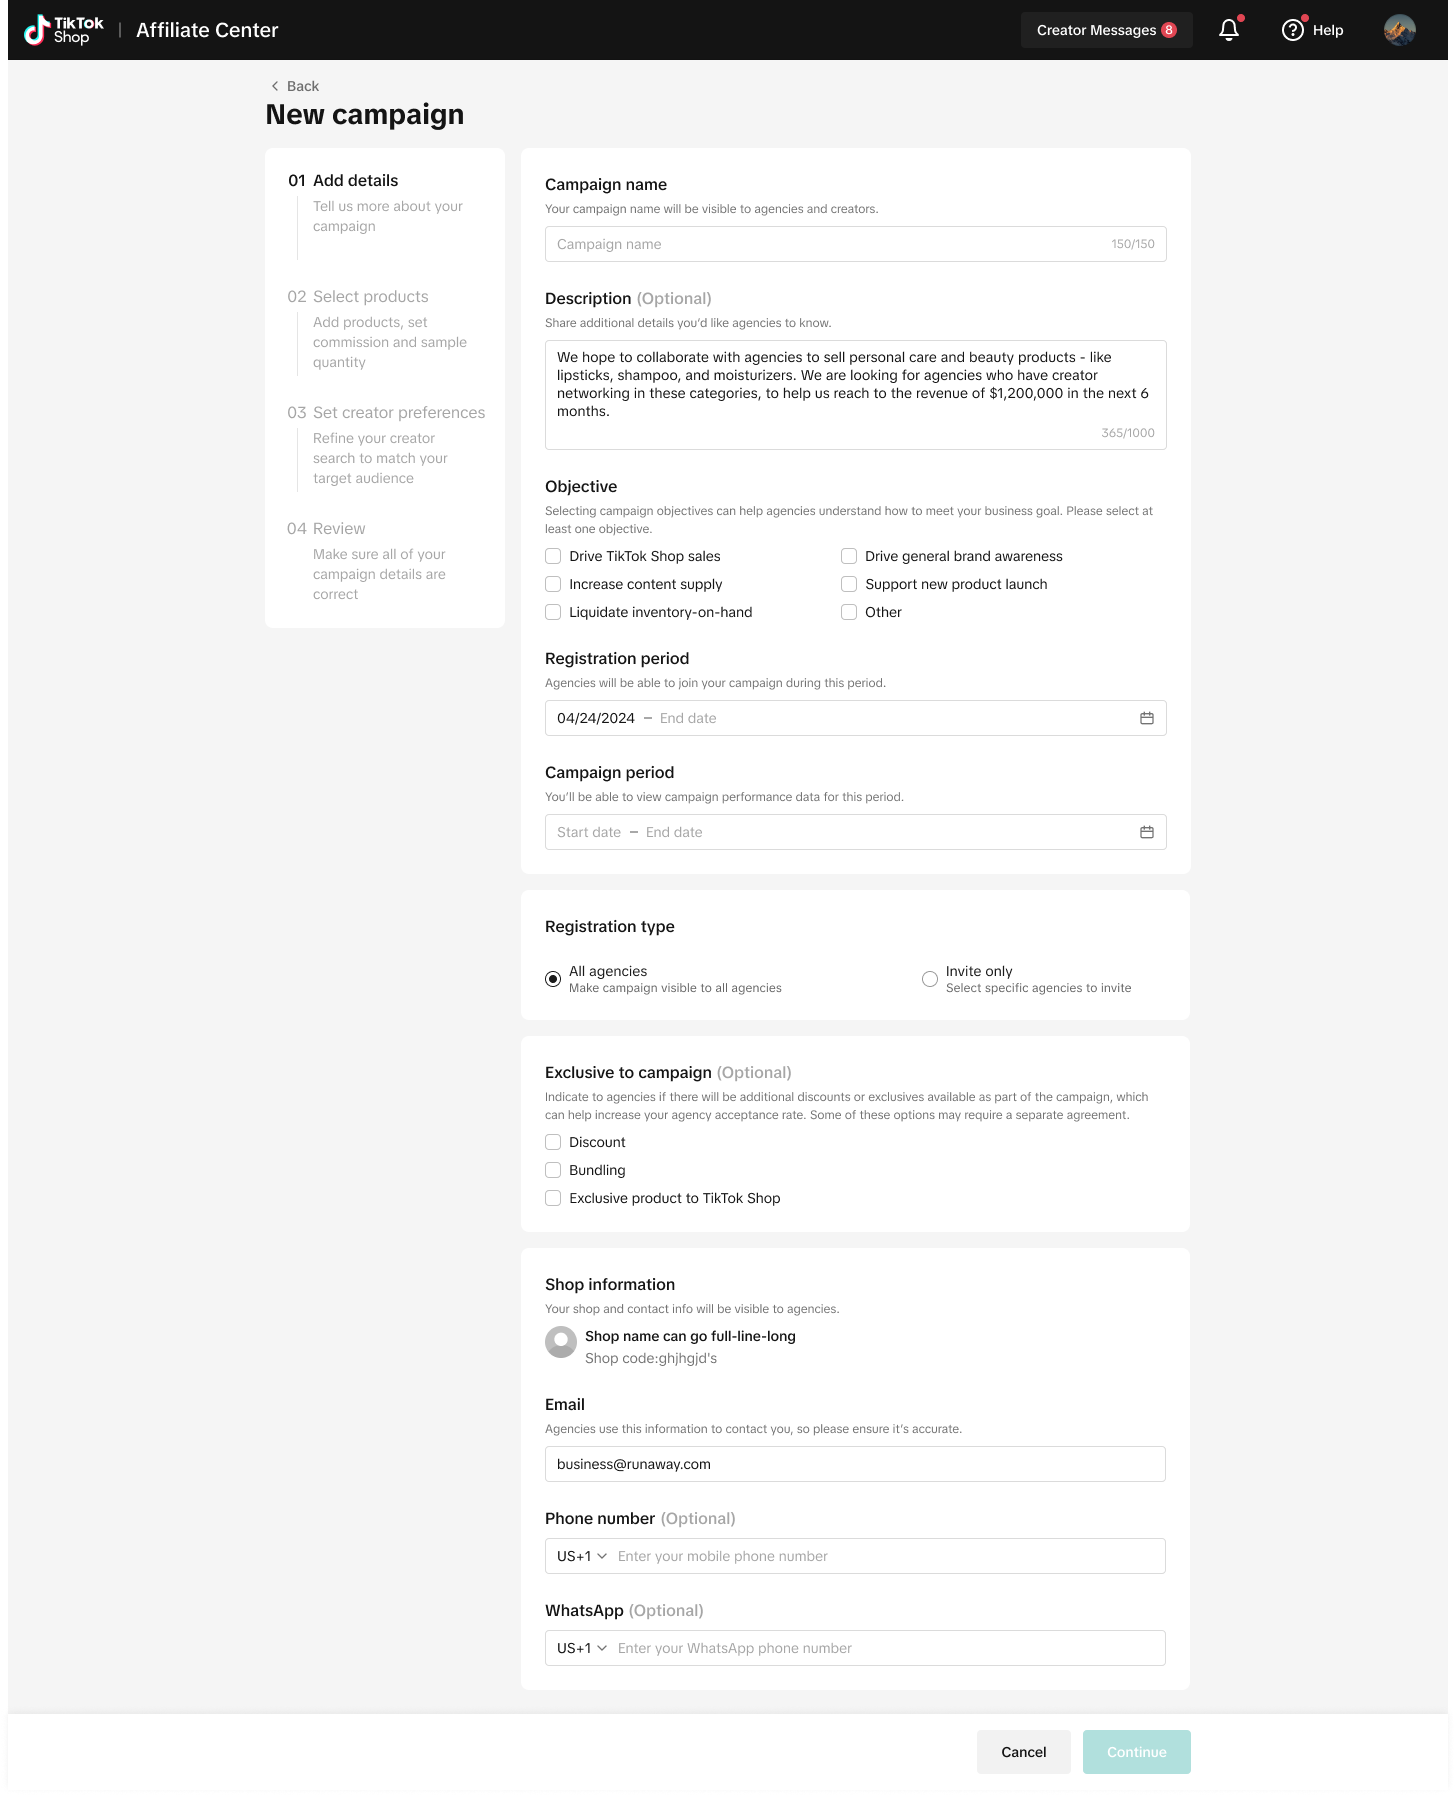 |
Description (optional) | Here you can write a description about the campaign, as well as information about your brand or products you have added into the campaign. | |
Objective | Selecting campaign objectives can help agencies understand how to meet your business goal. You must select at least one objective to continue. | |
Registration period | This is the period of time in which the agencies must register to participate in your campaign.The maximum registration period is 360 days from current date. | |
Campaign period | This is how long the campaign will be live for and during this period, agencies will work with creators to add products in your campaign to creators' showcase.Campaign period end date must be later than the registration period end date.The maximum registration period is 360 days from the current date. | |
Registration type | All agencies: you can open the campaign to all agencies Invite only: You can select to invite up to 20 agencies to your campaign | |
Exclusive to campaign (optional) | Here you can let agencies know if there will be additional discounts or exclusives available as part of the campaign, which can help increase your Agency acceptance rate.Some of these options may require a separate agreement and agencies can reach out to you offline to discuss this further.This information is optional | |
Email | This is the email address that agencies can use to contact you if they have any questions | |
WhatsApp/ phone number (optional) | This is the phone number that agencies can use to contact you if they have any questionsThis information is optional |
Select Products
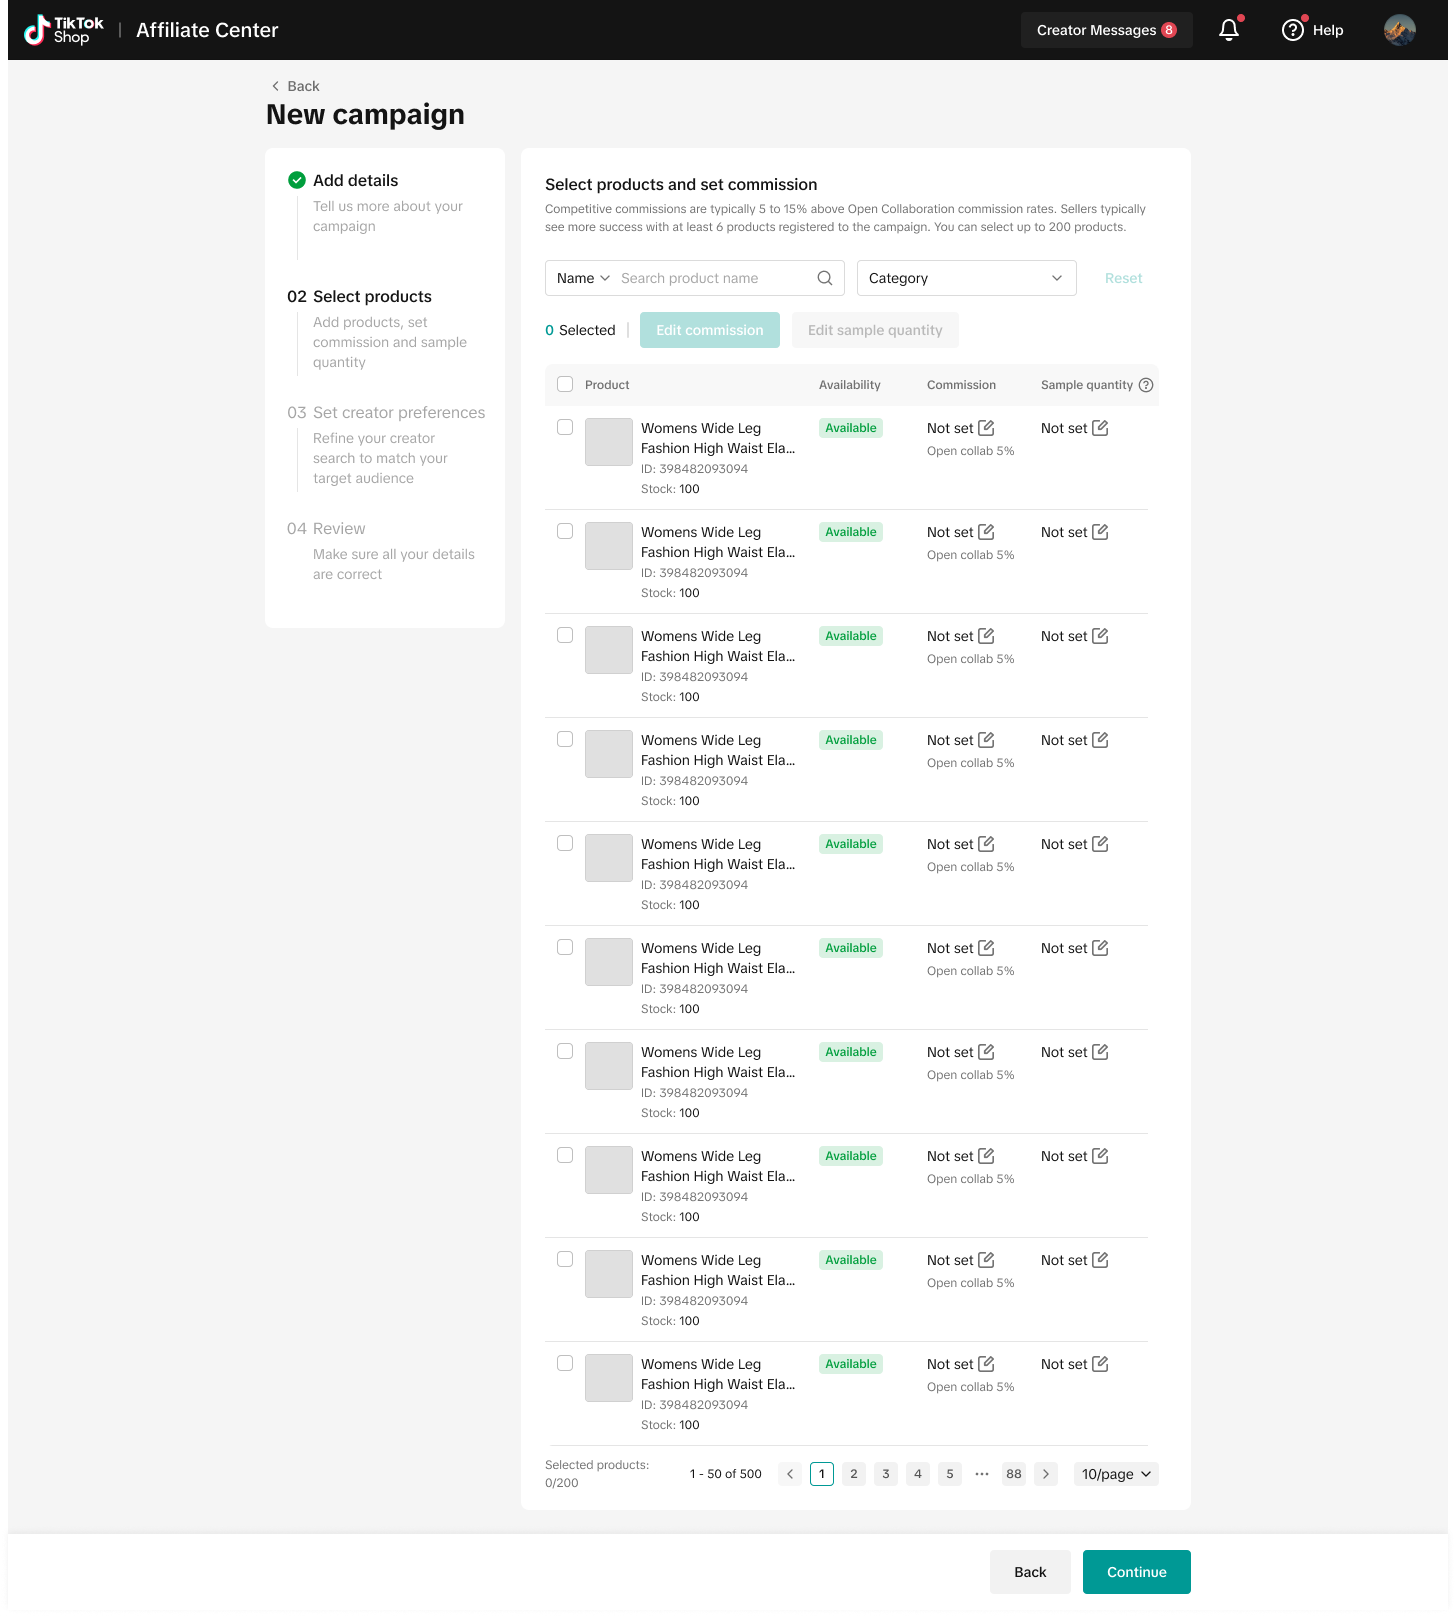
In this section, you will be able to add the relevant products to your campaign.- You can add all the relevant products you want to make available in this campaign
- You can set up commission in bulk by selecting the relevant products and then pressing [Edit commission] or you can select individual commission for the products under the commission heading.
 Please note on the agencies end, they will be able to compare the commission rate outlined in this section to the open plan commission rate.
 As such, we would recommend adding a higher commission rate than the one listed on your products for open plan collaboration.
- You can also set up the sample quantity in bulk by selecting [Edit sample quantity] or you can select individual sample quantity for each product by editing it under the sample quantity heading.
- The sample quantity you list will be available to all agencies. Once the campaign is live and agencies begin ordering samples for their creators, this number will automatically decrease as samples are ordered.
 If you want to adjust the free sample quantities for campaigns or agencies afterwards, you have two options:
- Adjust shared free samples for all agencies at the campaign level:

Go to Partner Campaigns > Seller Initiated. Select the specific campaign. Under the Agencies tab, click View Details and adjust the free samples.
- Adjust free samples for a specific campaign and agency:

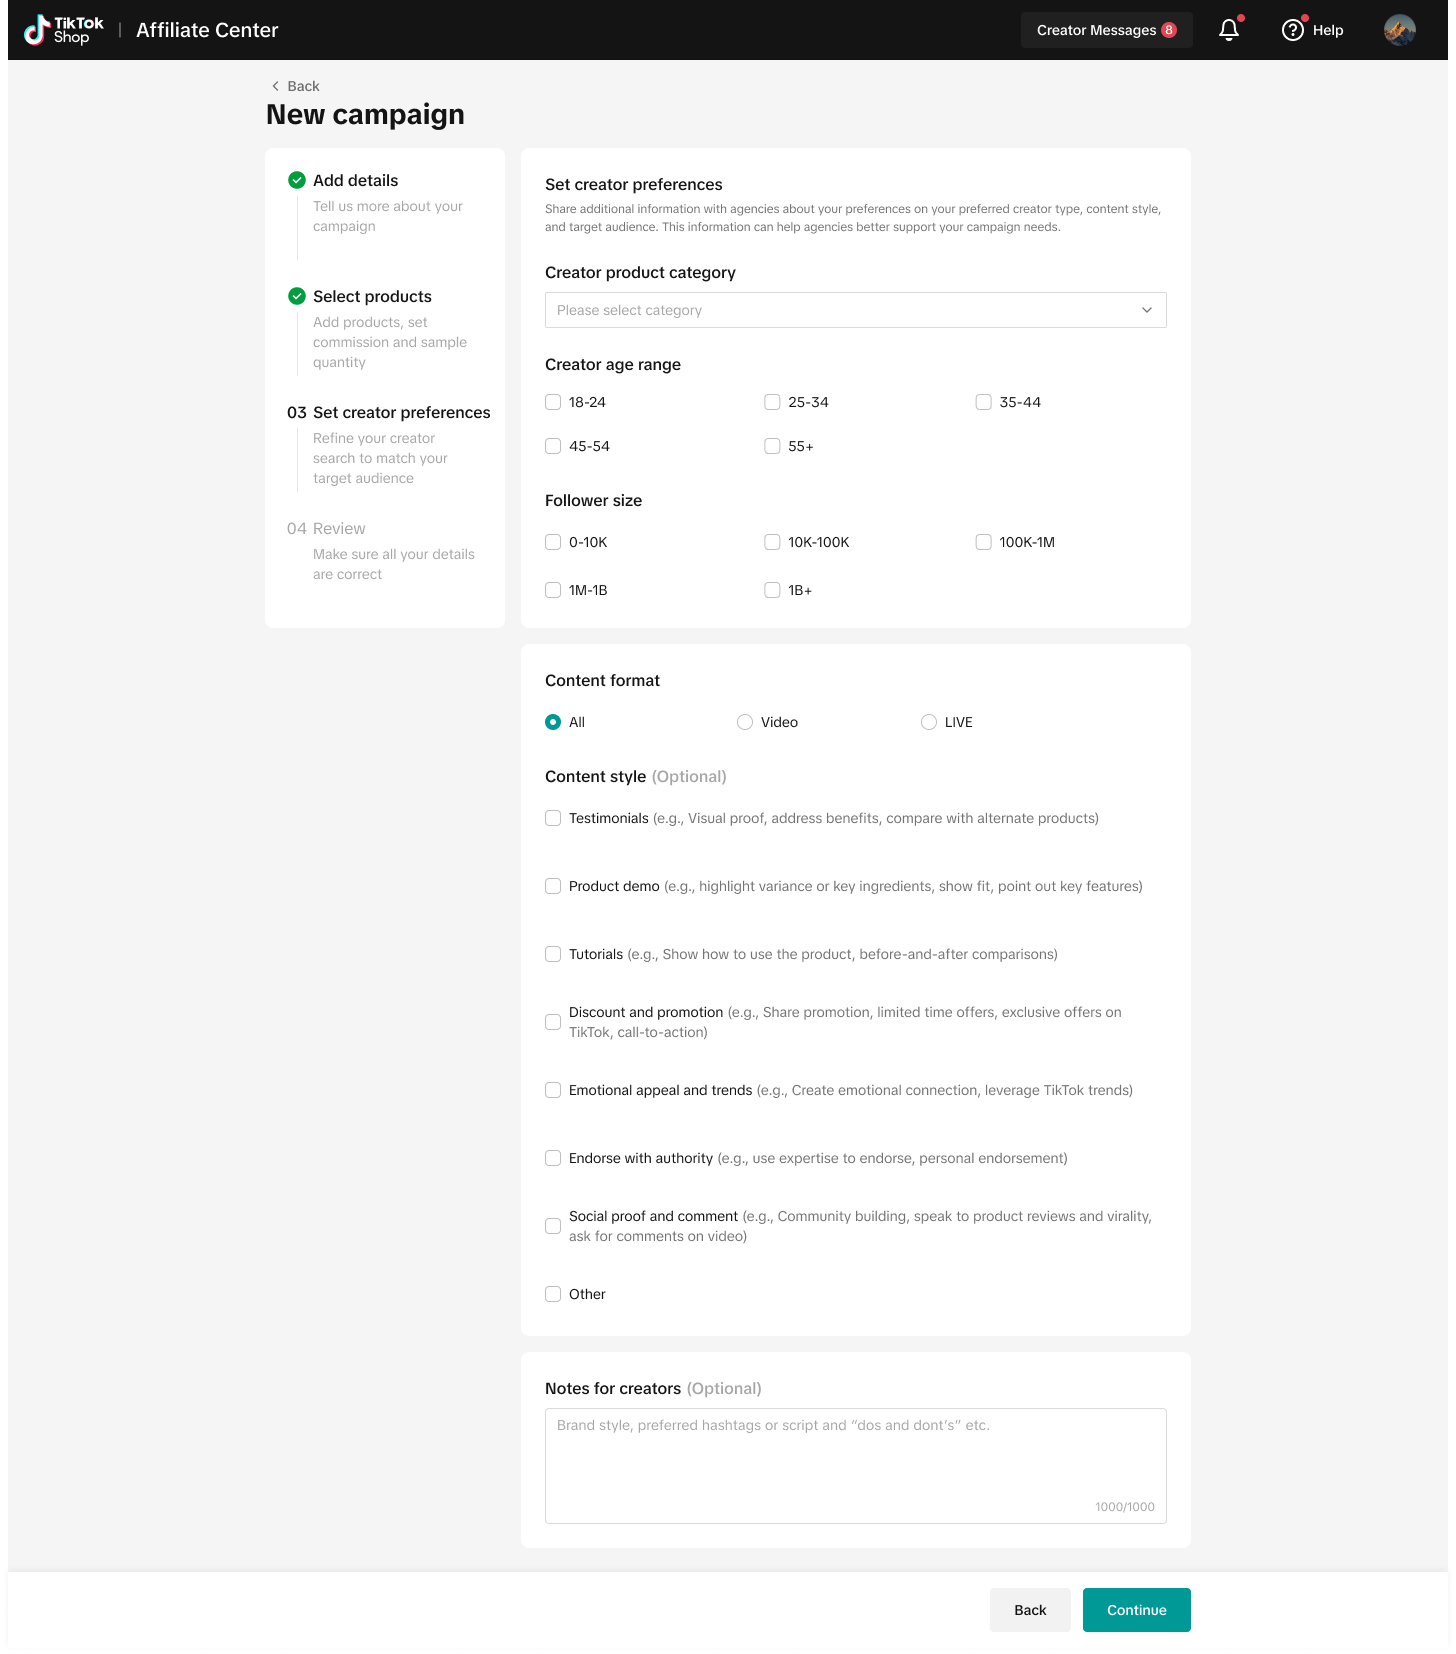
Set creator preferences
- In this section, you can share additional information with agencies about your preferences on the types of creators, content style and target audience for the campaigns. This helps the agencies to support your campaign needs better and ensure they can better match up the products to suitable creators.

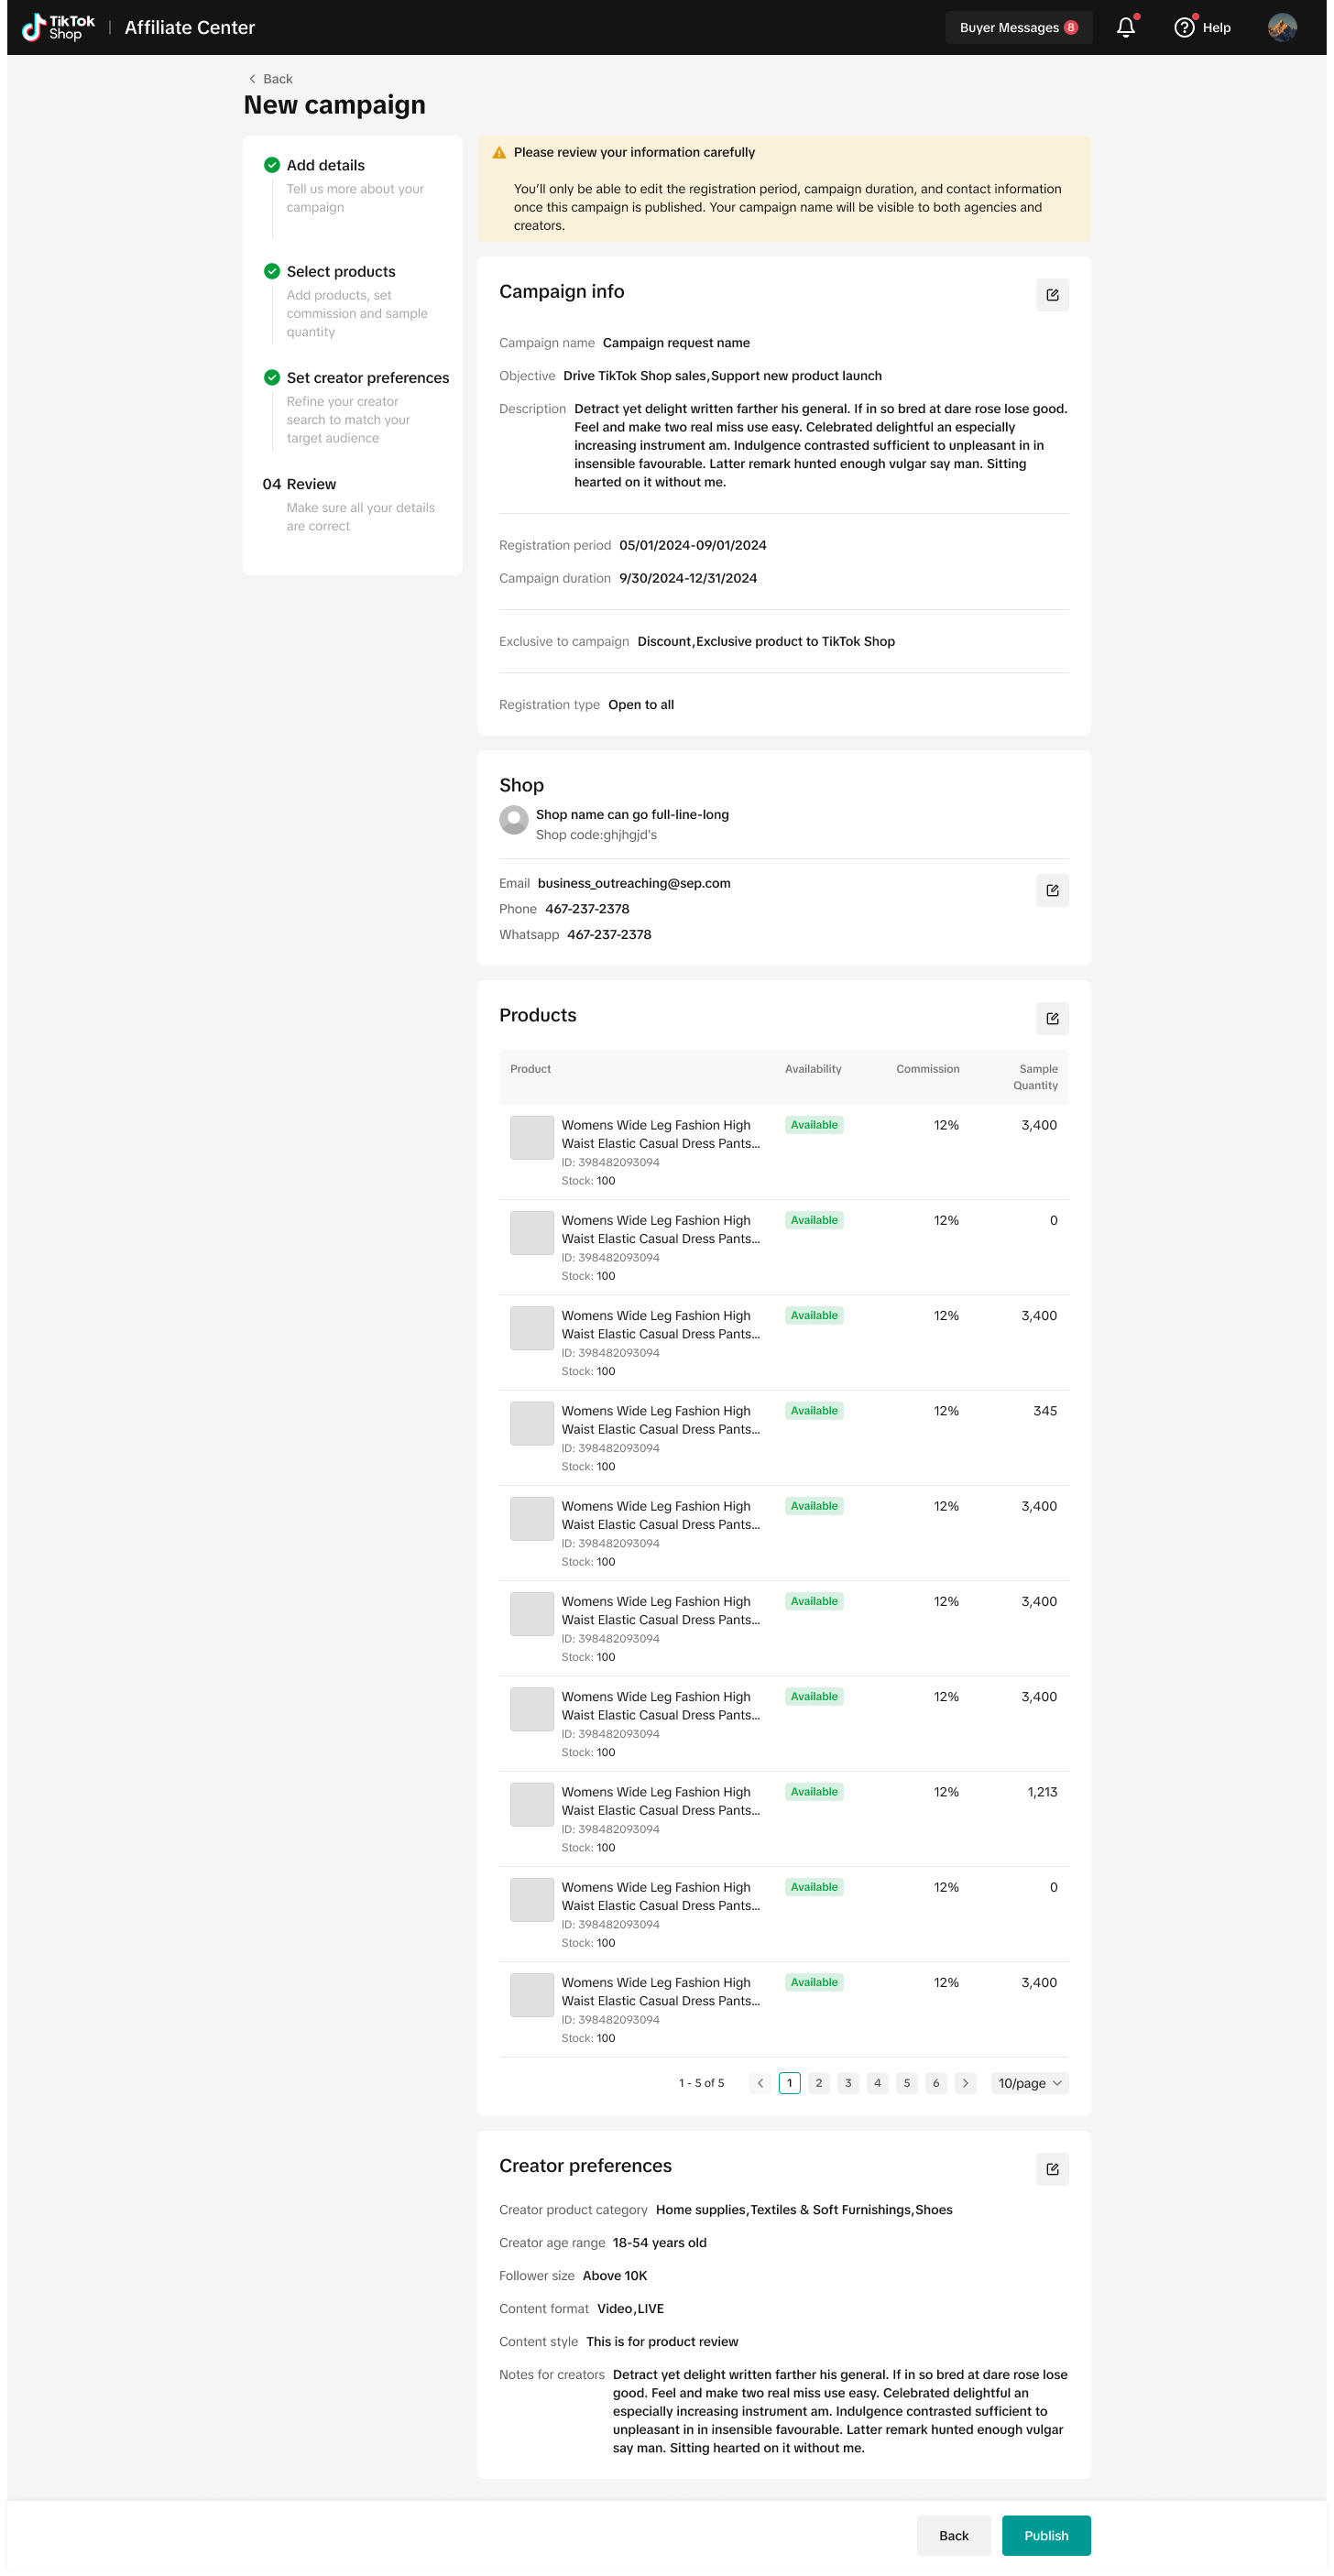
Review
You can review all the information you have submitted and ensure everything is correct before publishing this for agencies to view.Once a campaign is active, information you can edit will be limited to campaign period, request open period and increasing free sample quantity only.

How to check when agencies have accepted your campaign?
- Regardless of whether you have invited up to 20 agencies to a campaign or if you have opened the campaign to all agencies, you will be notified via email once they have accepted.
- You will also be notified via email if an Agency you have invited to campaign declines the invitation. The Agency will need to provide a reason for the rejection which you will be able to see in the email.
How to add additional samples after agencies have accepted campaign?
- In order to ensure that agencies enrolled onto your campaigns have sufficient samples to distribute to their creators, you can increase the sample quota for specific agencies.

- You can do this by going to: Seller Centre > Affiliate Centre > Partner Campaign > All Campaigns > View details
For example:
- Seller A has 2 products in their campaign:
- Shoes with campaign sample quota 25
- T-shirts with campaign sample quota 25
- 3 agencies join the campaign: Agency X, Agency Y, Agency Z
- After 1 week the remaining sample quota is:
- Shoes sample quota remaining = 2
- T-shirts sample quota remaining = 5
- Agency Y reaches out to Seller A offline to request 10 additional samples for shoes. This means that Agency A will update the sample quota within the Seller A x Agency Y campaign to be:
- Shoes = 10 (This sample quota is for Agency Y only as per their request)
- T-Shirt = 5 (This sample quota is to be shared across the 3 agencies)
- Therefore, the shared sample quota for all 3 agencies remains as:
- Shoes sample quota remaining = 02
- T-shirts sample quota remaining = 5
FAQs
- How many products can I add to each campaign?
- Can I edit products or commission rate once my campaign is live?
Có thể bạn cũng quan tâm về
- 1 lesson
How to join campaign on TikTok Shop
Sellers will learn about "the types of TikTok Shop campaigns" and delve into the correct "steps to j…
Livestream Campaign
Livestream Campaign This article teaches you how to use Livestream Campaigns to increase traffic an…

Health & Beauty Sellers: Campaign Season Policy Tips & Trick…
Show off your best glow this campaign season. Follow these tips to avoid violations, boost your sal…
Featuring LIVE Specials
This article teaches you how to feature your LIVE Specials Vouchers through your Official and Market…

LIVE Specials
LIVE Specials This article teaches you what LIVE Specials are, how it works, as well as how the LIV…

Marketing Benefits Package - Payments
This article introduces the different payment methods available for our Marketing Benefits Packages.…