

Add and Manage Product
01/28/2026


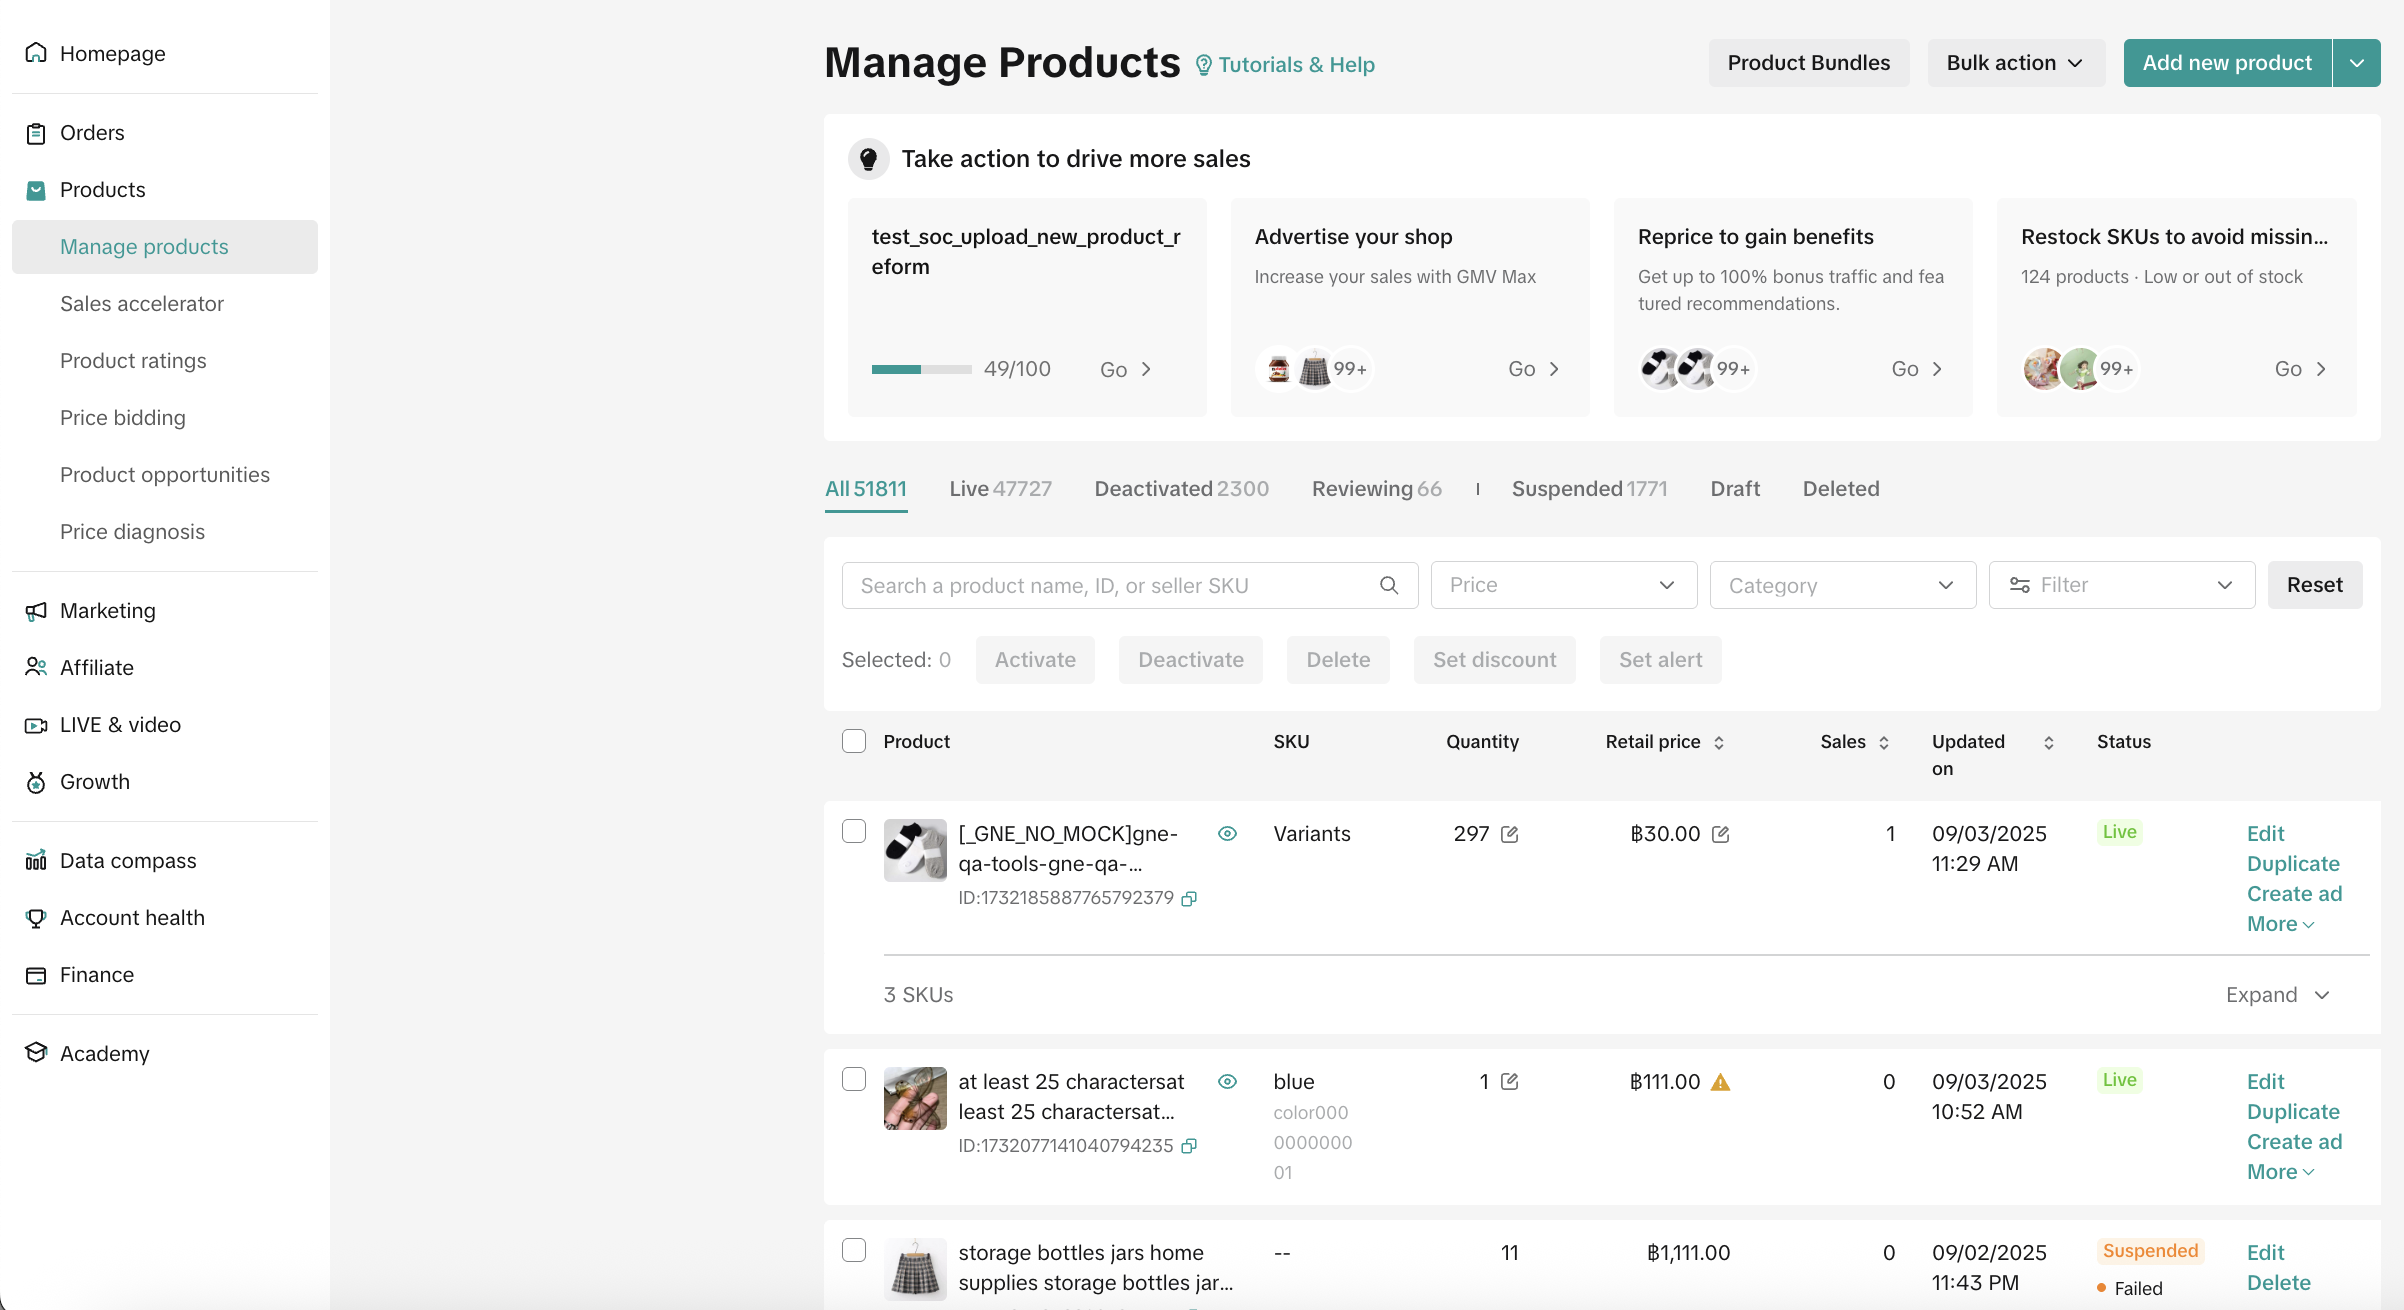
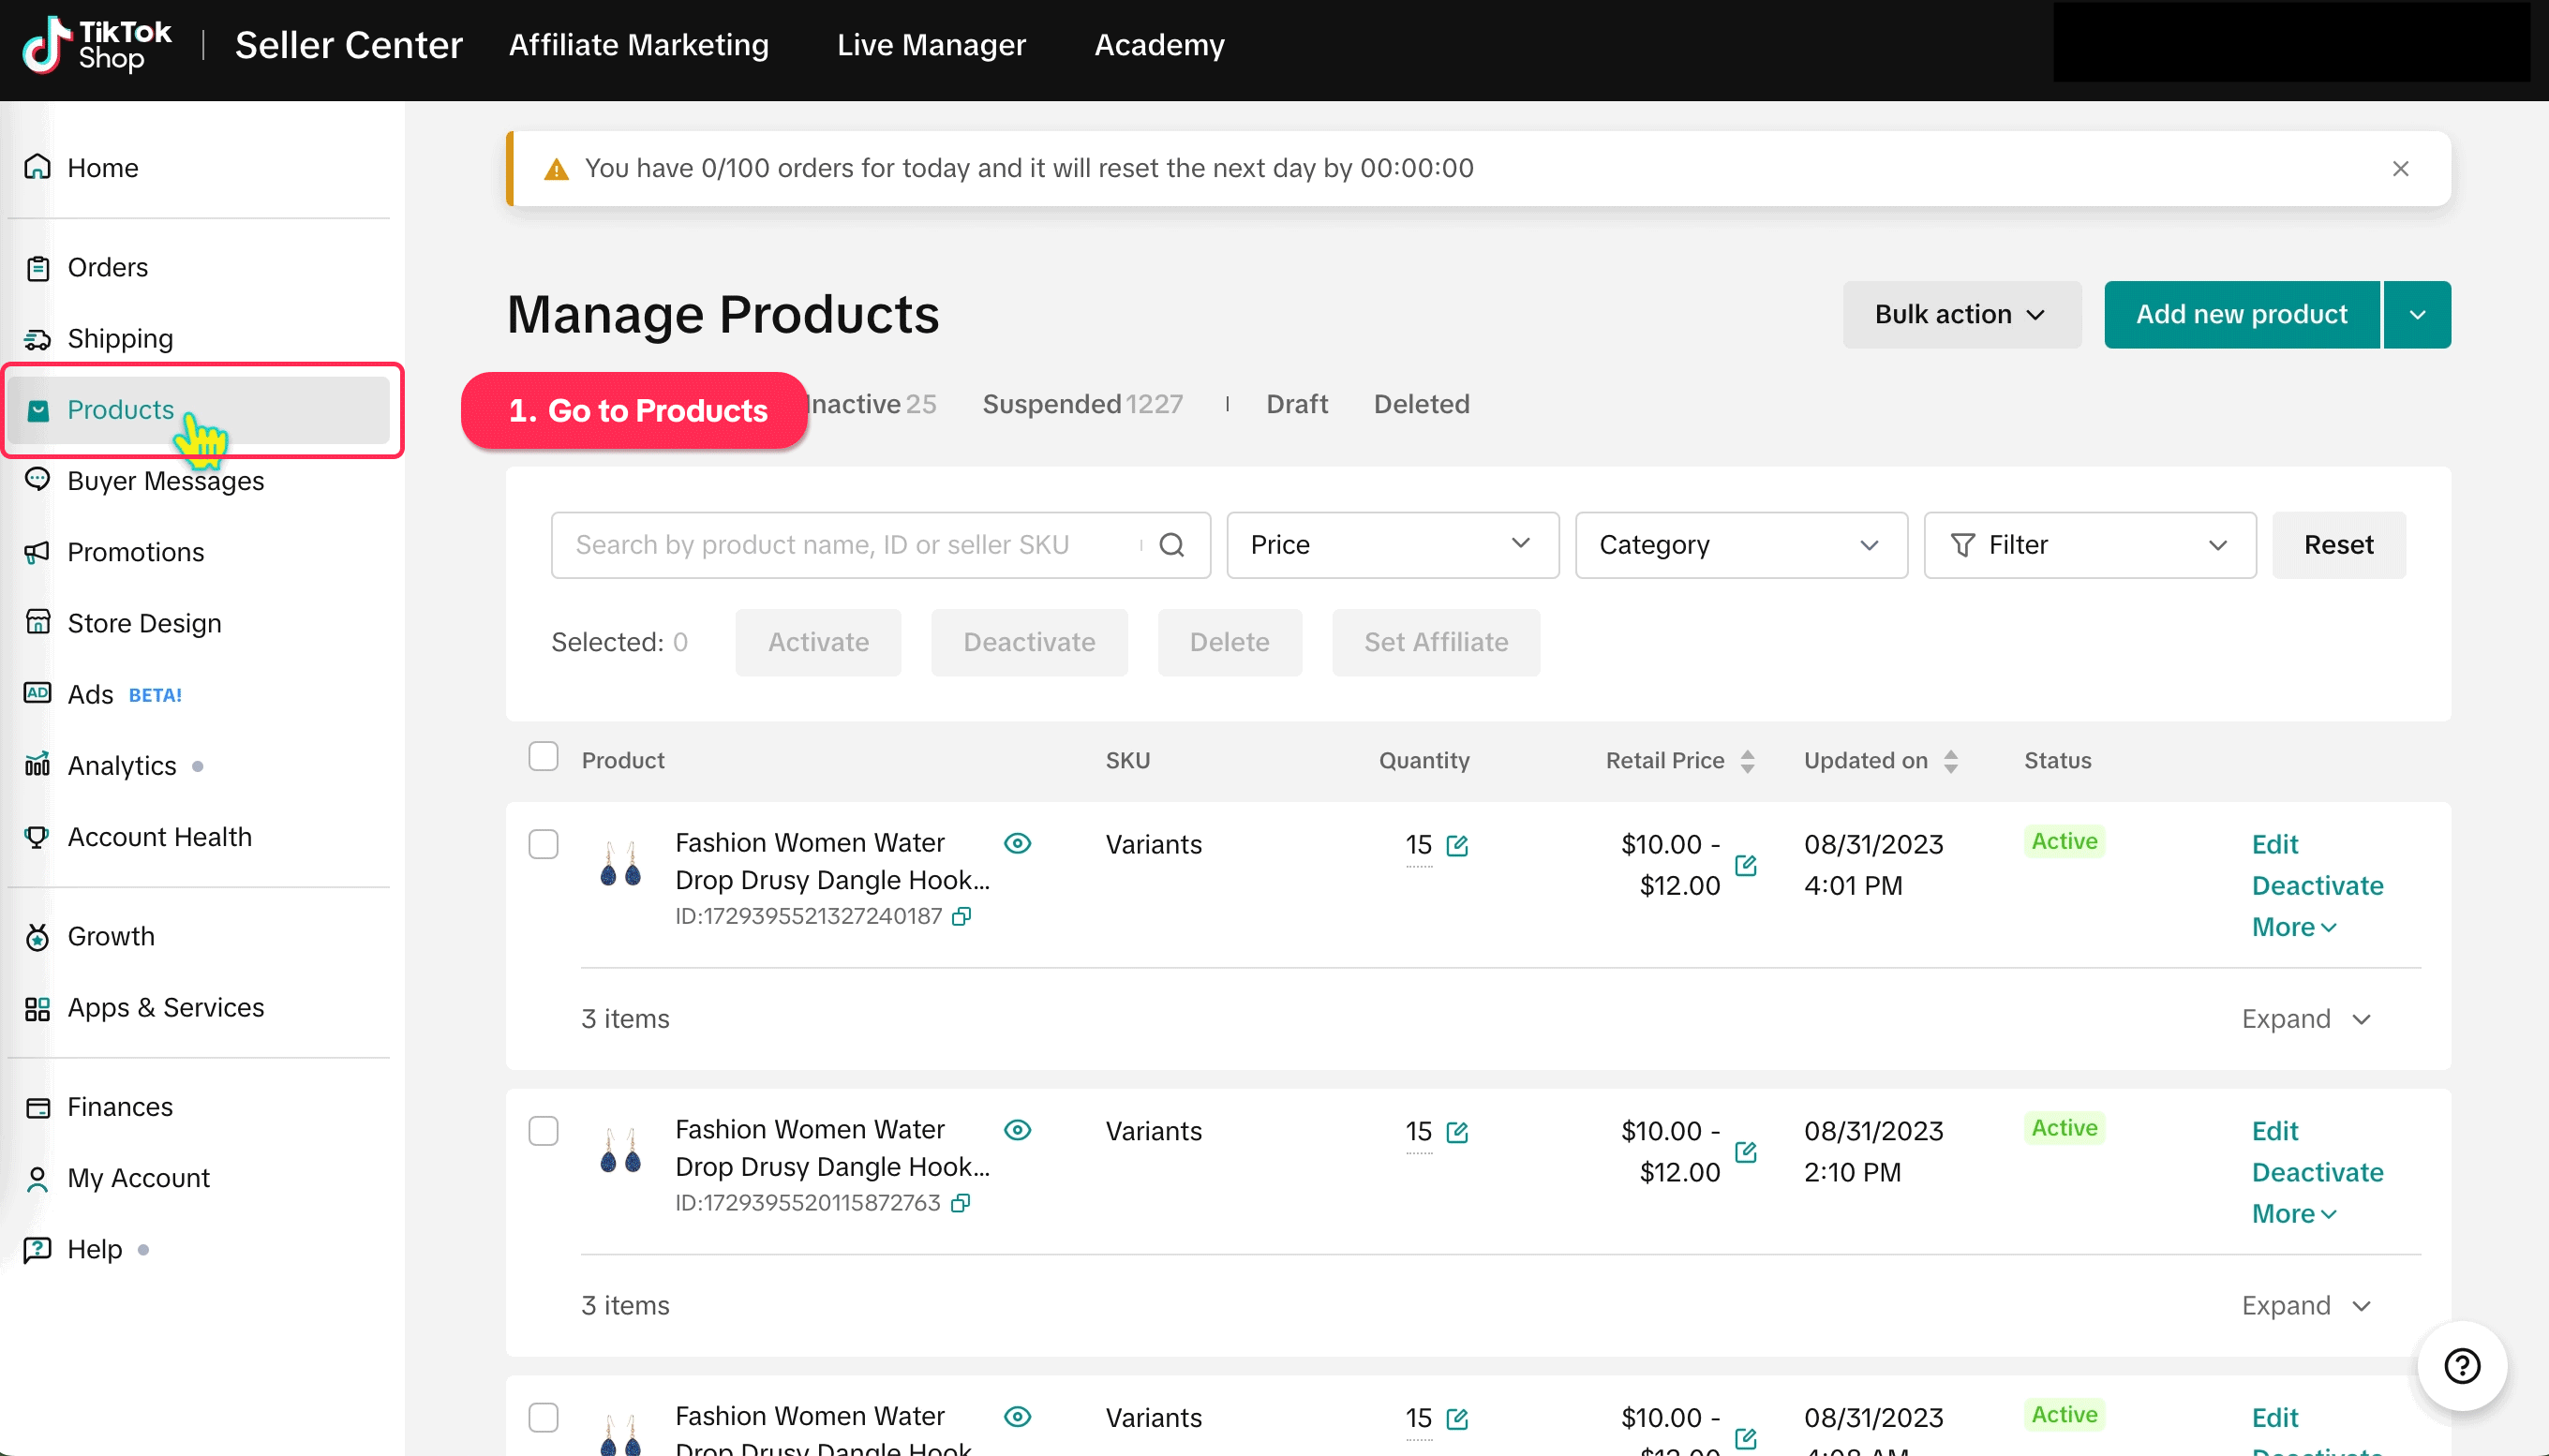
Manage Products
In this section, you can search for products by Seller SKU, category, and price as well as edit, delete, copy, deactivate, change price and stock of products one by one or in batch. You can also easily manage your products that have been classified based on various product statuses.Entry point: Products > Manage Products
 Important: All products must comply with the following product guidelines.Seller can easily find those links to the guideline in the 'Category' section when adding a new product.
Add Single Product
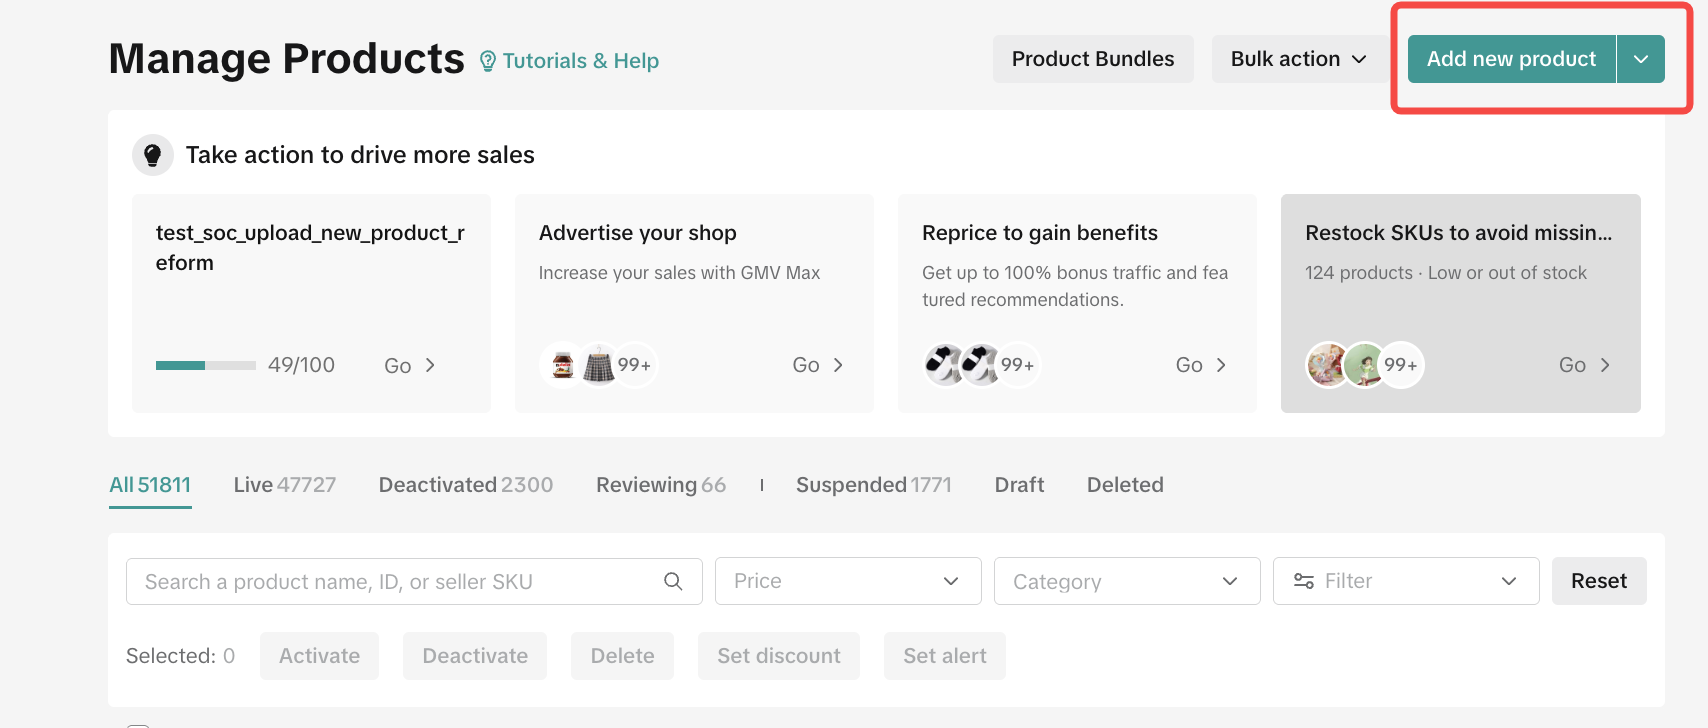
Currently, Seller Center supports single product uploads and batch product uploads that can display up to 1,000 products online.Add a single product by using the Add New Product feature:
Basic Information
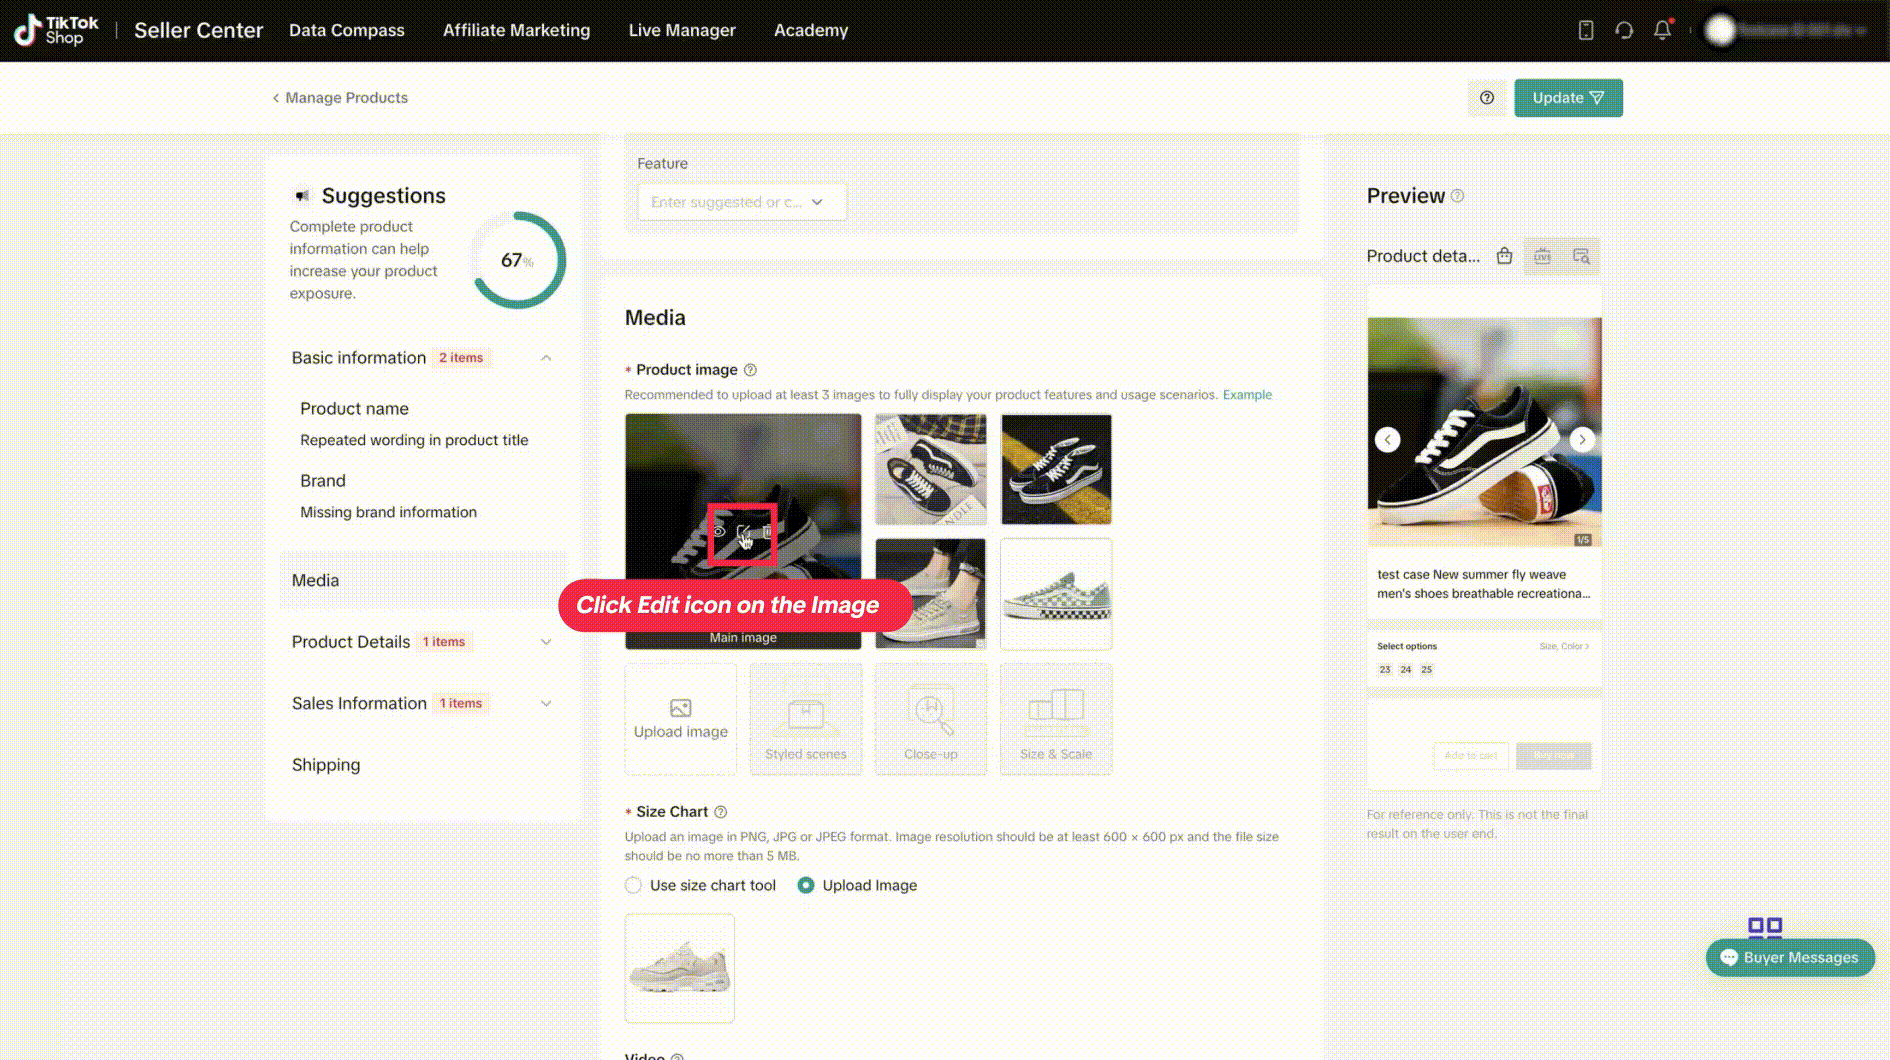
Basic information including Product Image, Product Name, Product Category and Attributes.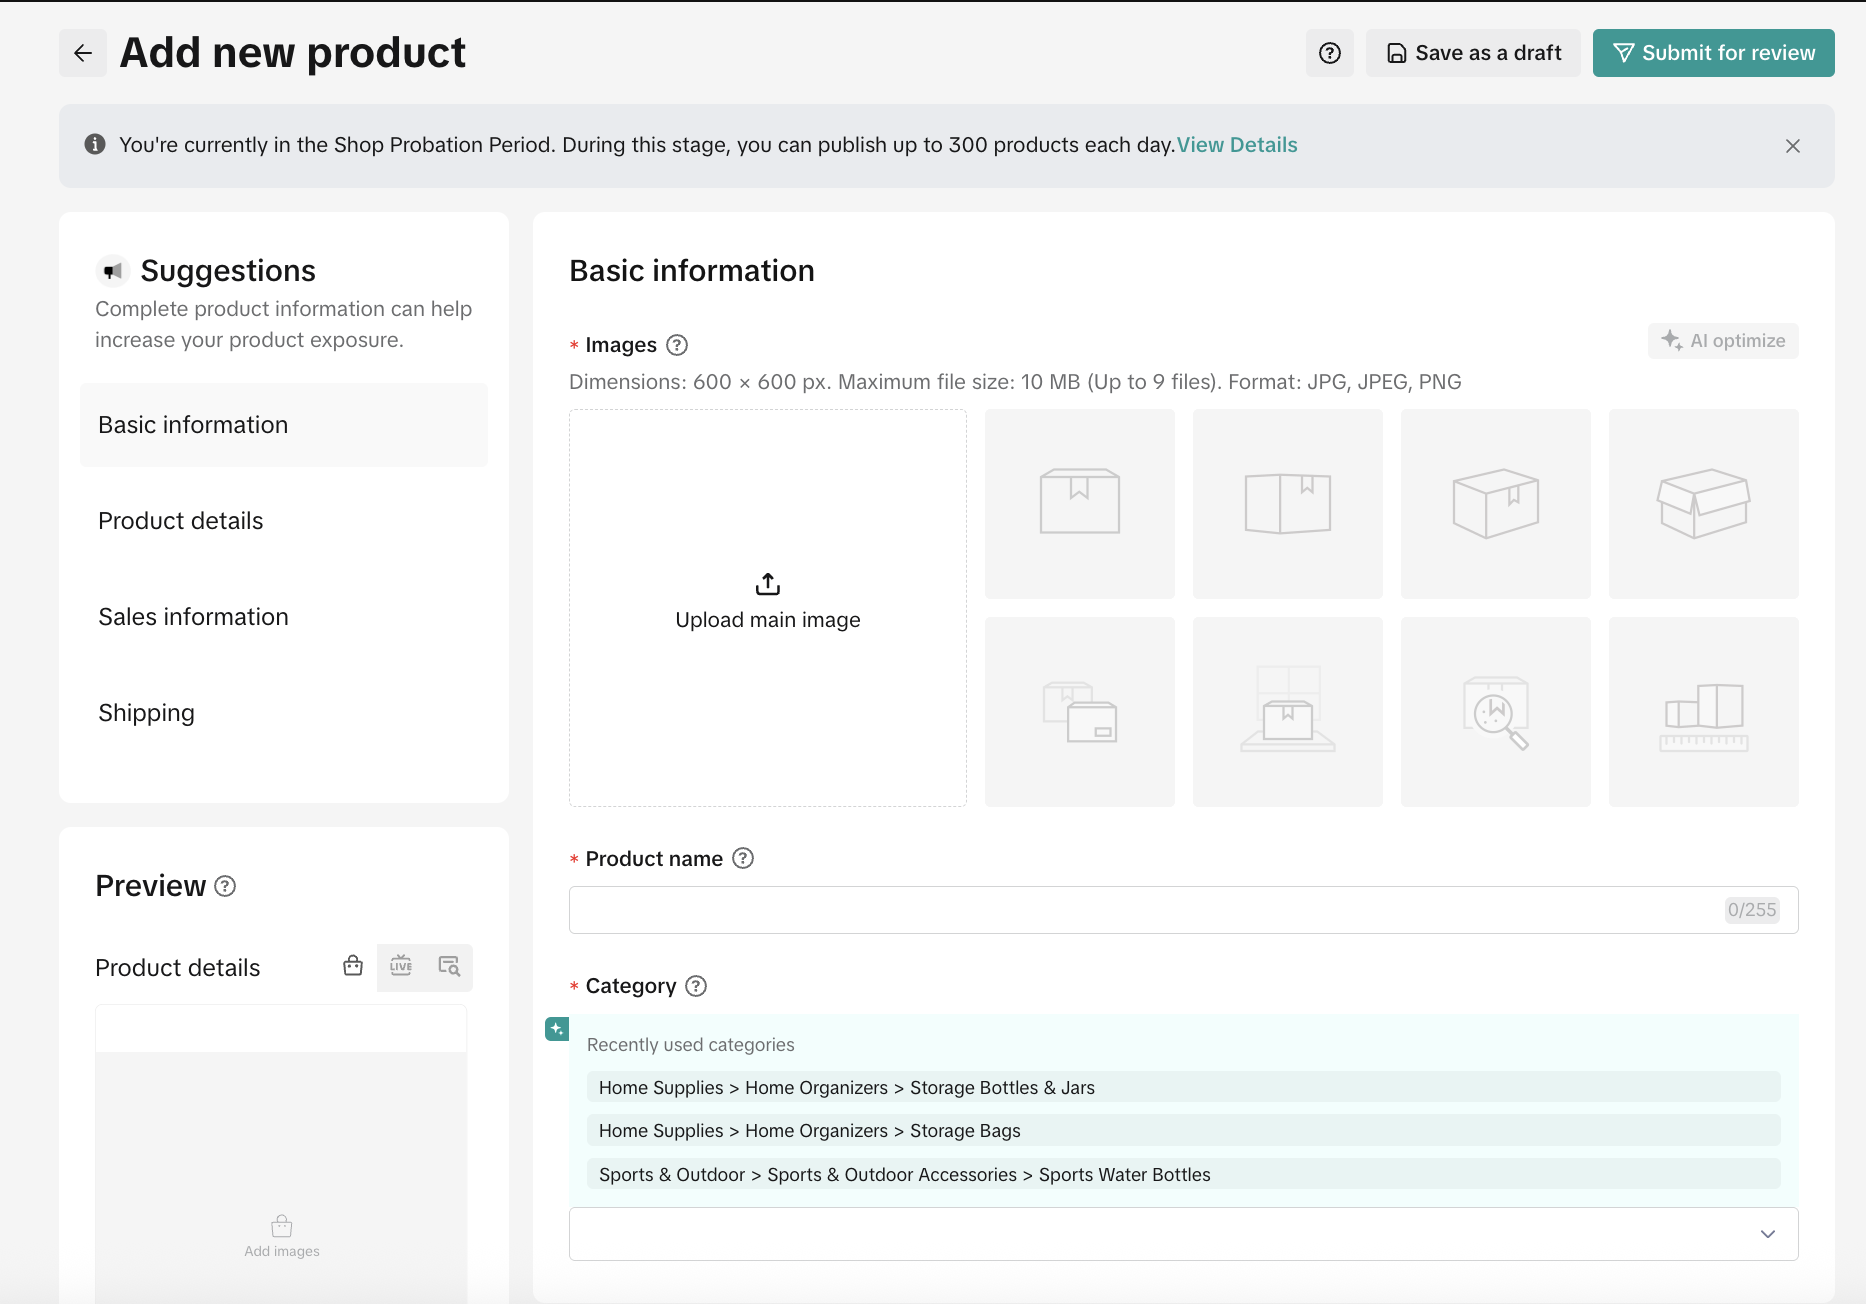 Systems will also give recommendations for your product name and category based on images that you have uploaded.
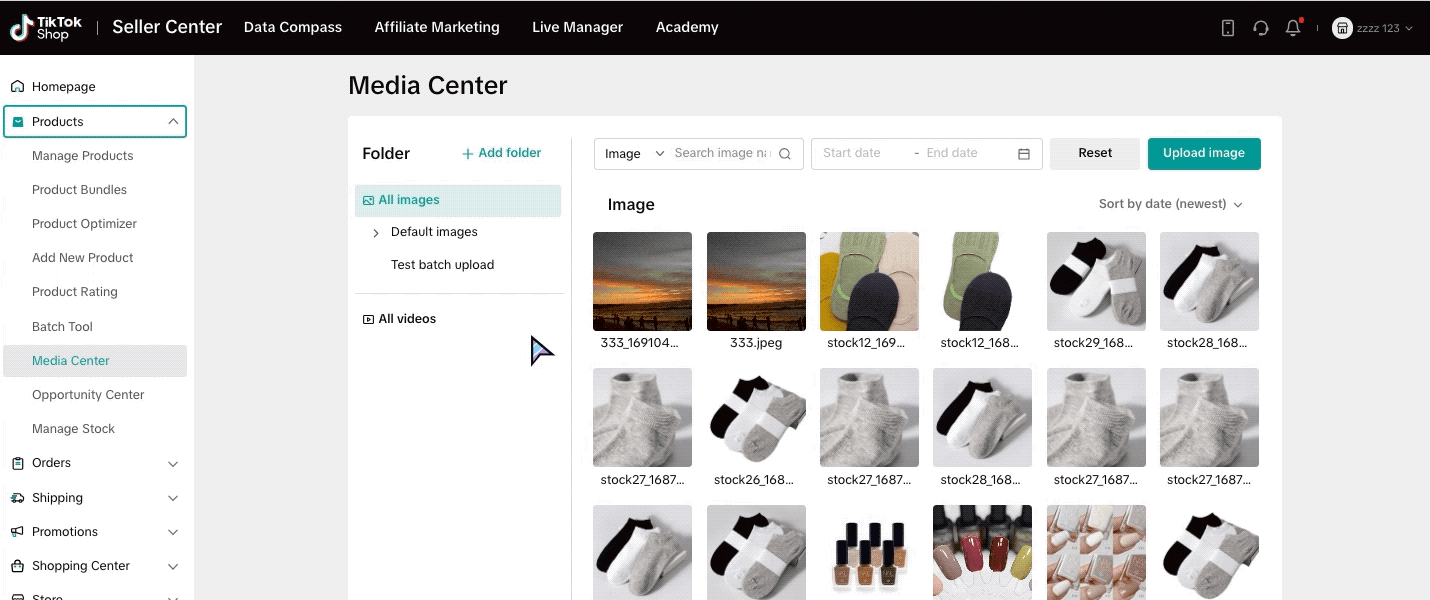
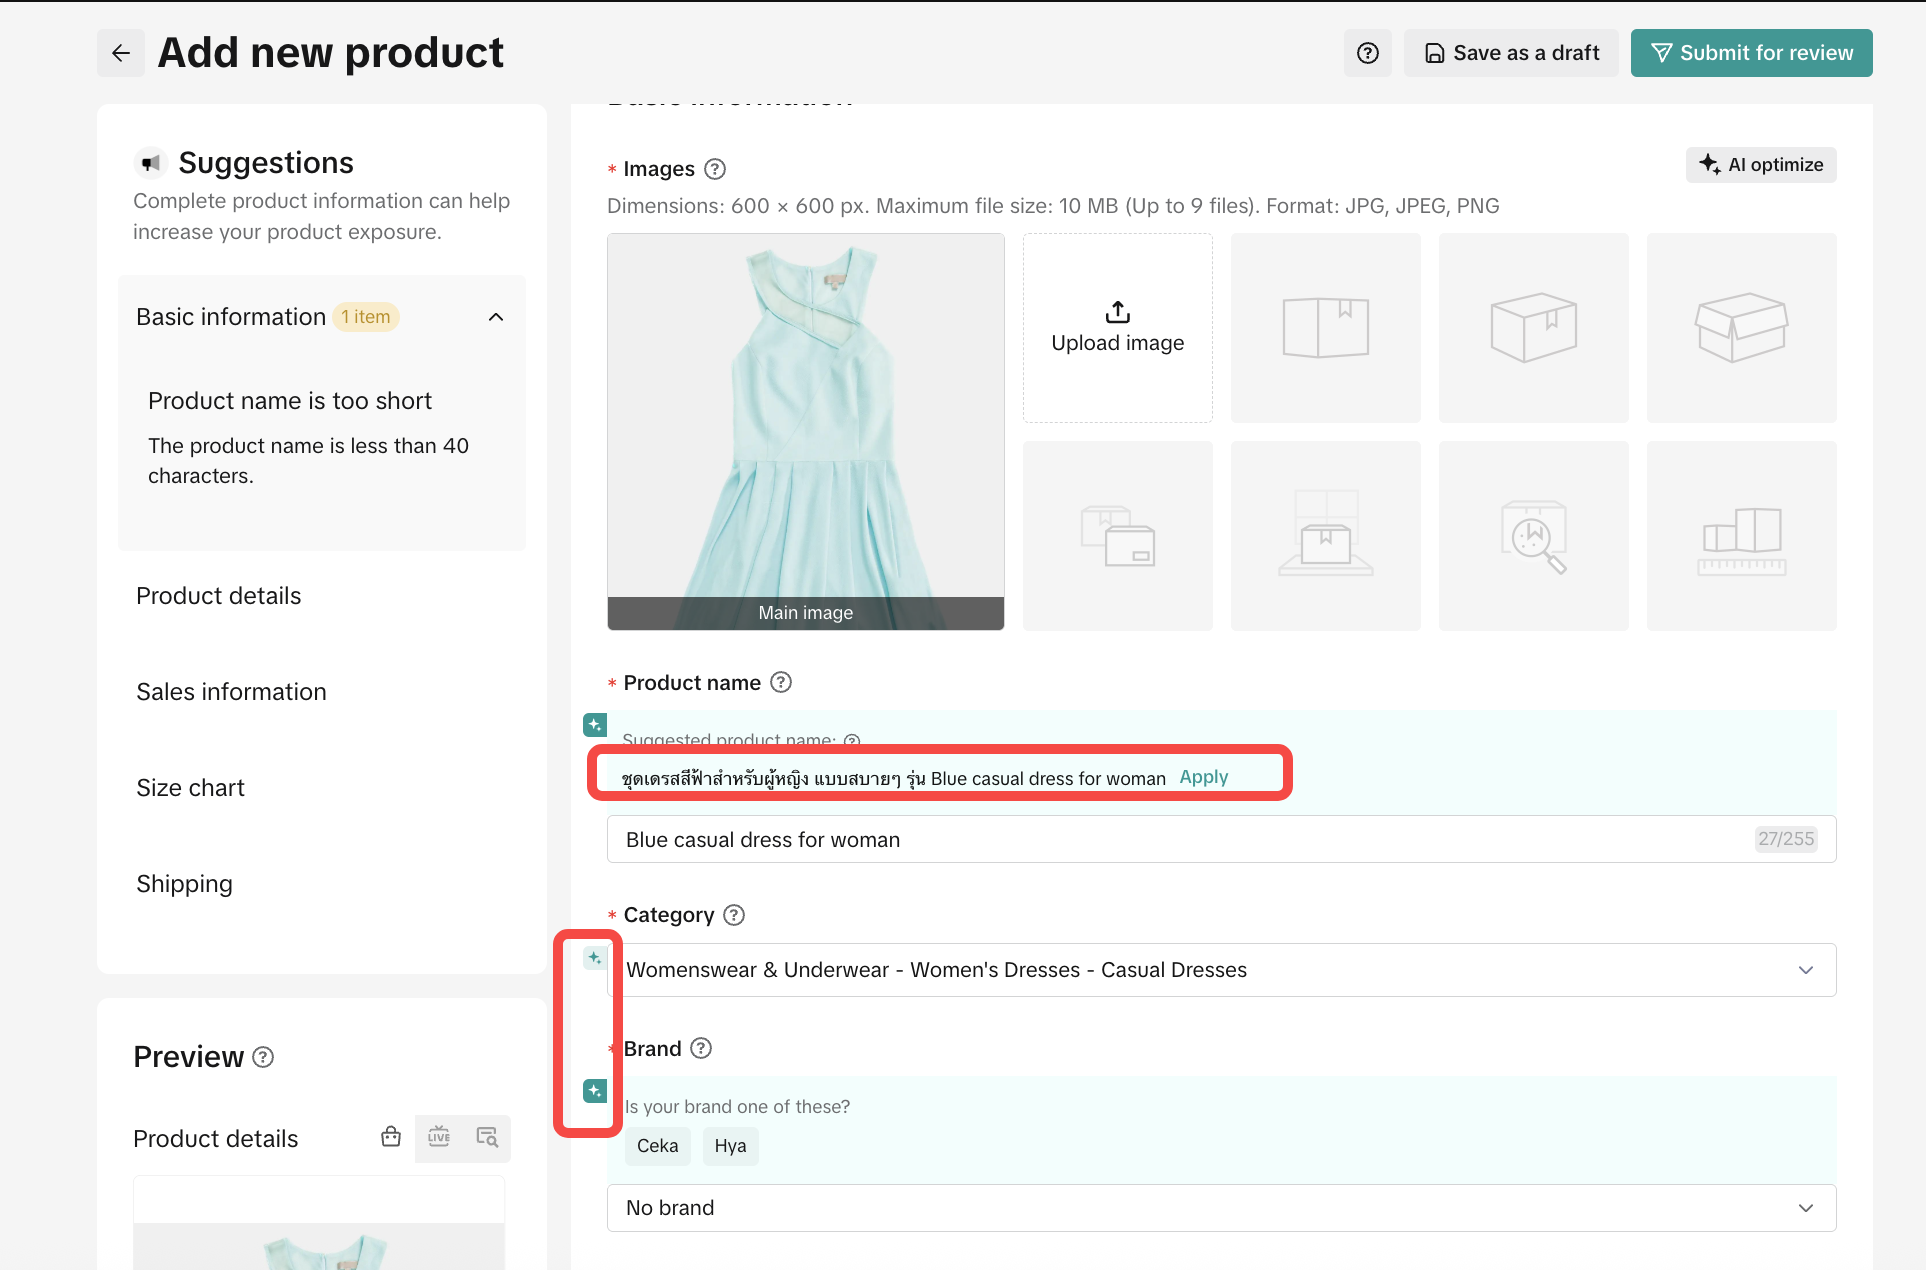 For ImageSellers can utilize Media Center to store their product images and use it anytime during product upload for up to 5GB.
- Maximum 9 images per product
- 1:1 Image ratio
- Minimum image size is 600 x 600 px
- The maximum image file size is 10MB
- Suggested video ratio is 1:1, 9:16, or 16:9
- The maximum video file size is 20MB
Product Details
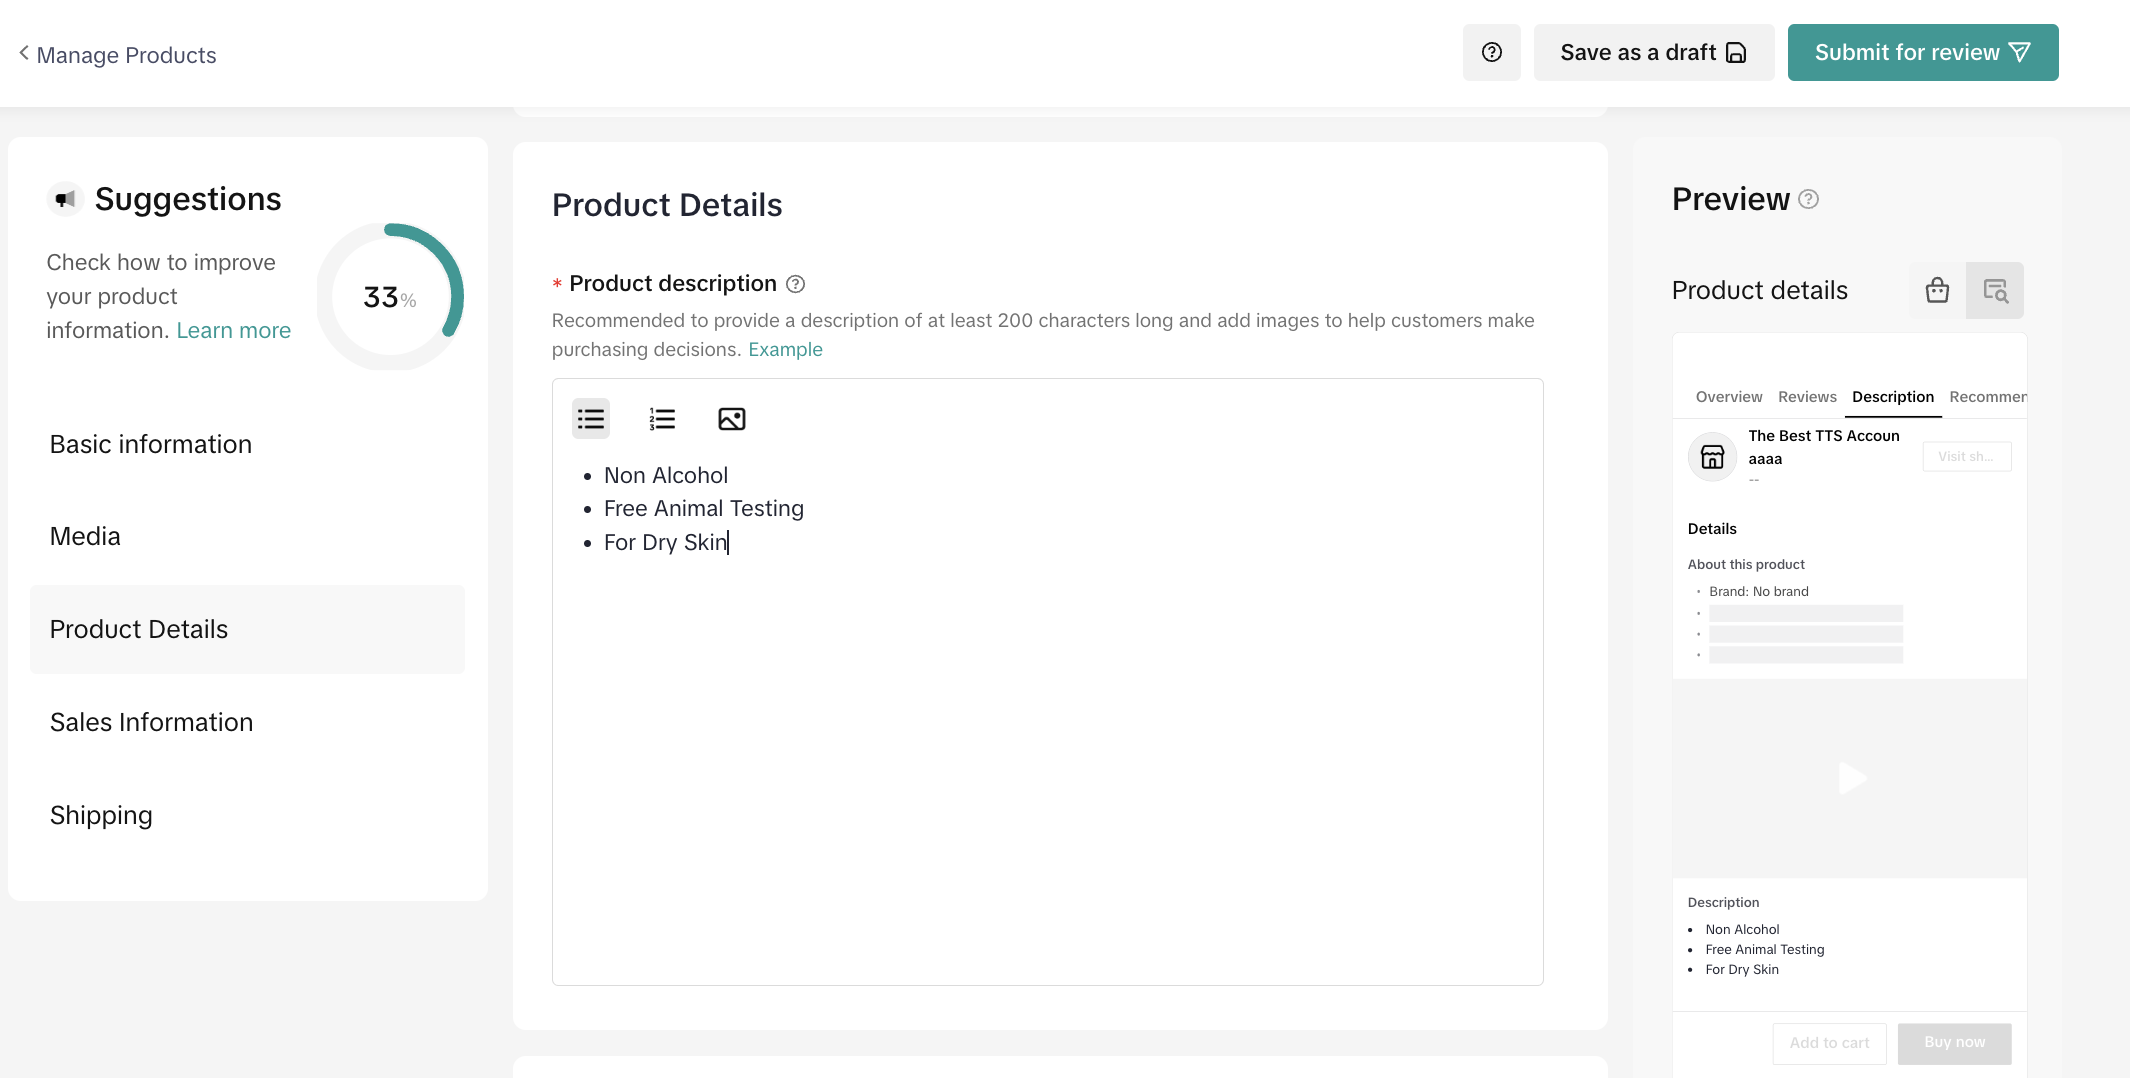 To make it easy to read, it is suggested to fill each selling point in separate paragraphs, preferably with auxiliary images. Avoid information redundancy, the total description of a single selling point should be less than 250 characters. Other recommendations:
- Describe a product with text and bullet points
- Add up to 30 related banners or images.
- Add size chart image (if needed) on the product description

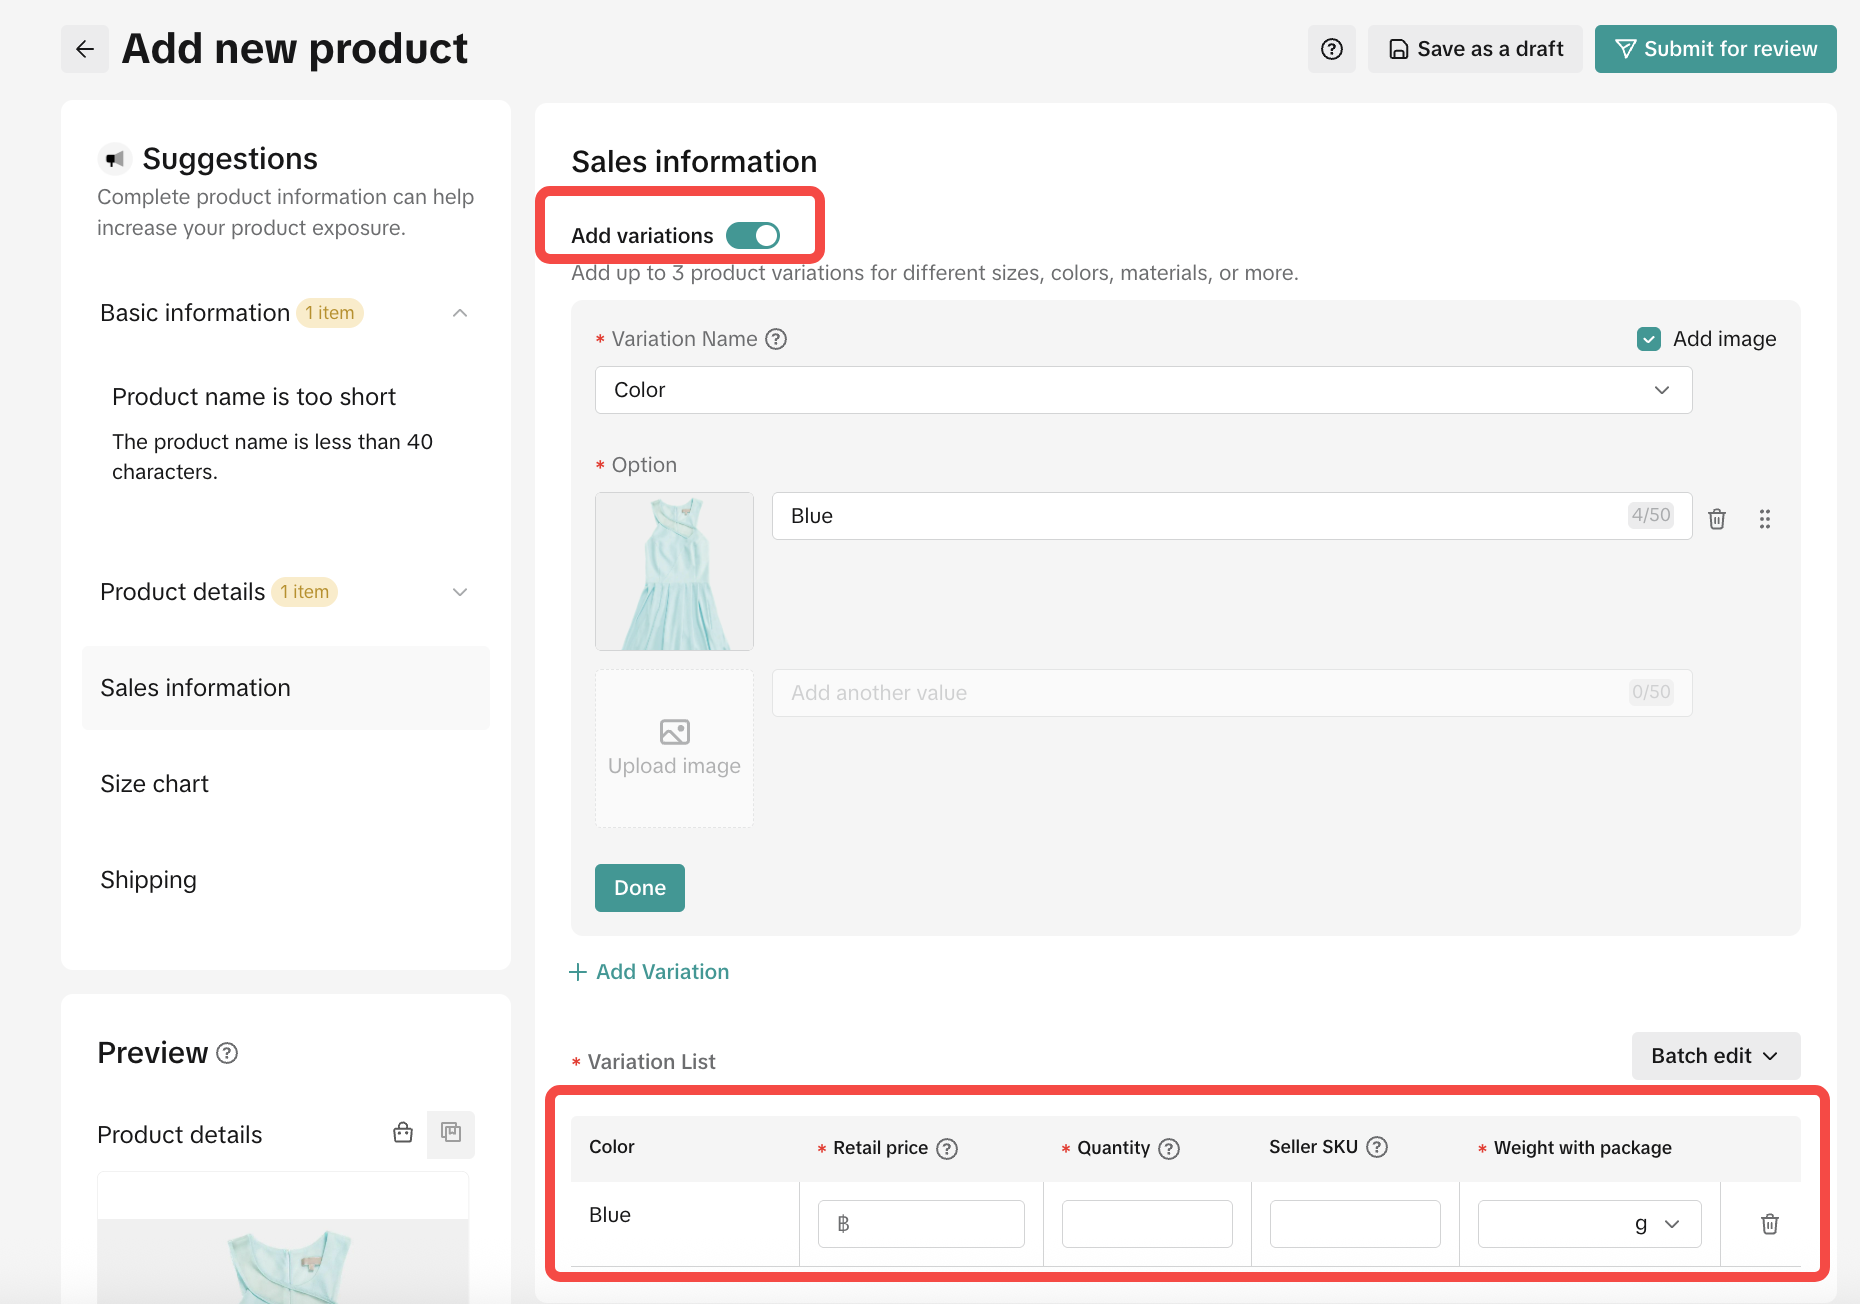
Sales Information
This section allows sellers to set up variations for their product.Sellers can choose the available variant option or write any new variants freely on the variation name.
Note: Only the first variation can add images.
 Pre-orderSellers can setup product as pre-order through the settings icon, then enter the number of pre-order days for each SKU in the Selling Options column.
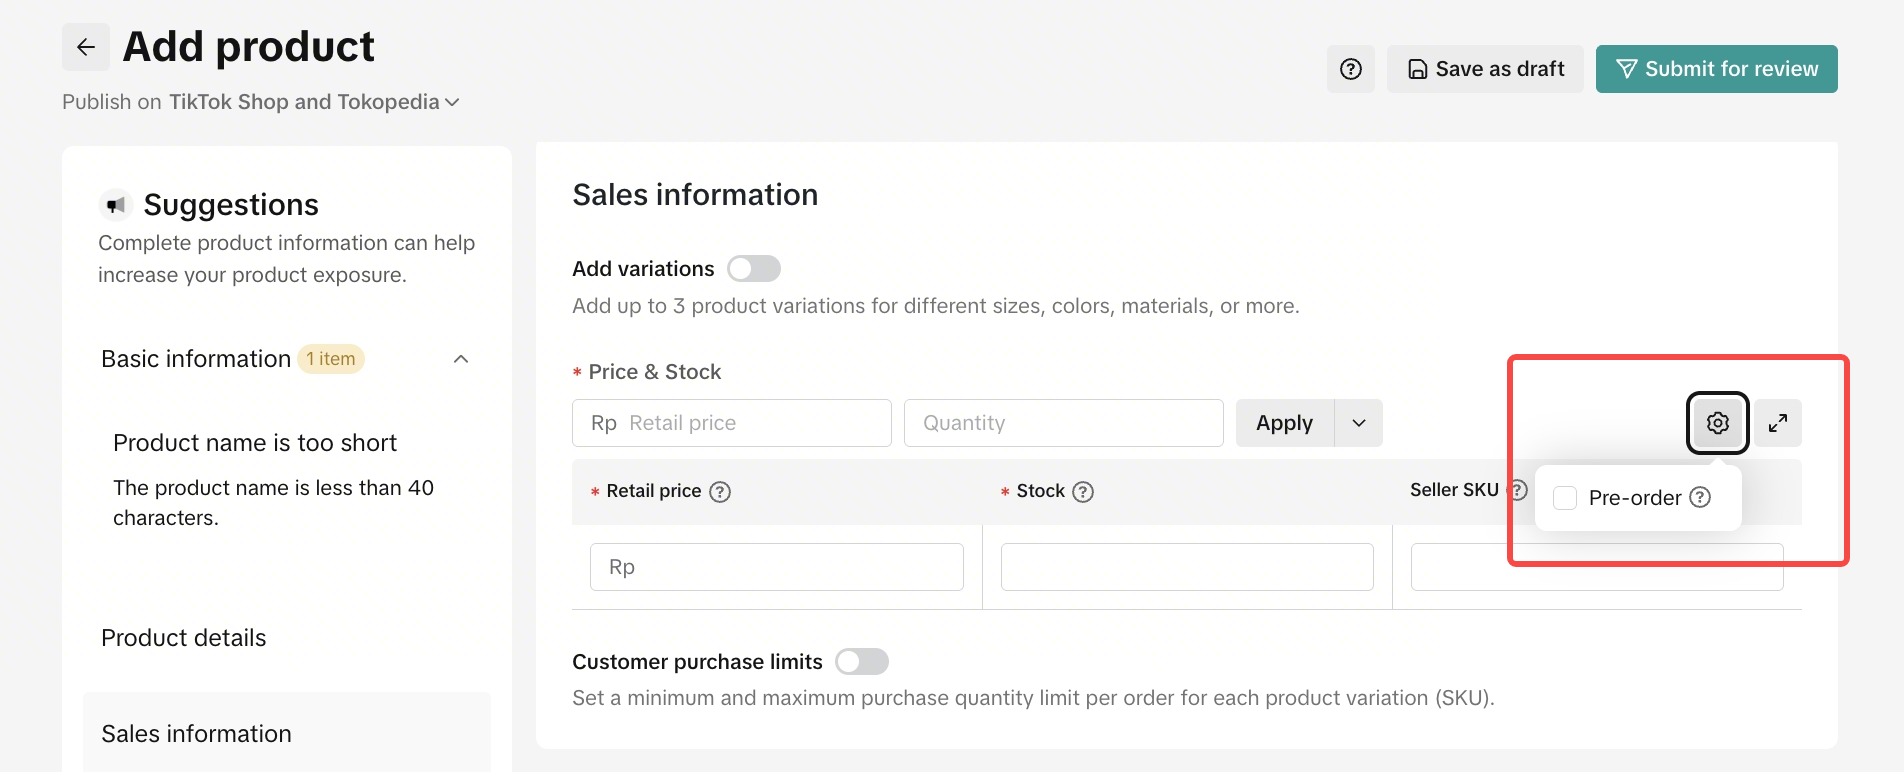 | 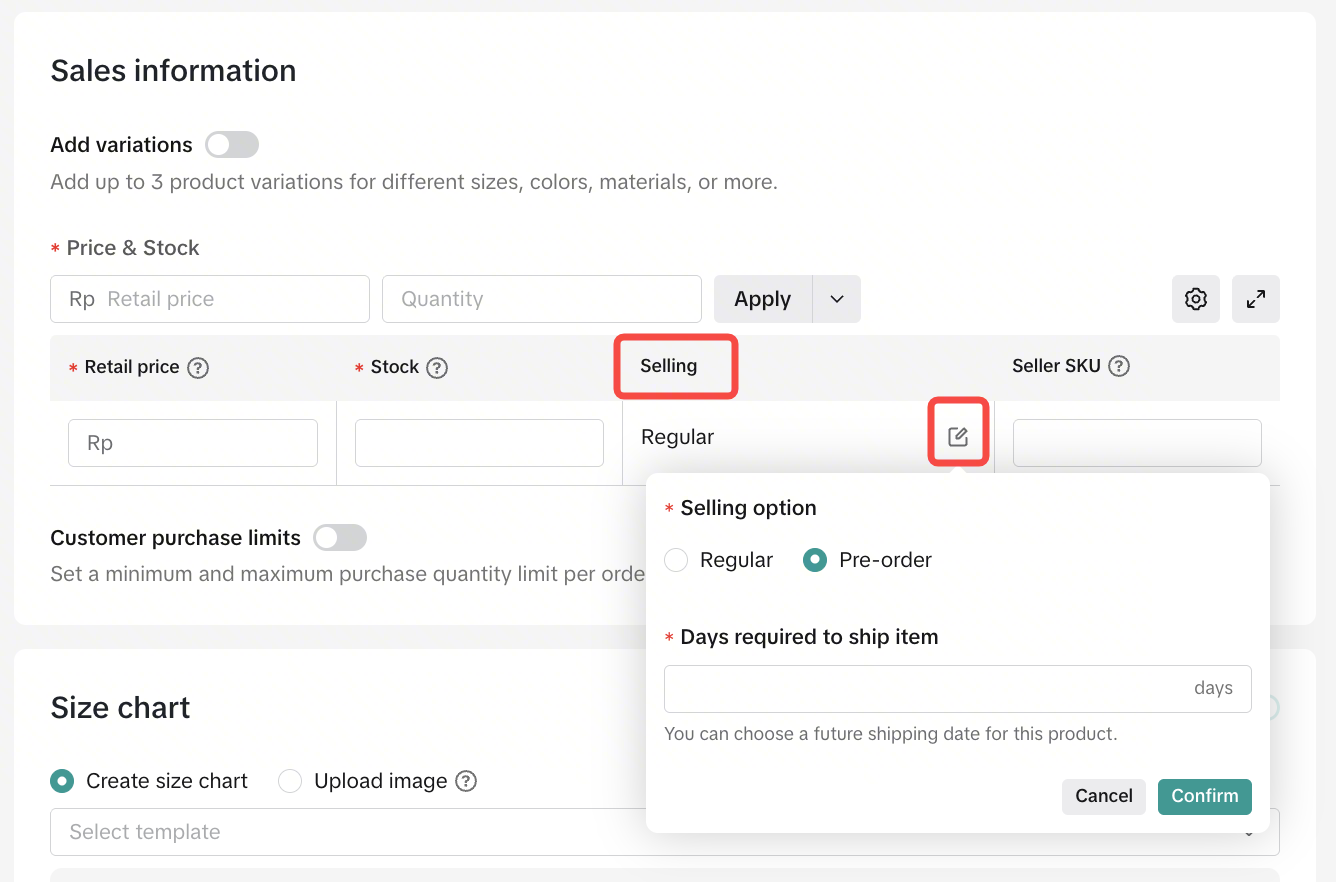 |
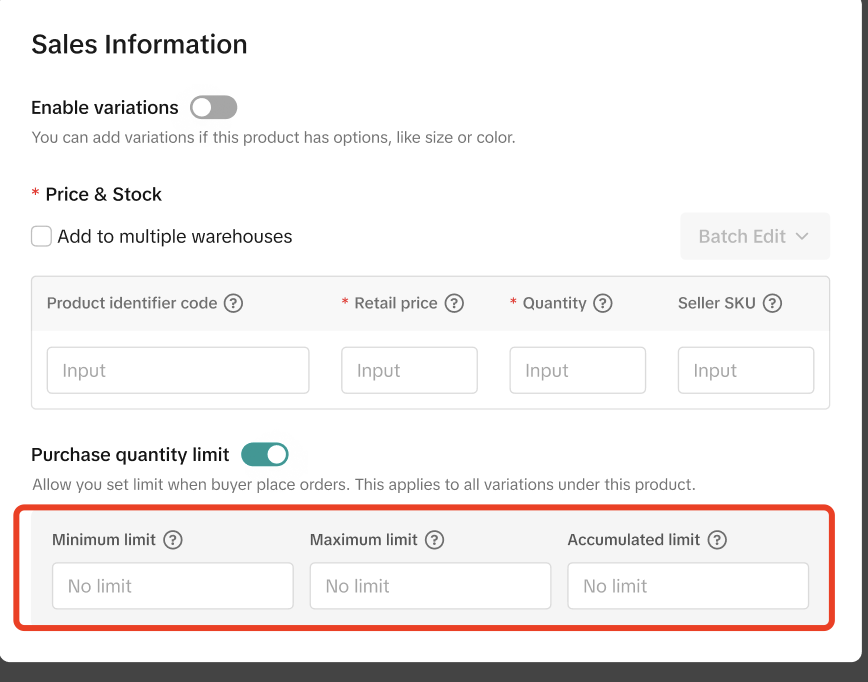 You can now set minimum and maximum purchase limits per product to better manage your inventory and sales!
If you’d like to activate this feature in Seller Center, simply submit your request using the form below, we’ll process it within 7 days.
Once activated, you’ll find the new setting on both the Add Product page and the Edit Product page.Submit Request Here
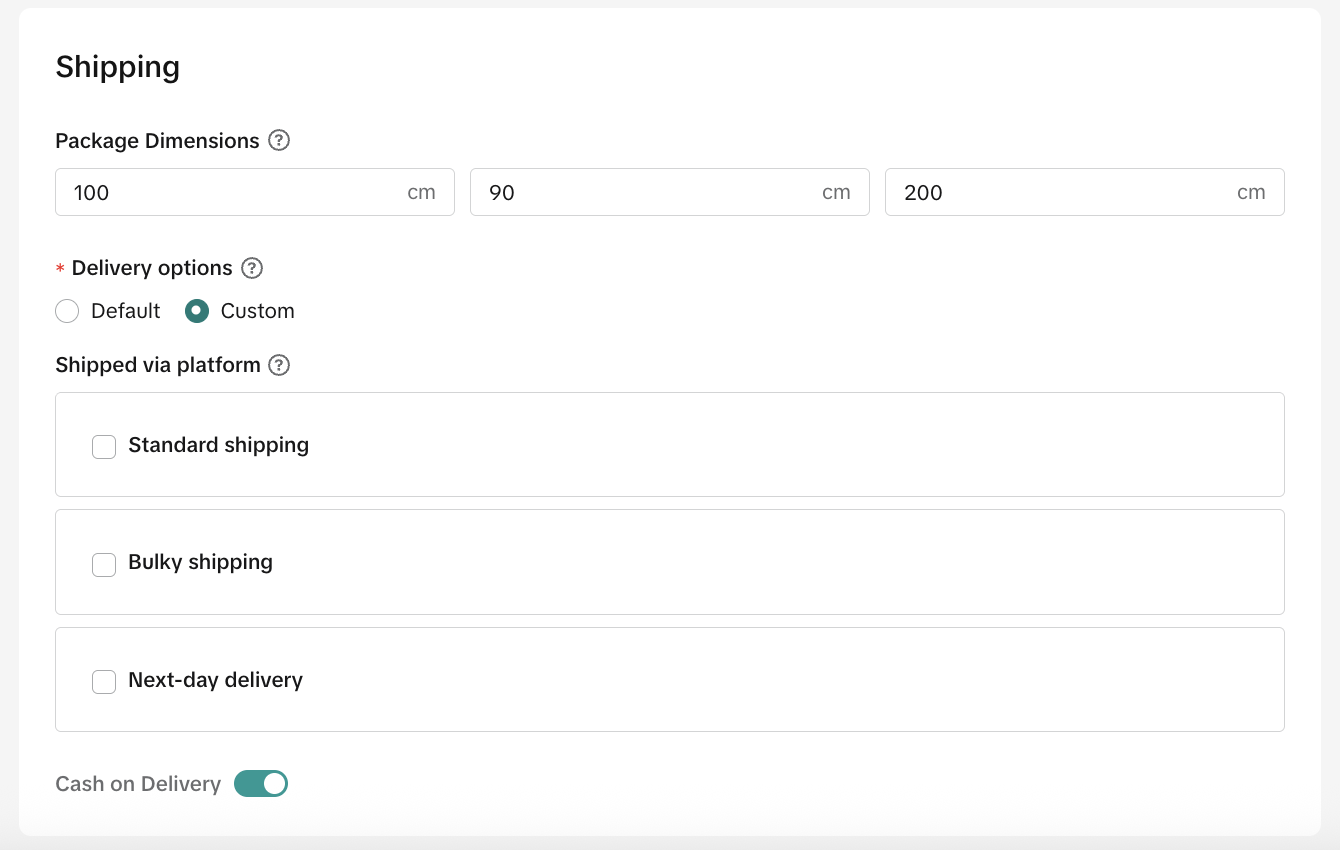
Shipping
This part is for sellers to define their product's size, which could affect their shipping fee and type of delivery options.The allowed package weight is 1-100 Kilograms.
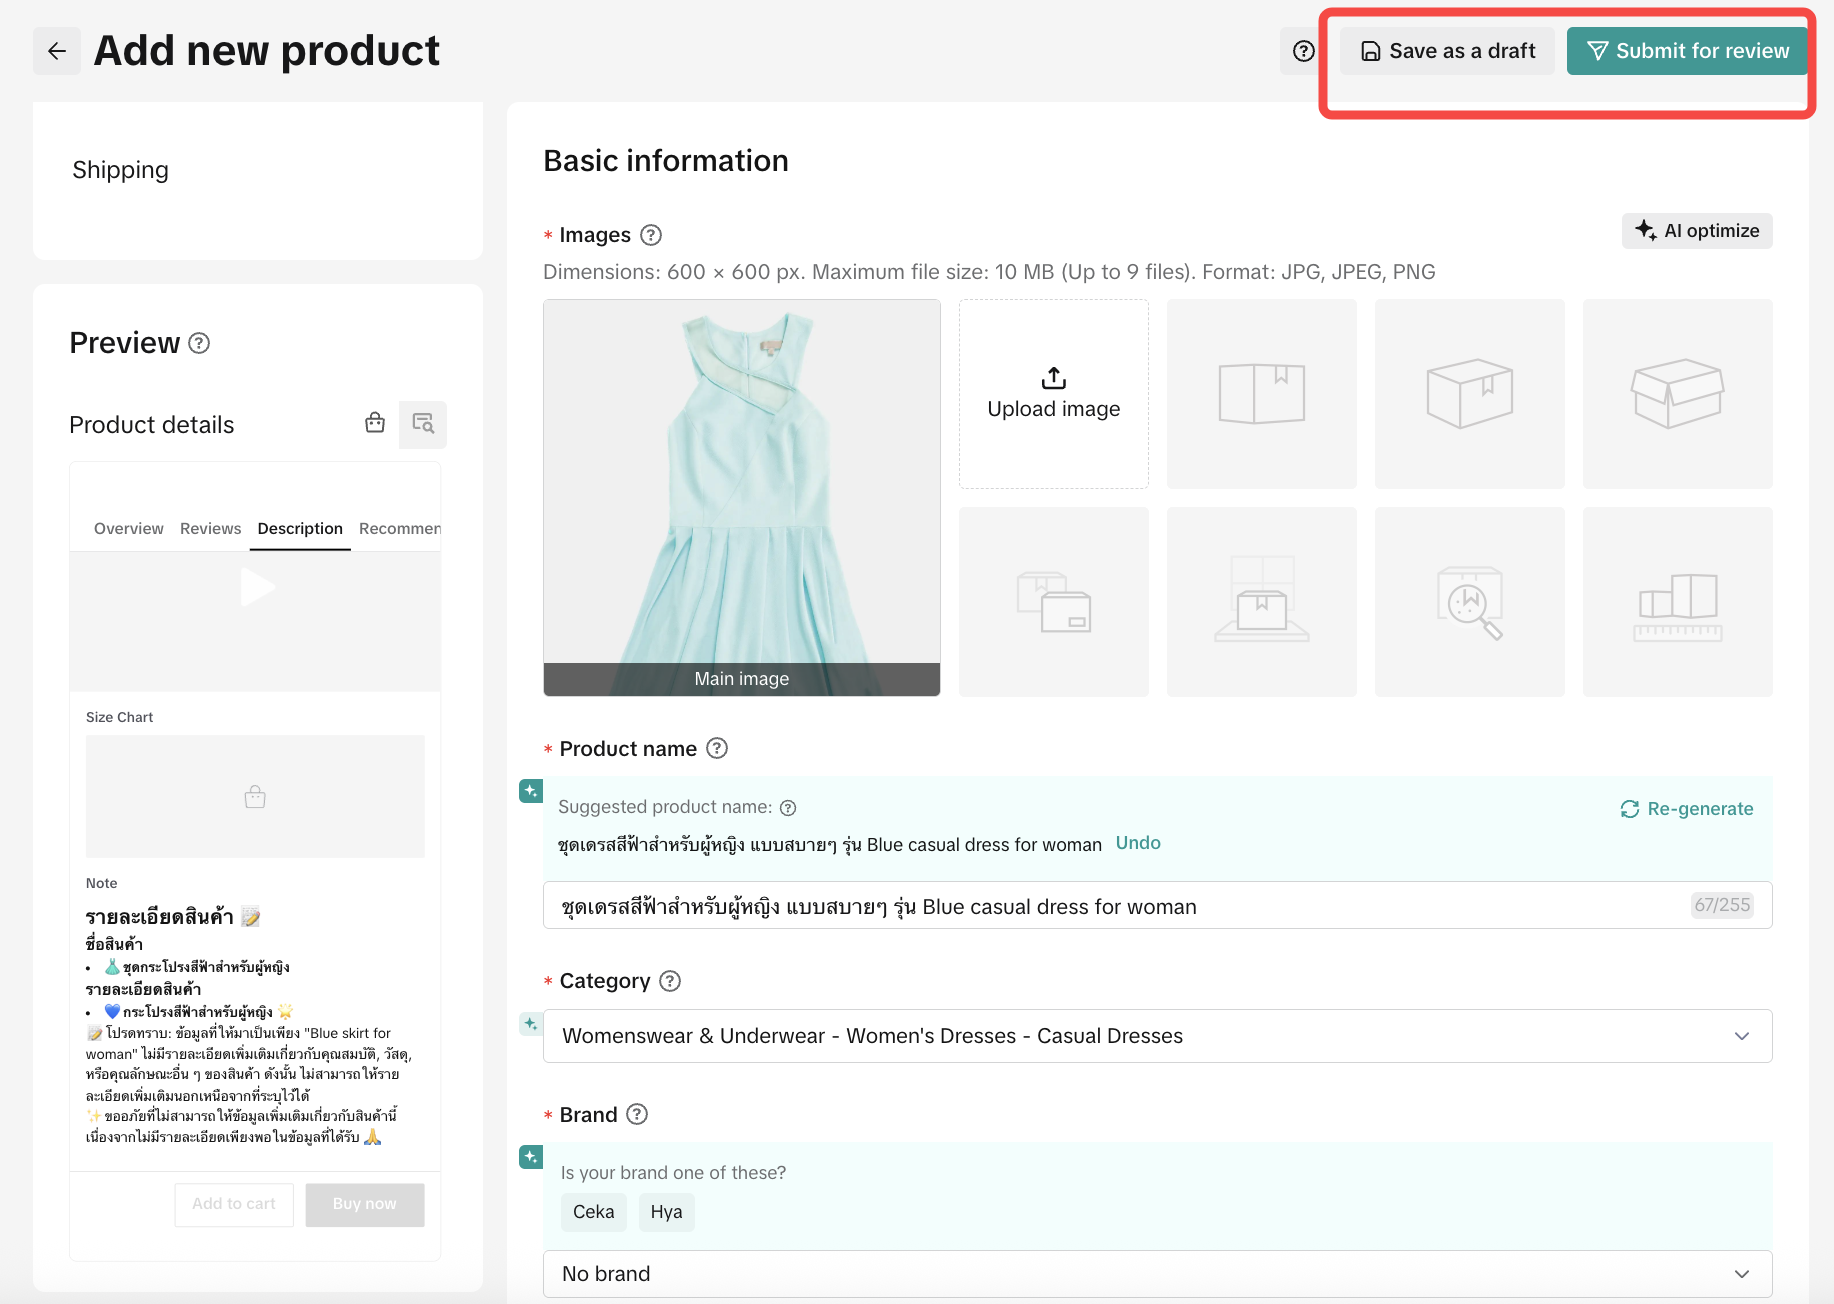
Save Draft or Publish
- Save as a draft: Save current description but product will not be submitted to the review process. Sellers can continue to edit this product later.
- Publish: Product will be submitted to the review process and will be active right after get approved.

Add Multiple Products
You can add multiple products to TikTok Shop in one go by using the Bulk Action feature under Manage Products section. For guidance, follow the step-by-step process below:Batch Publish Product
Go to Products - Manage Product - Bulk Action - Bulk ListingFollow these 3 steps to easily upload your products in bulk:Step 1: Download the Template
- Download a template by selecting the product category you want upload. To find the related category, you can search by product keyword or select from the Browse.
- It is recommended to add a product brand and have the brand authorized because it can help sellers gain trust from buyers, and then download the template.
- Currently, you can only select one category for each template.
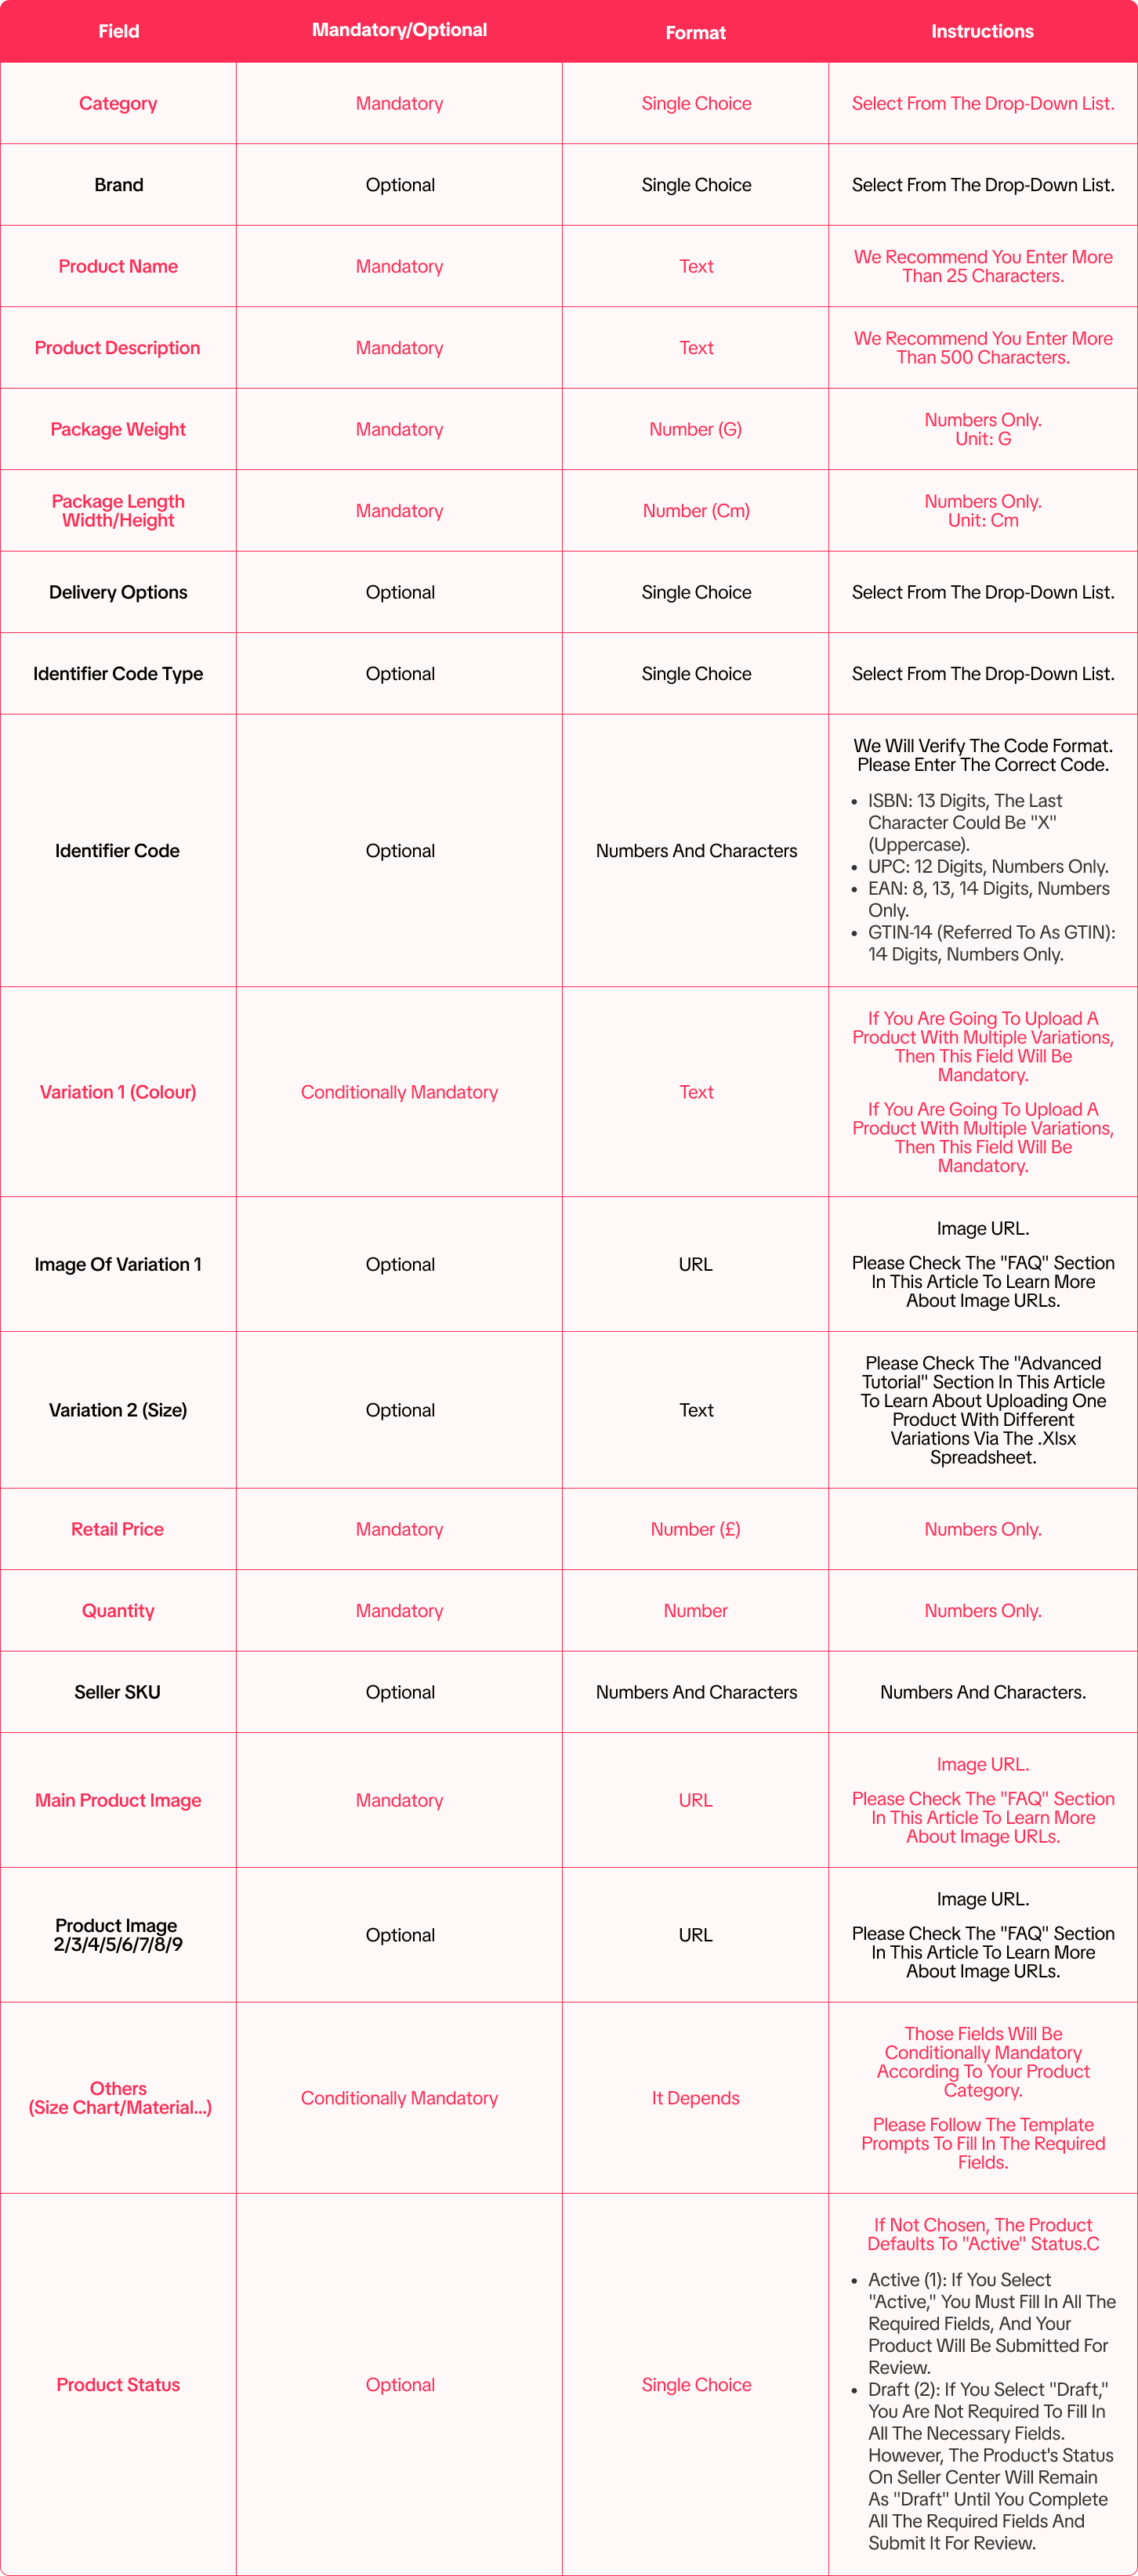
Step 2: Fill in the Information
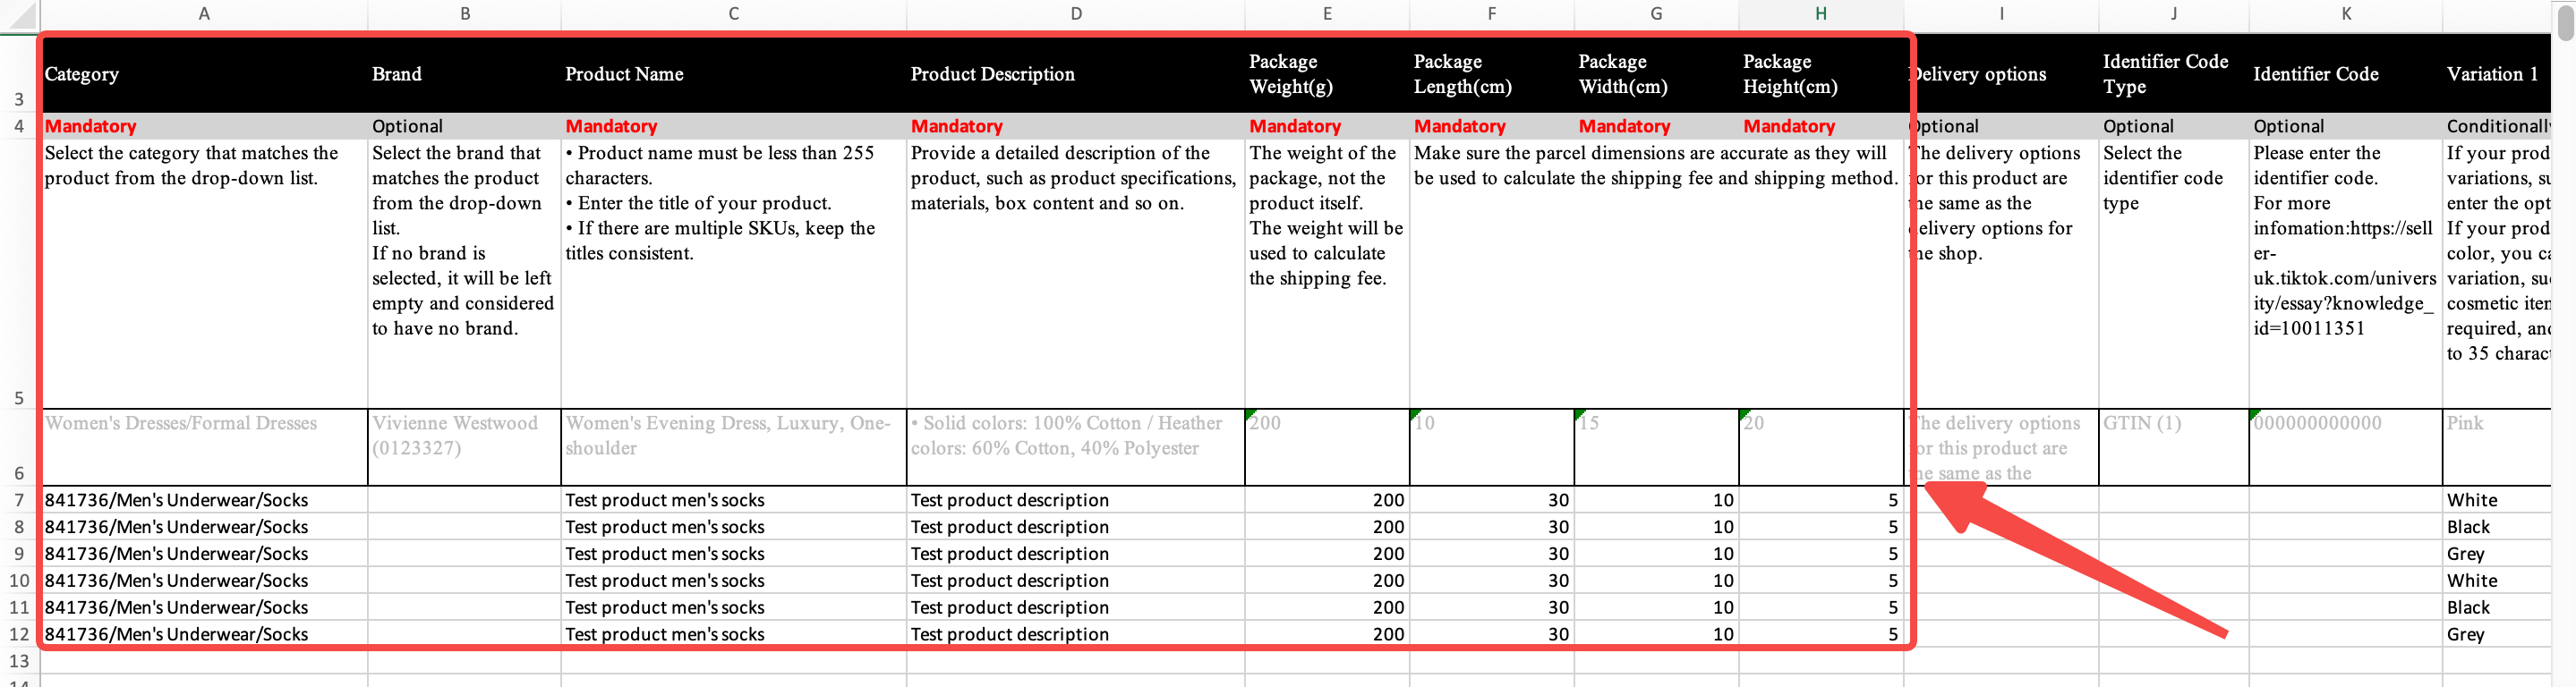
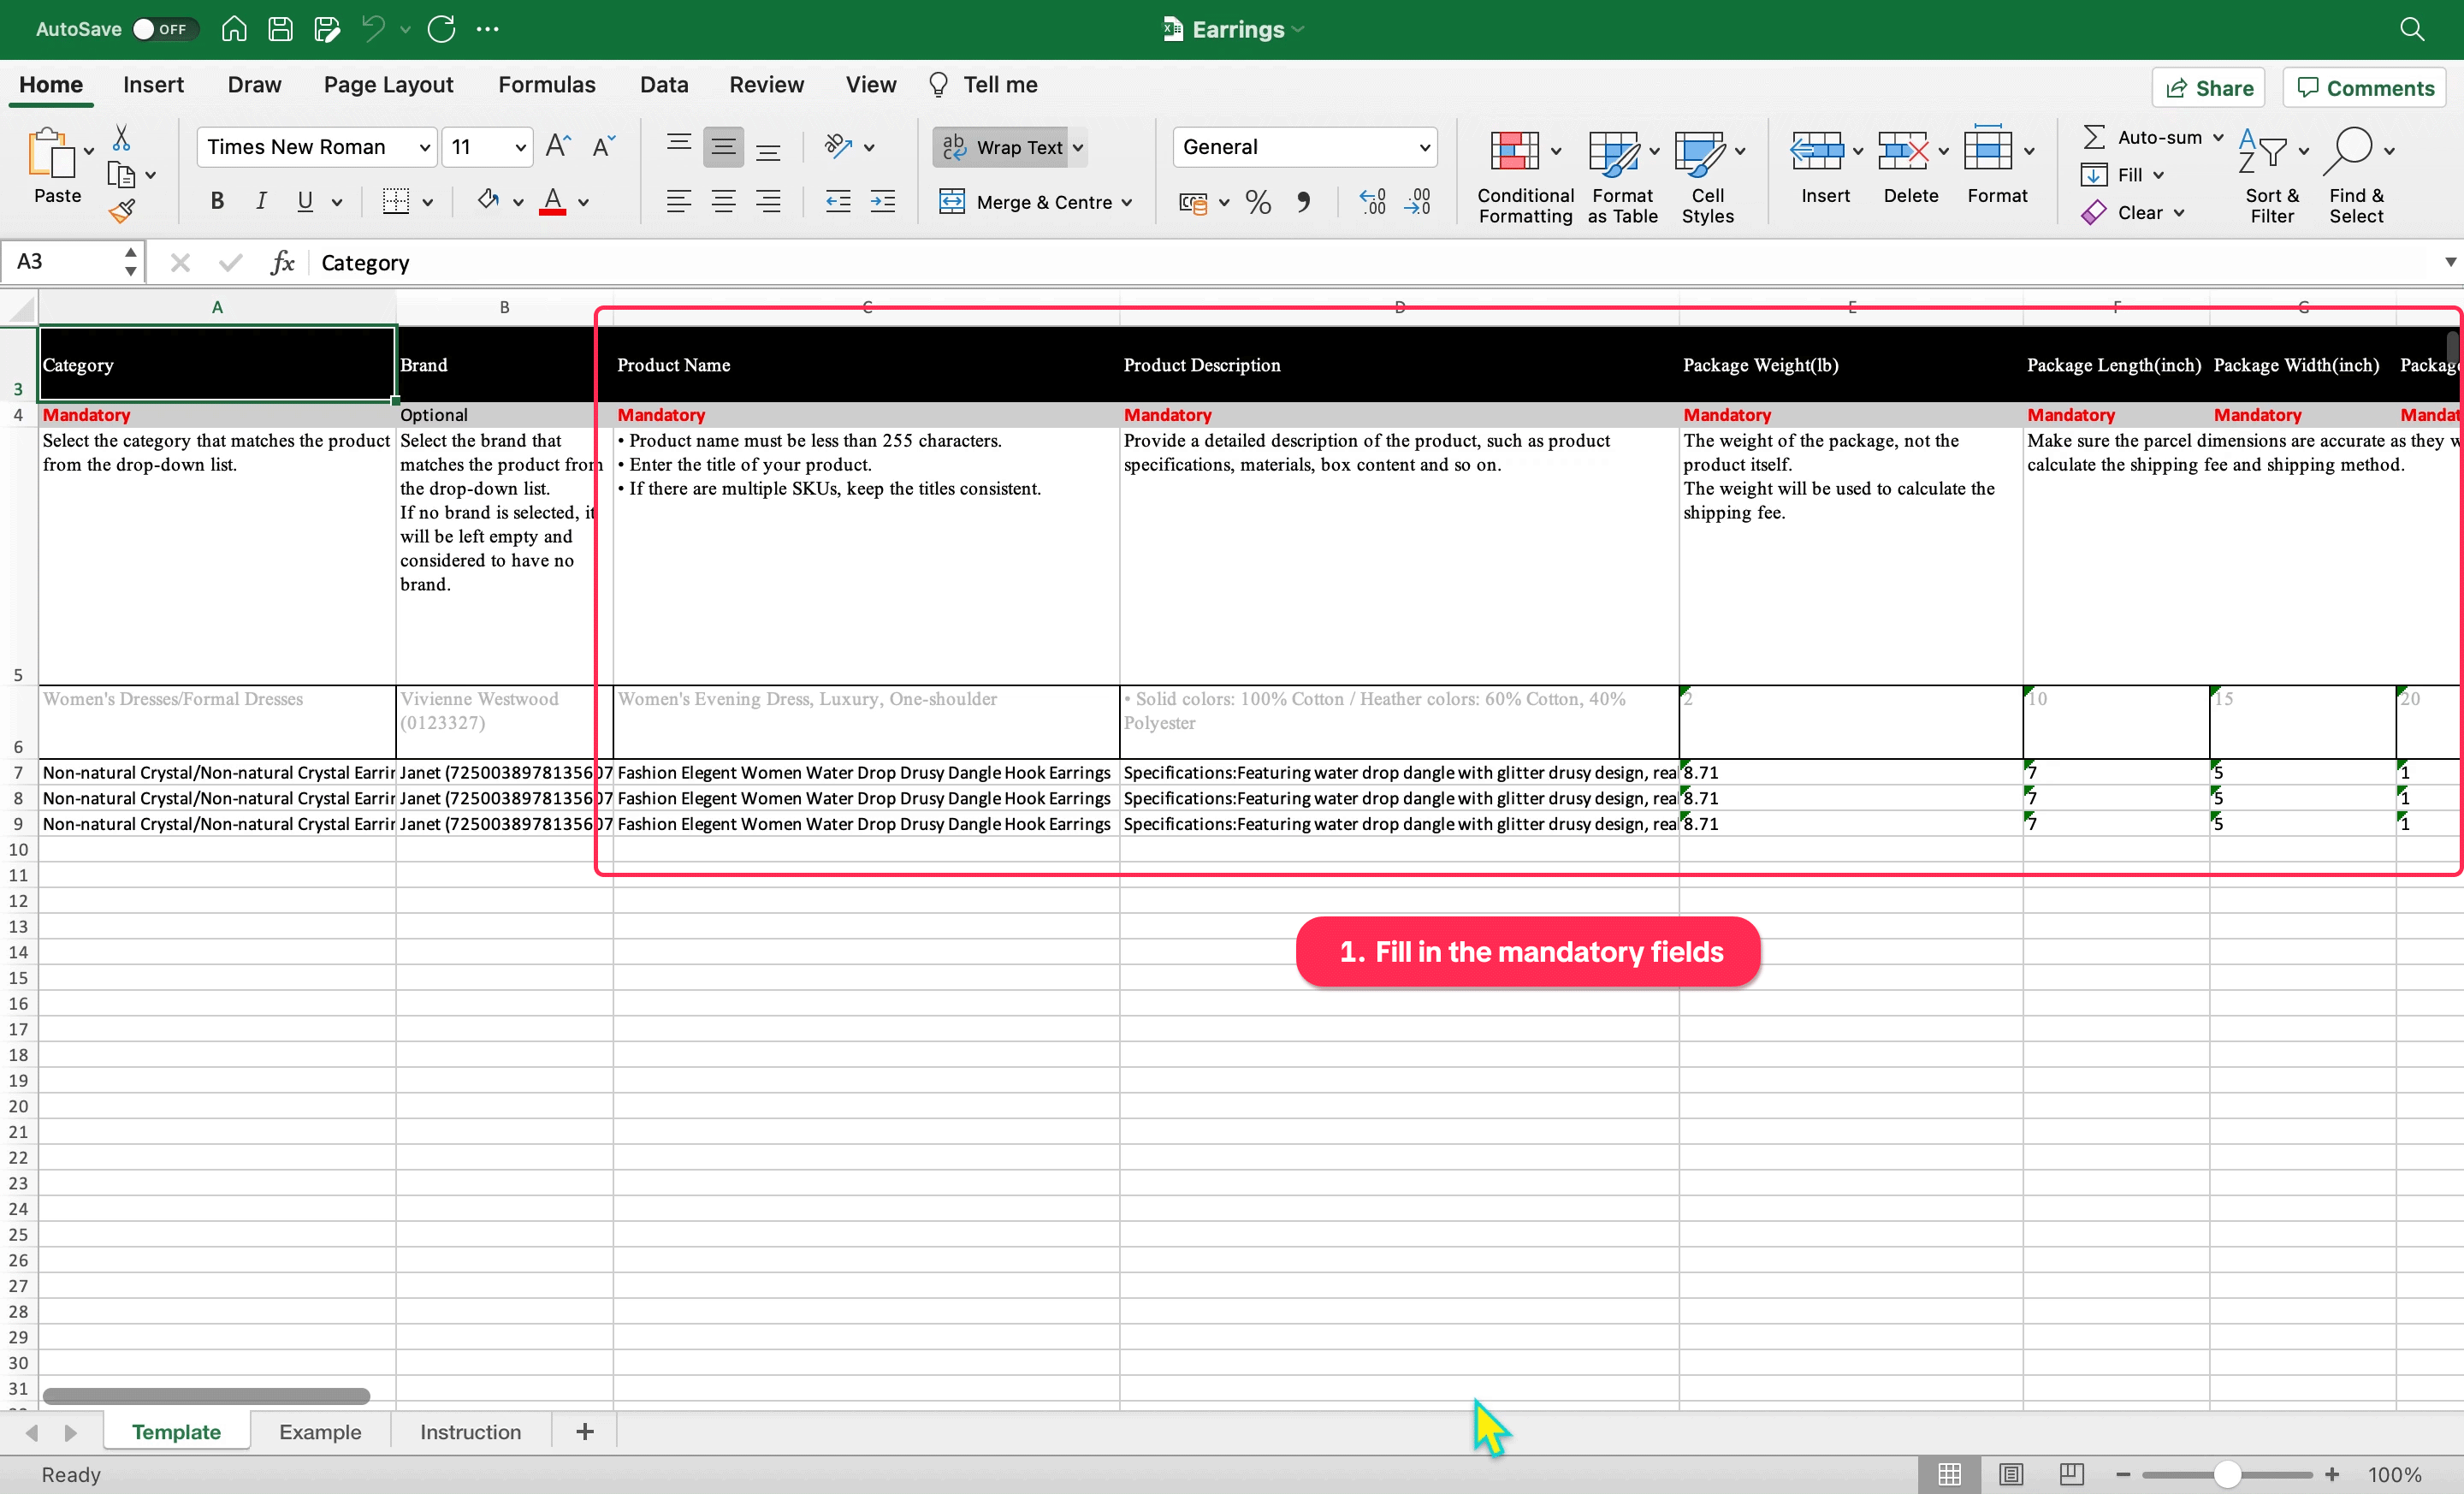 Important: Do not add or delete any rows or columns in the template.
- The mandatory field will be highlighted in red boxes
 Product level info(mandatory)
- Product Name
- Product Description
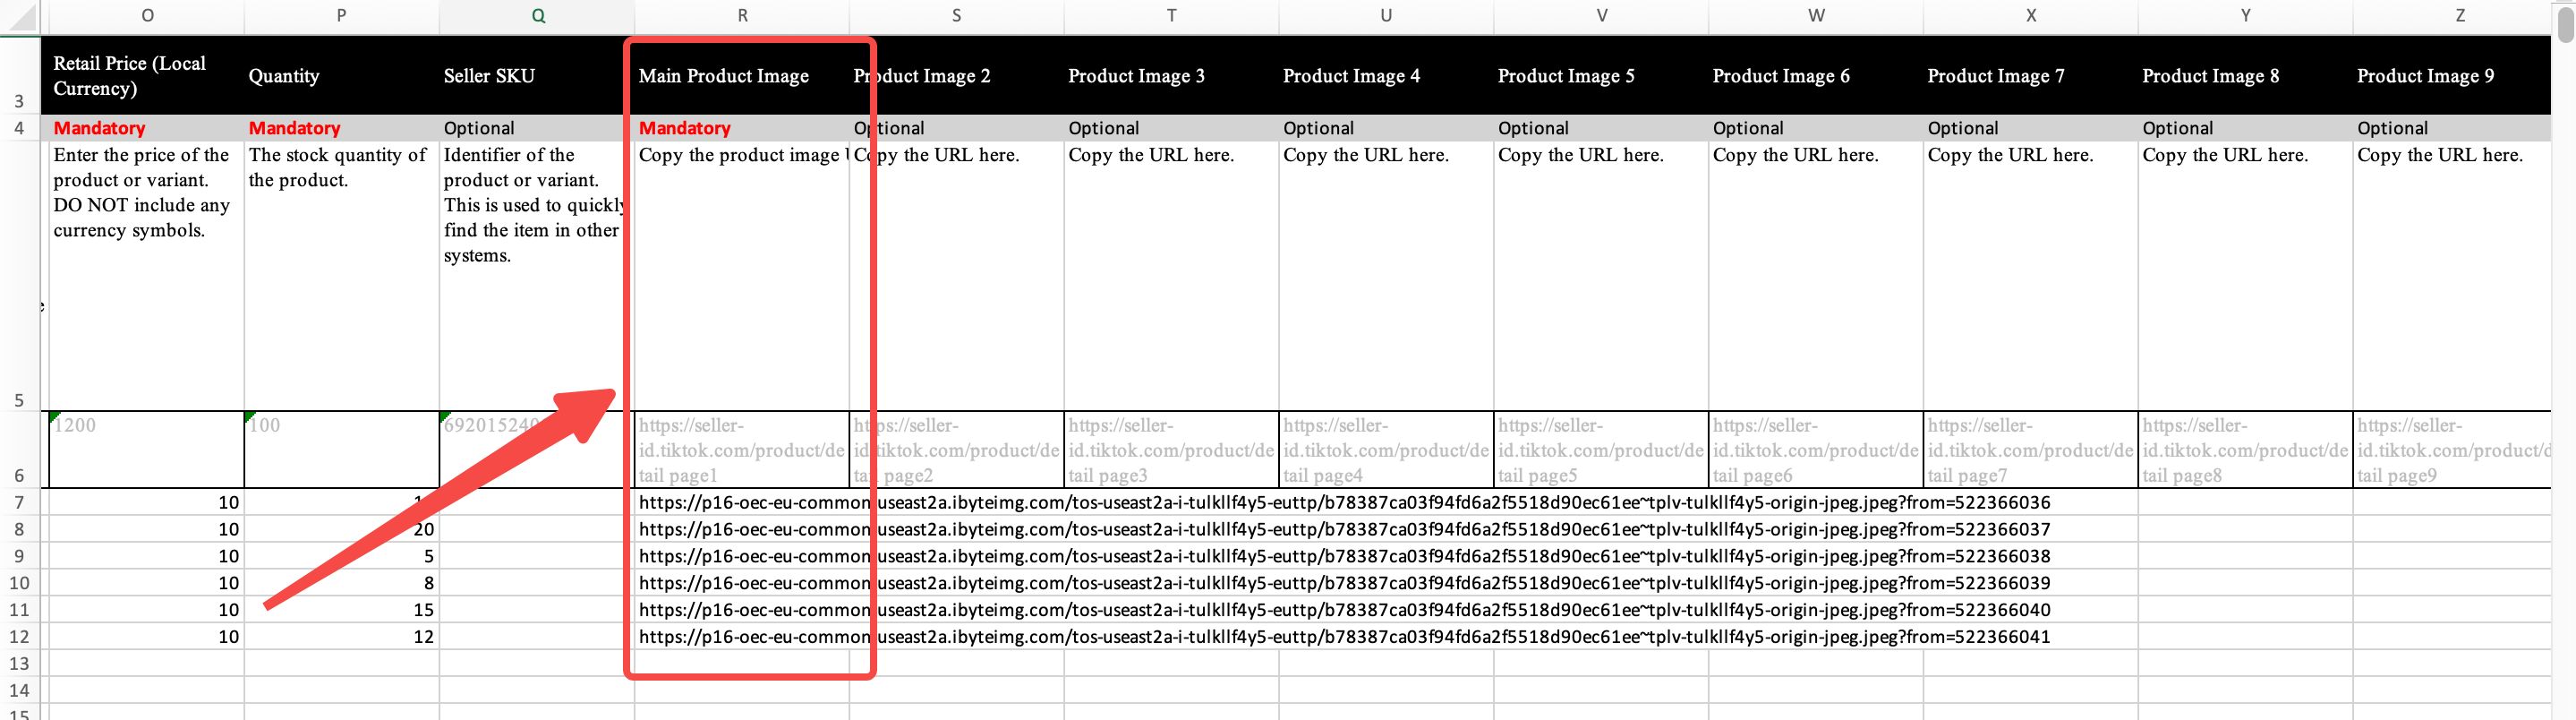
- Main Product Image
- Parcel Weight
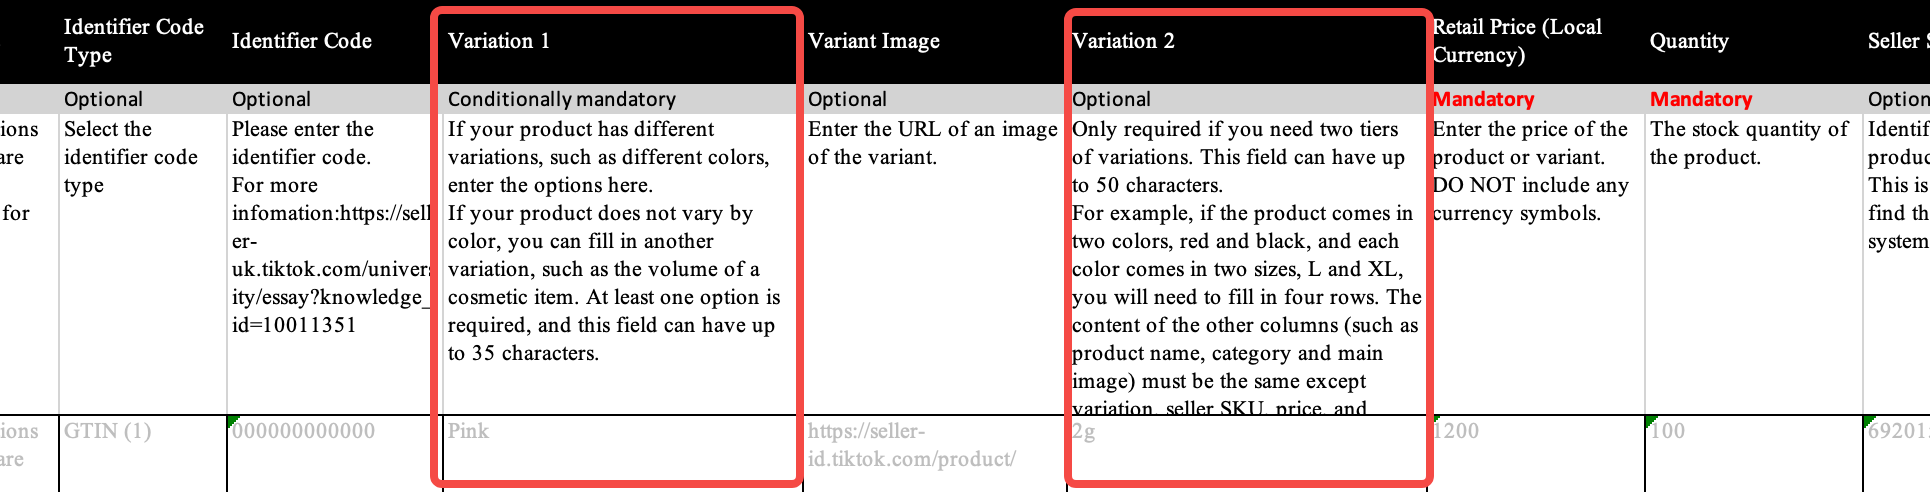
- Variation 1
- Retail Price
- Warehouse
- Quantity
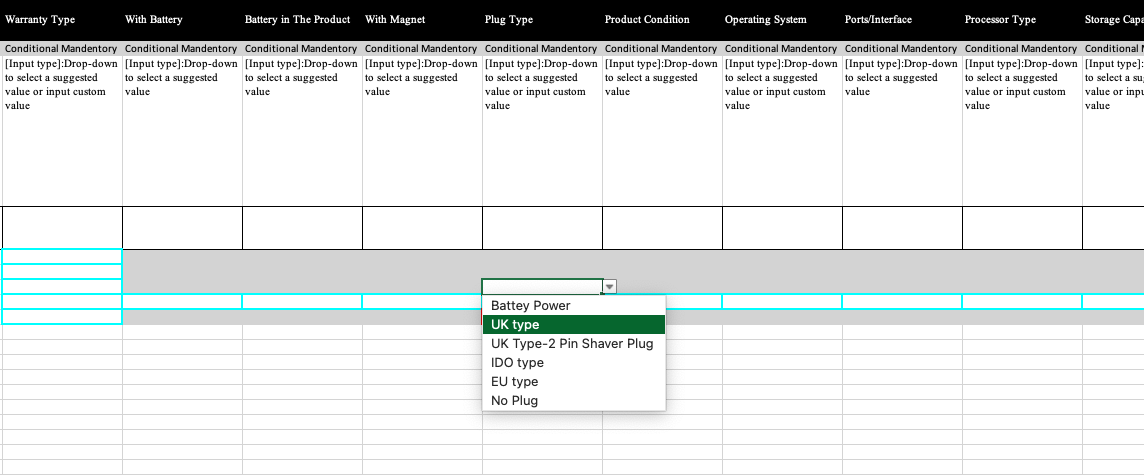
- There will be dropdown field with validation capabilities on excel template
- Read this table below for more details on how to fill the template:
Step 3: Upload Spreadsheet
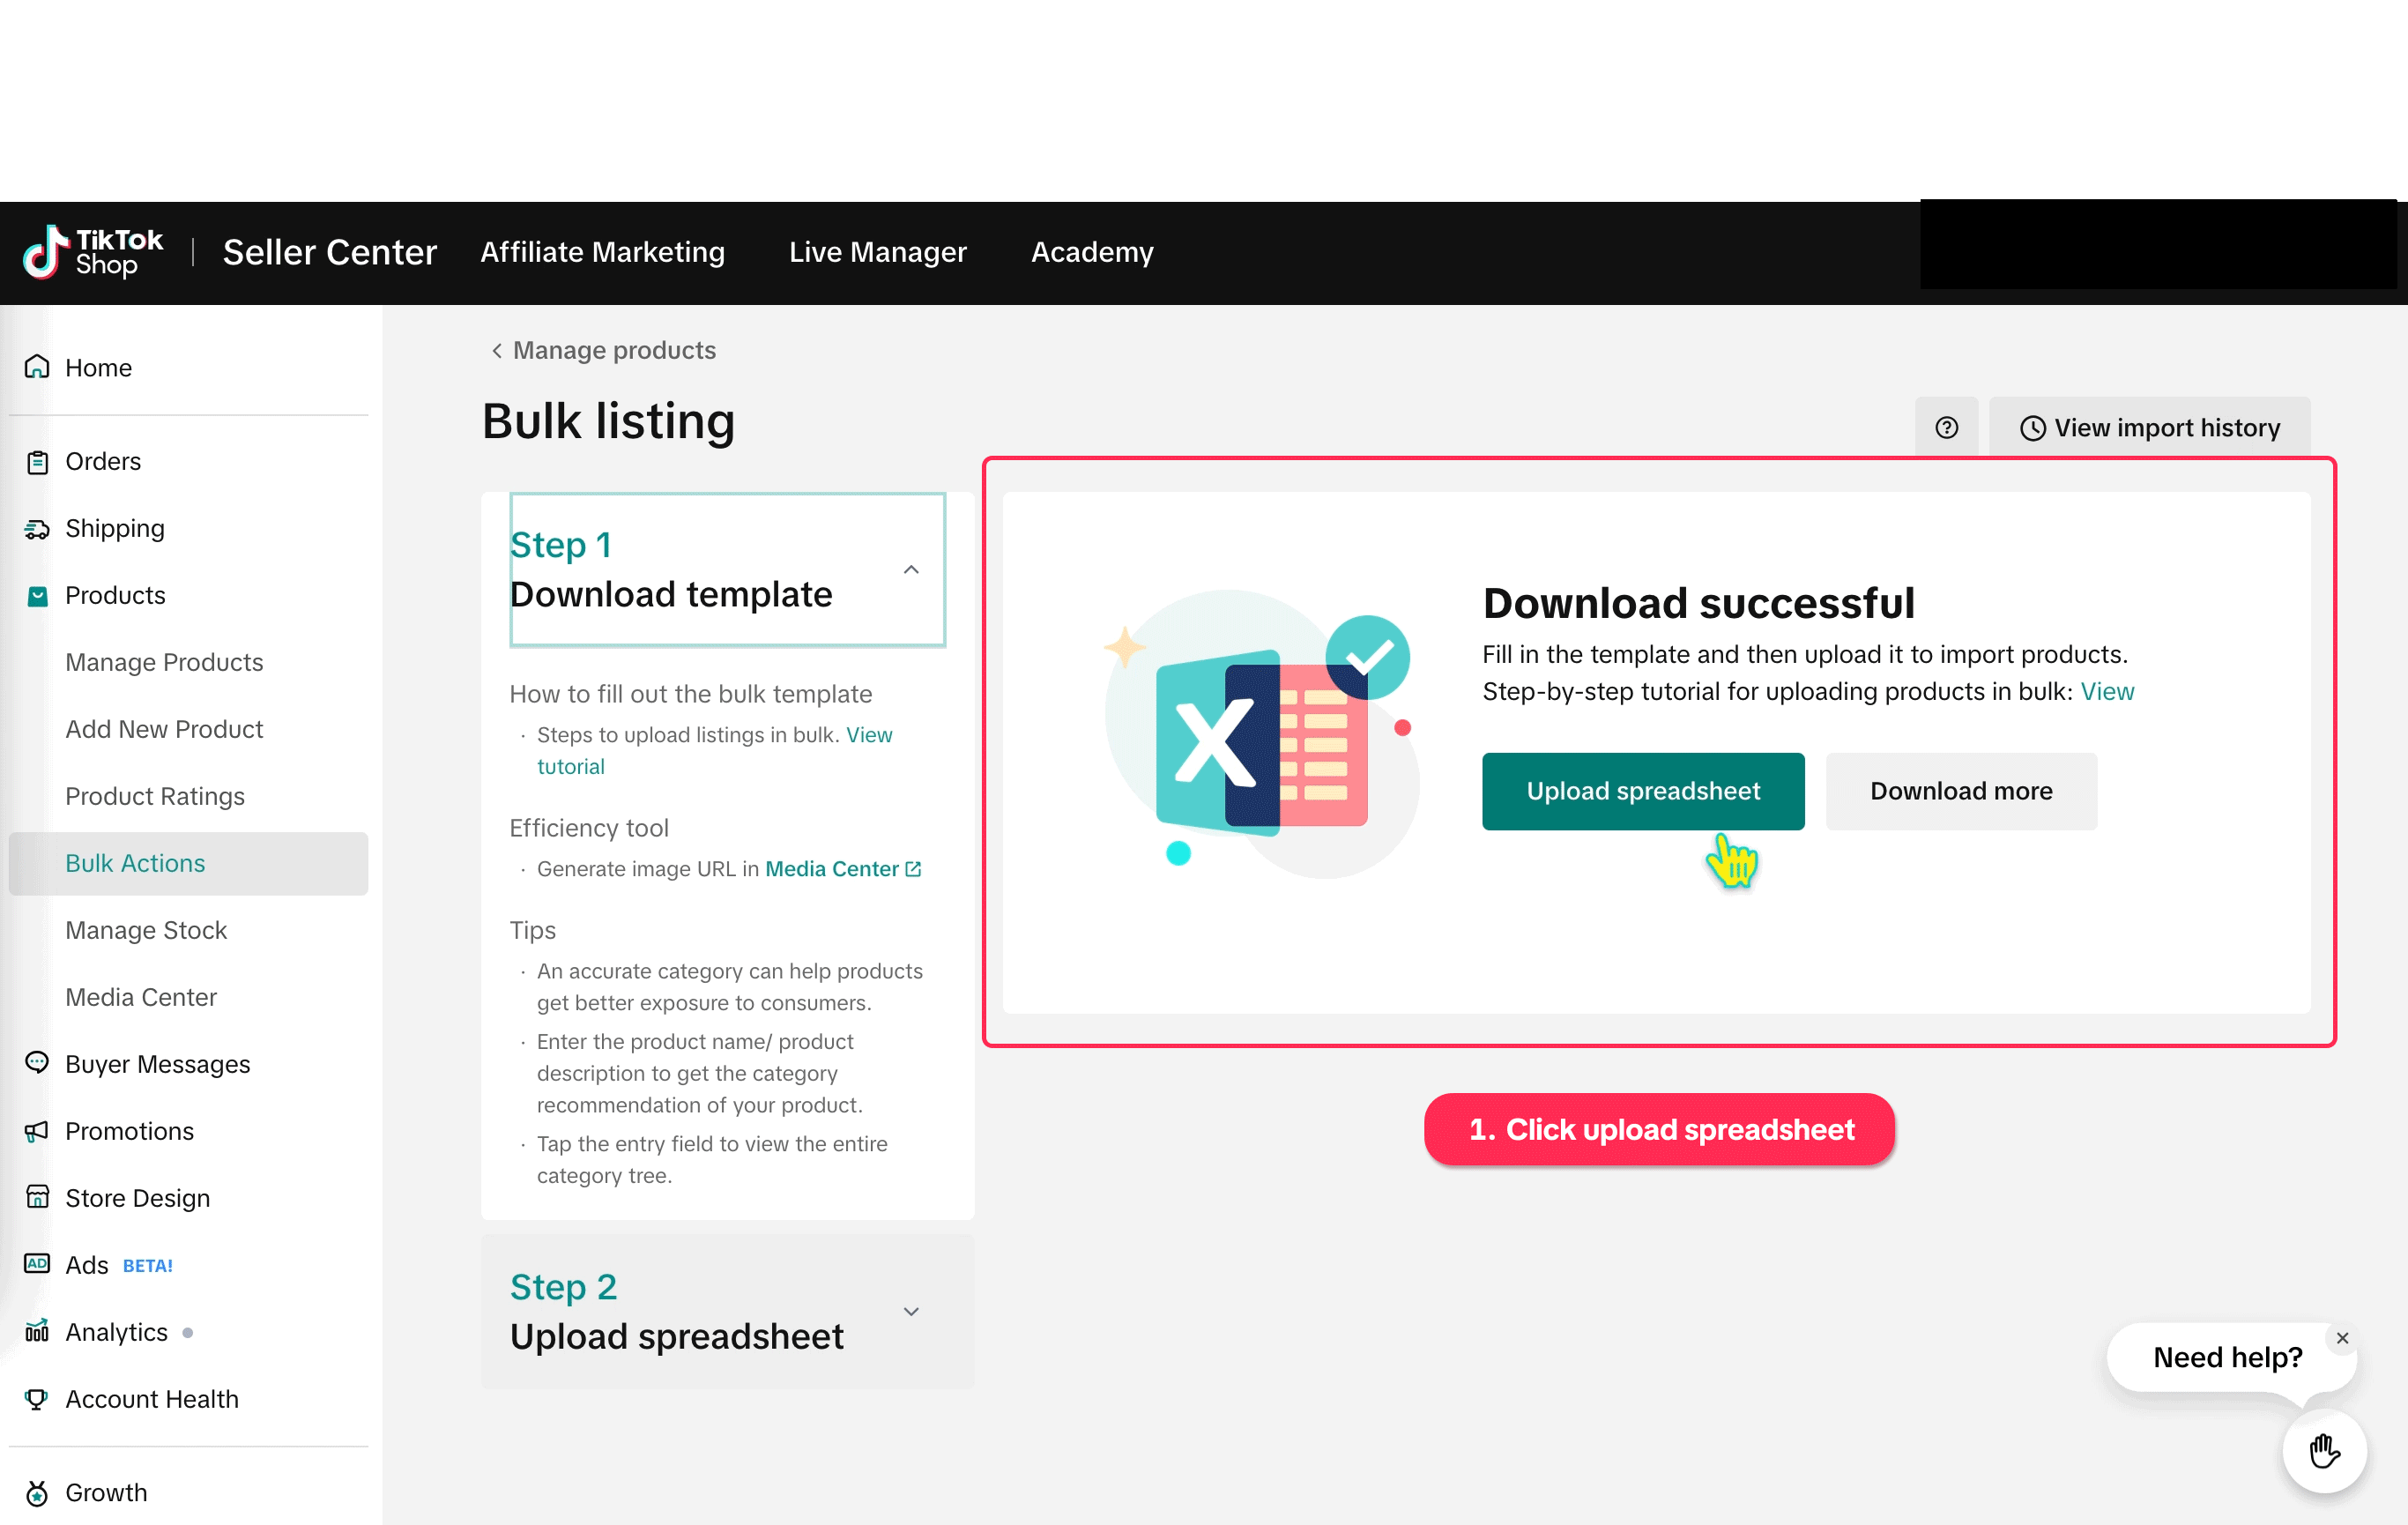
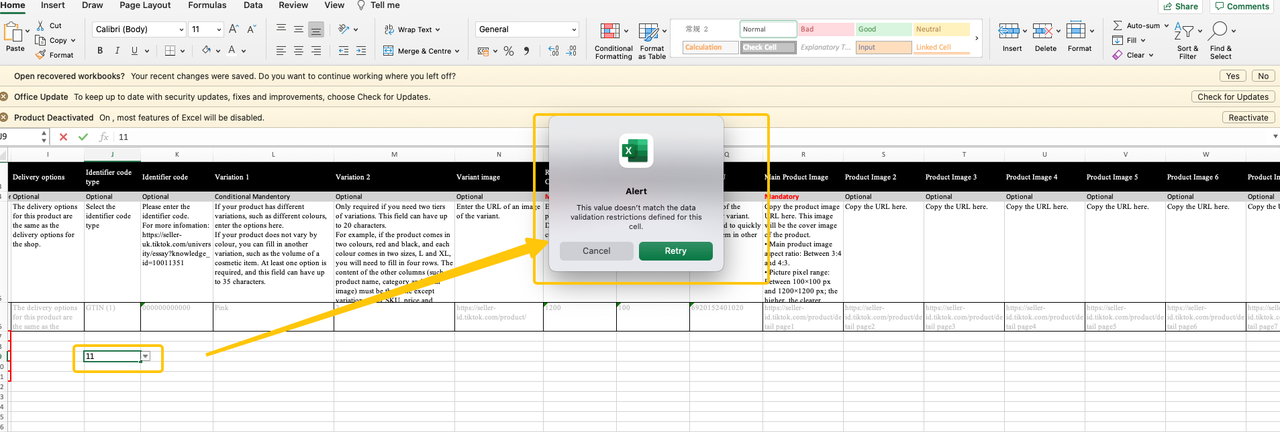
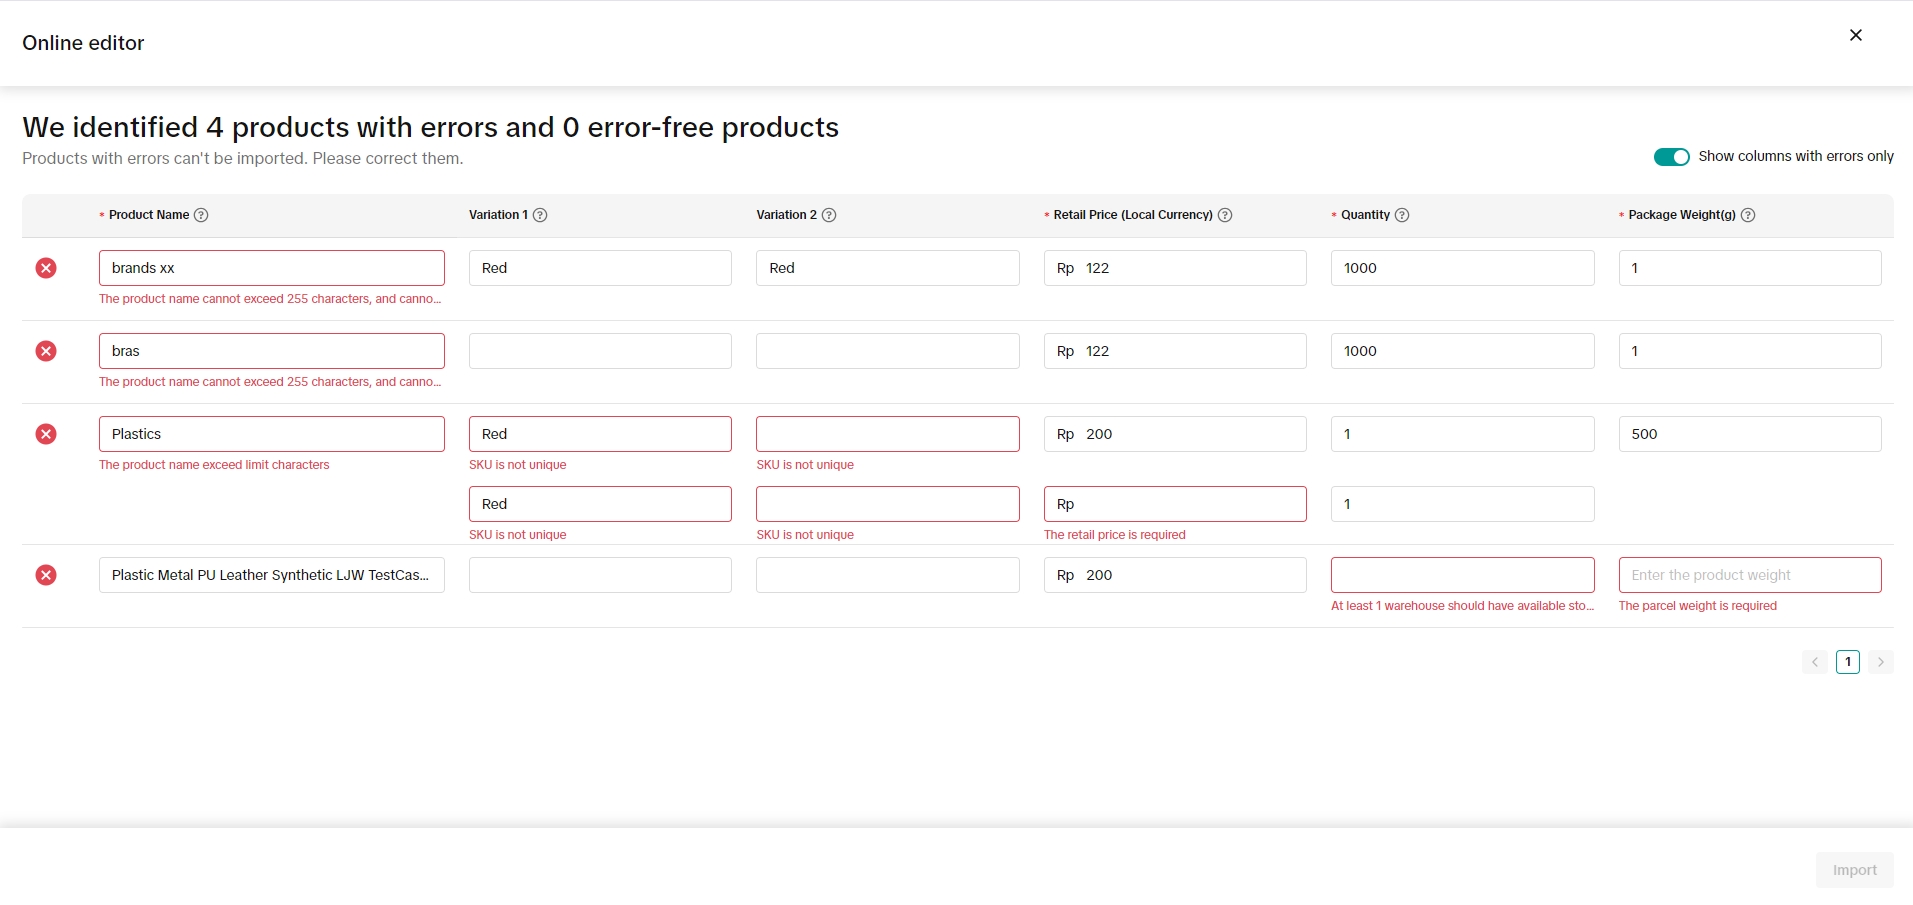
If Products Fail to Upload
If any of your products failed to upload, click "Download precheck error reasons" to see the details.
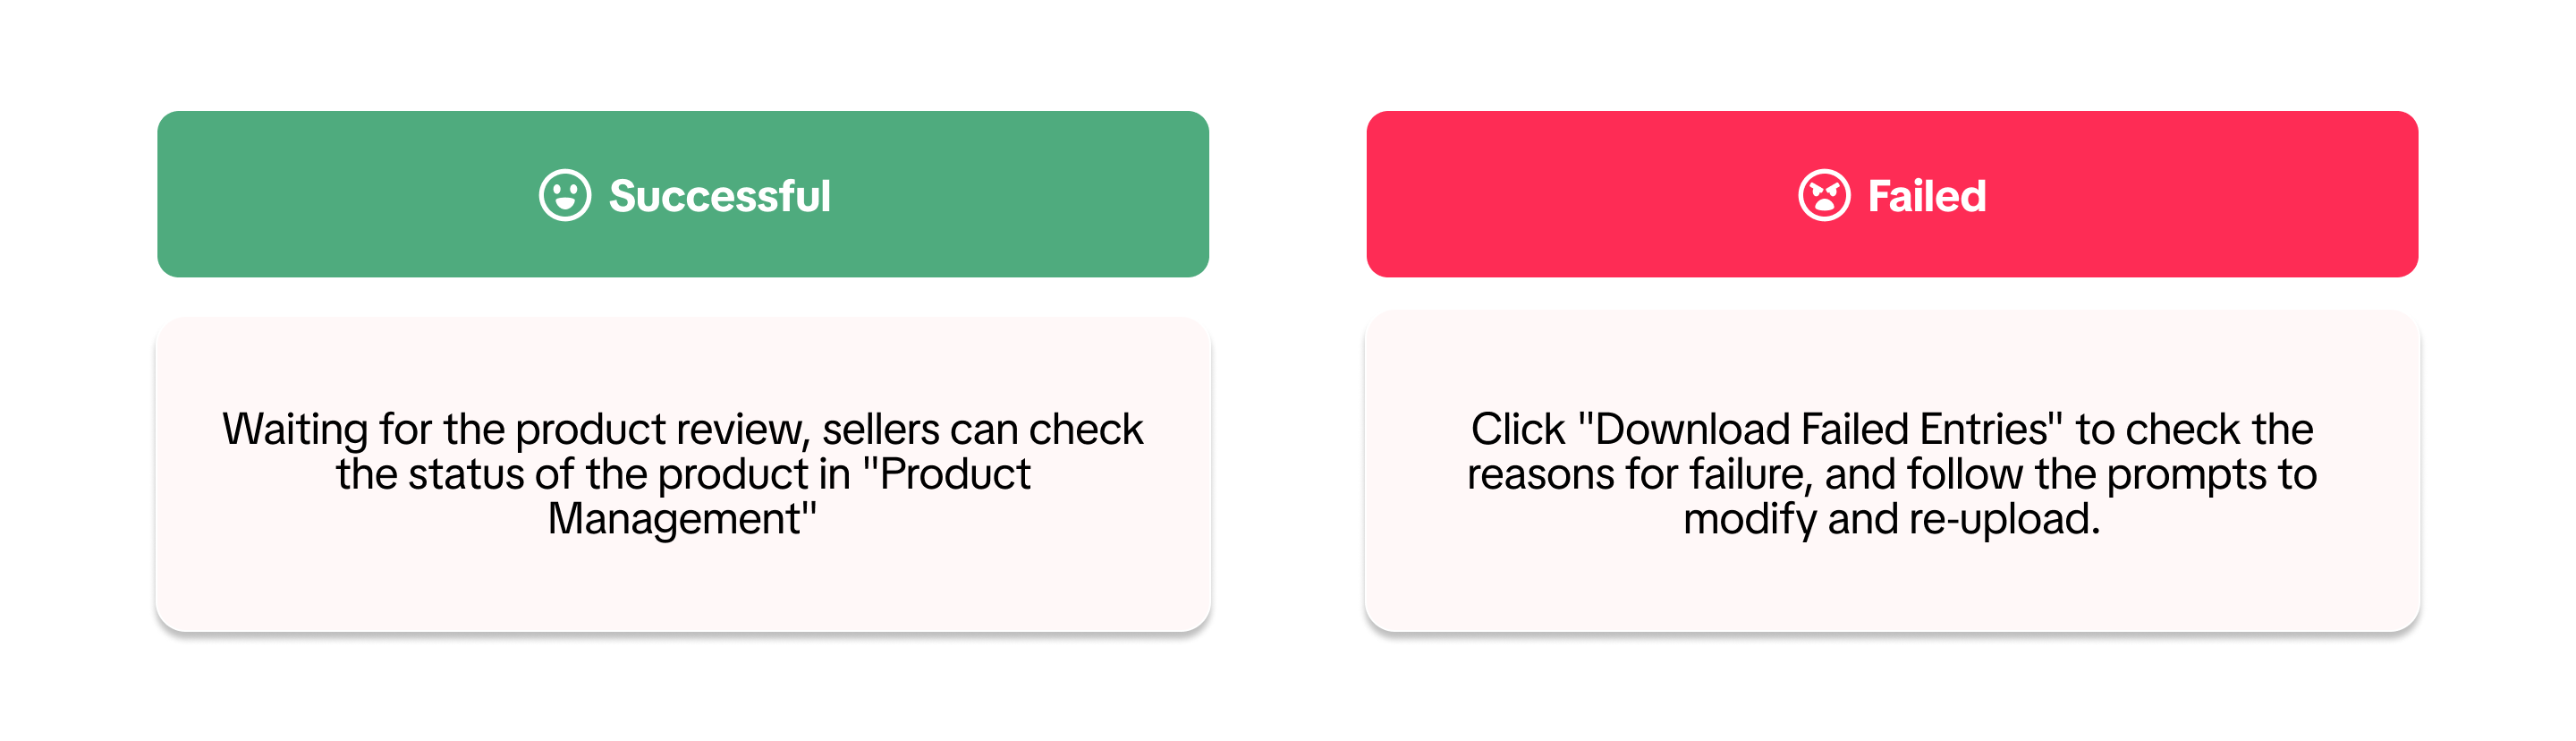 Open the "result" document, and the failure reason(s) will be displayed in the last column. Please follow the instructions to adjust your template and upload it again.
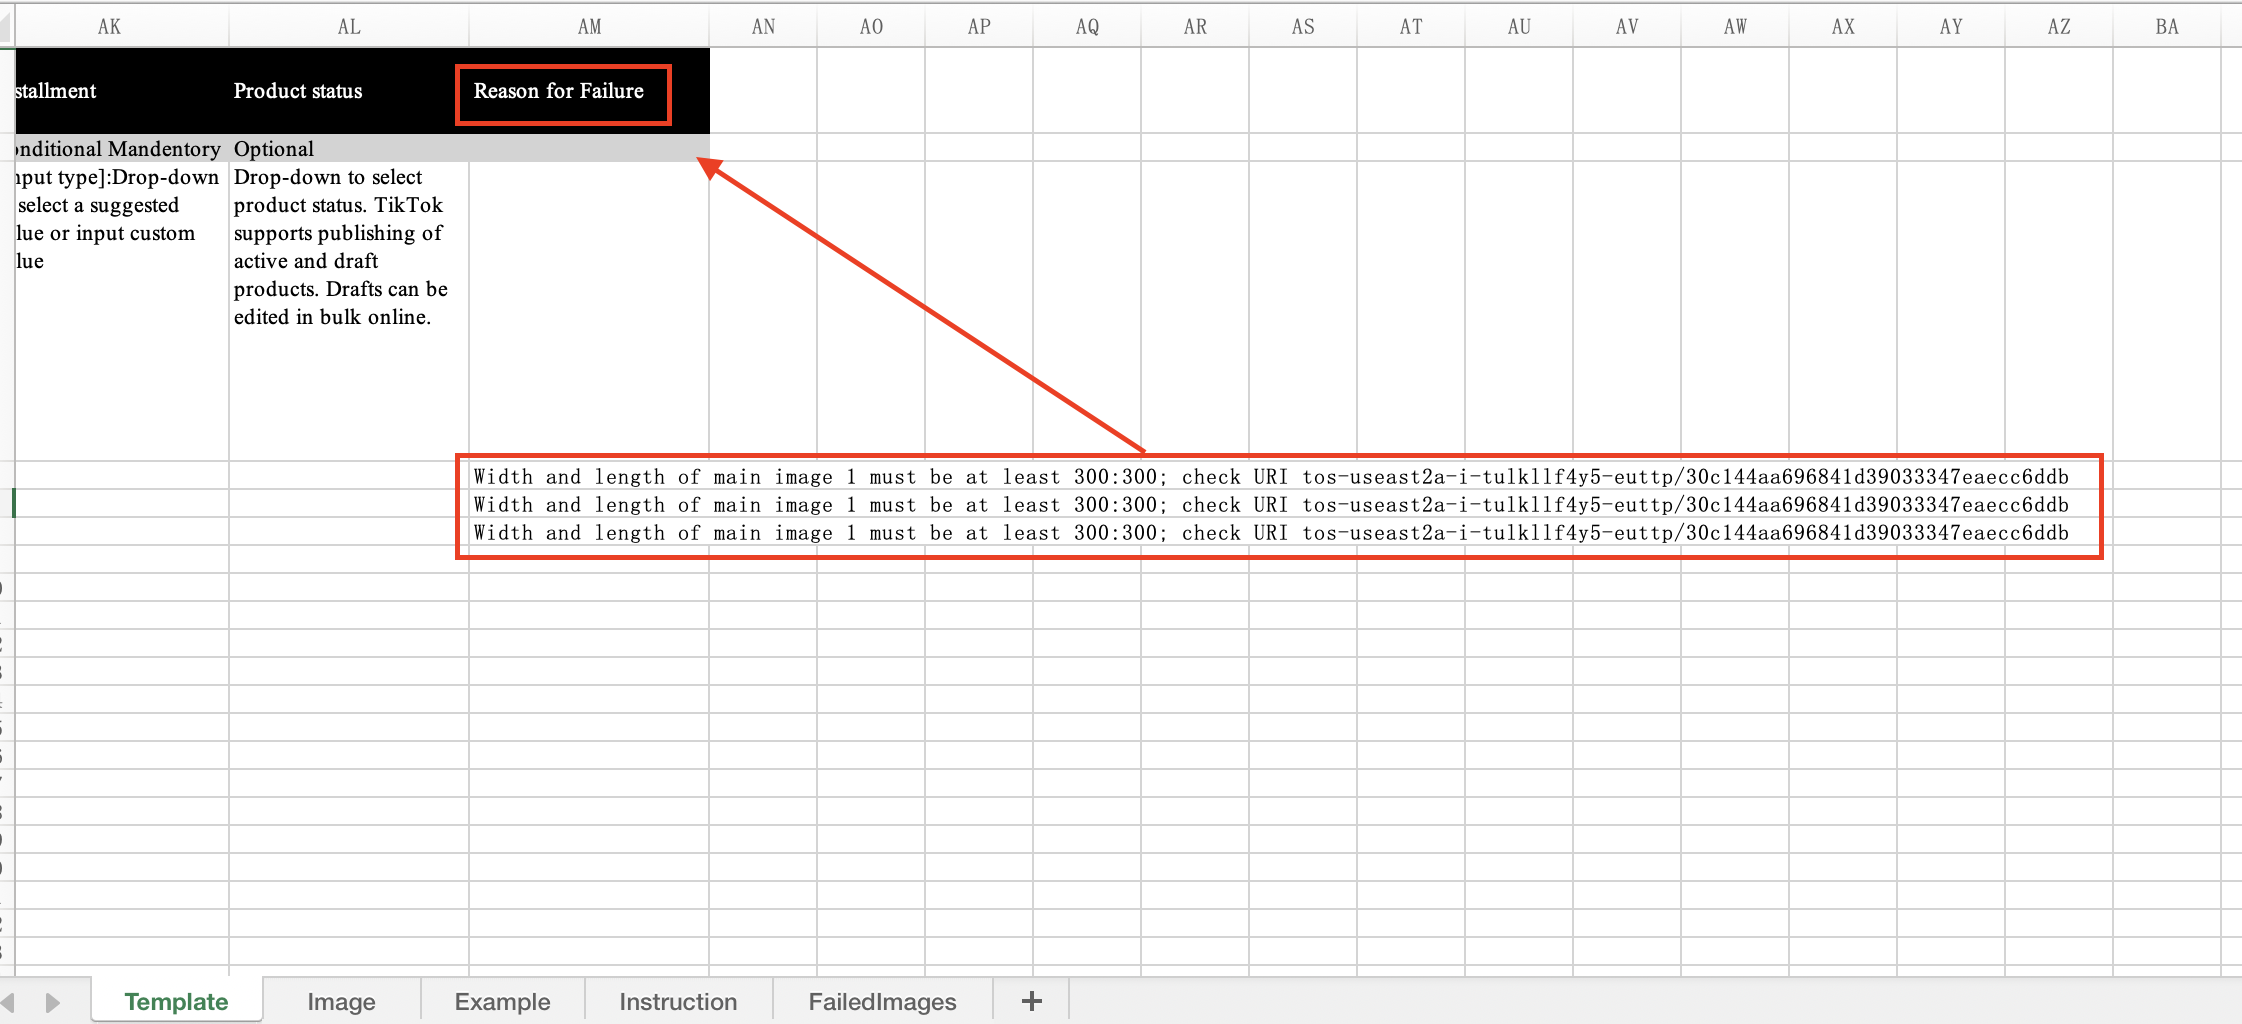 Note:
Note:- Duplicate templates can only be uploaded once;
 Sellers can correct a maximum of 5000 SKUs using the online bulk editor.
If the product you want to upload has multiple different variants, such as colours, sizes, etc., referring to the following tips and examples can help you fill out the template more effectively.
Tips
"Utilize Product Media Centre for uploading product pictures on batch tool"Batch tool requires seller to embed url of a product picture that seller wants to upload on their product information, to minimize failure in uploading picture through the batch tools. We suggest our sellers utilize our product media centre feature to upload and retrieve the url provided by our system as this is the most reliable method to obtain product picture urls"Variation 1" is mandatory for multiple variation products.1) "Variation 1" is required. Please enter the names of different variants on a new row, such as "White", "Black" and "Grey."
2) "Variation 2" is only required if you need two tiers of variations, such as colours and sizes.
3) "Variation 1" will be regarded as "Colour", and "Variation 2" as "Specification" by default.
4) Same product's variation values have to be different.
- Each SKU should be placed on a separate row.
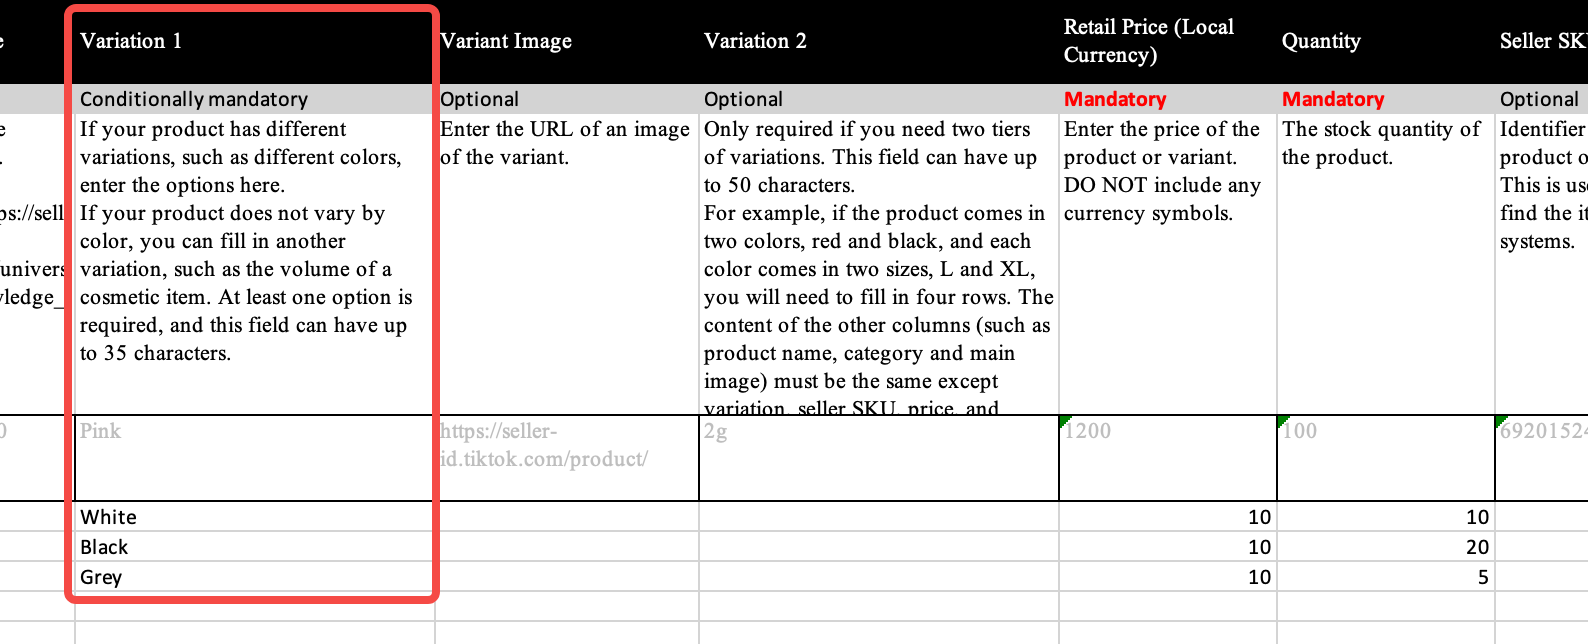 2) If the product comes in 3 different colours and 2 different sizes, there will be a total of 6 SKUs (3 colours × 2 sizes), with each SKU on a separate row.
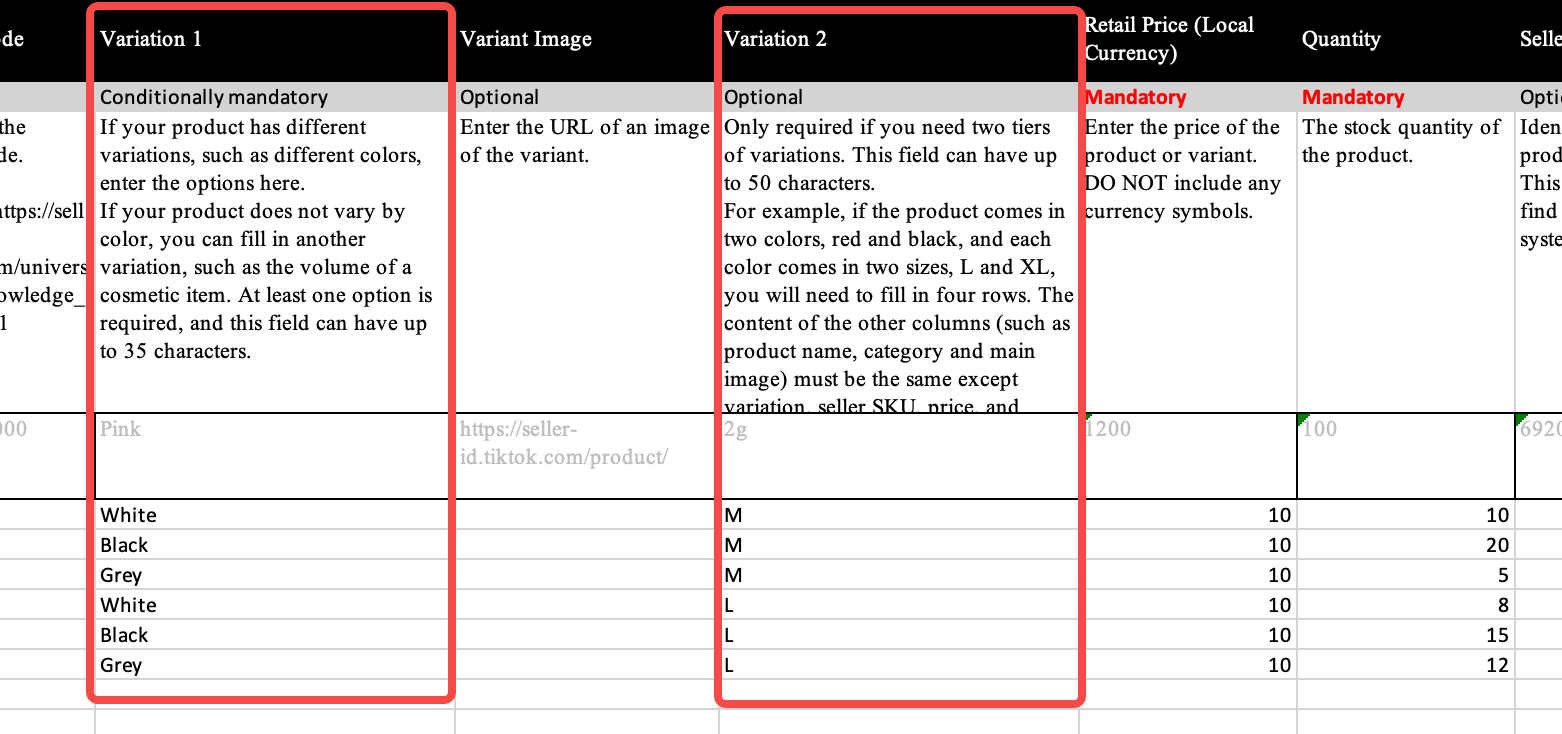
- Product common information should be kept exactly the same.
| Type | Seller Center screenshot | Template file for reference |
| Product with 3 different colours | 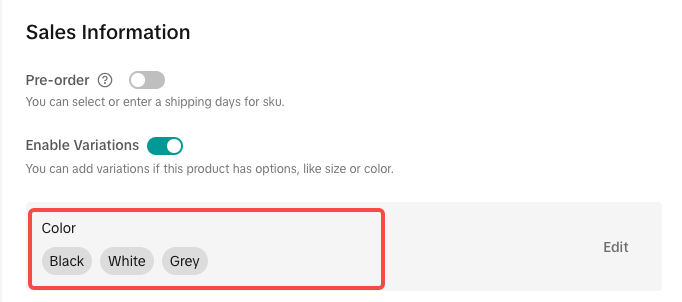 | Template - Product with 3 colors.xlsx |
| Product with 3 different colours and 2 different sizes | 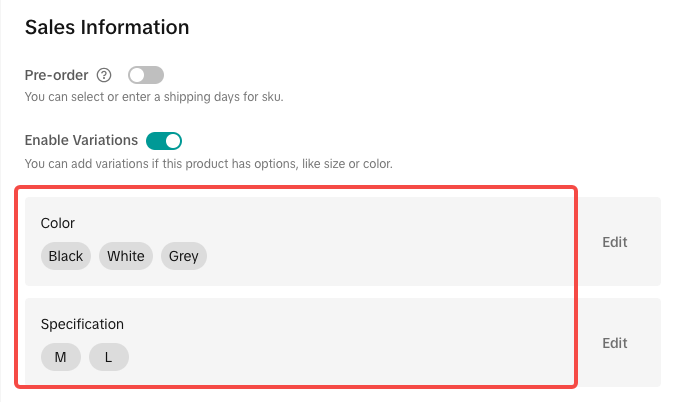 | Template - Product with 3 colors and 2 sizes.xlsx |
| *Cells requiring exact content consistency have been highlighted in red within the template. | ||
Batch Edit Product
Products - Batch Tool - Bulk Edit Products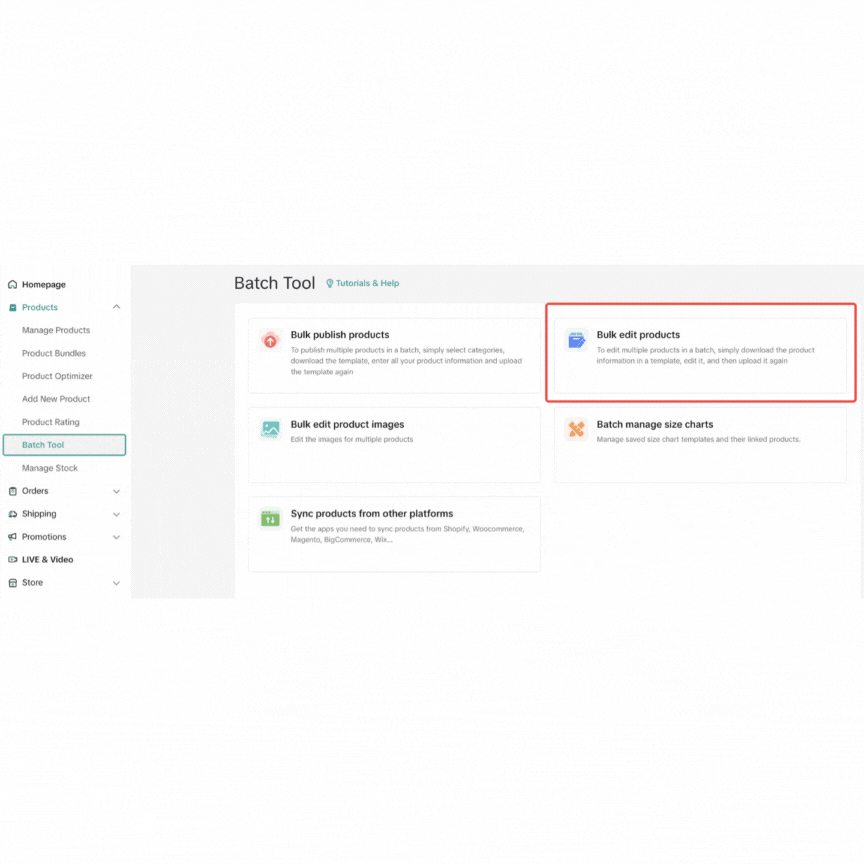 Select ProductsFilter the products, the filter conditions are:
- Product status: Active/Inactive/Draft
- Product Categories
- Product Name/Product ID/Seller SKU
- Method 1: Click designated products
- Method 2: All products that meet the filter conditions can be selected(Maximum 50000 Products)
- Select "Template", the editable content of 5 templates will be different:
- Sale information: Editable-price/quantity/SKU
- Basic information: Editable-Product name/Product description/Affliate commission
- Shipping information:Editable-weight / length, width, height / Warranty Period /Enable COD
- Images information: Editable-Images links
- Product properties information
- All information (Recommended): a combination of the 4 templates. The above information can be modified at the same time
- Click "Download" template
- Editable content and whether they support editing will be displayed when you hover each template
- Up to 5000 products information can be downloaded in a single template
- If the seller selects 50000 products and then clicks Generate , it will be split into 10 templates for download.
- Modify the product information in the downloaded template
- Upload the template which has been modified
- View template upload status: “Upload history ”will display
- Number of completed products
- Number of failed products: Click "download failed entries" to view the reason for the failure, and modify according to the prompts, then please upload again.
Batch Edit Images
Products - Batch Tool - Bulk Edit Product Images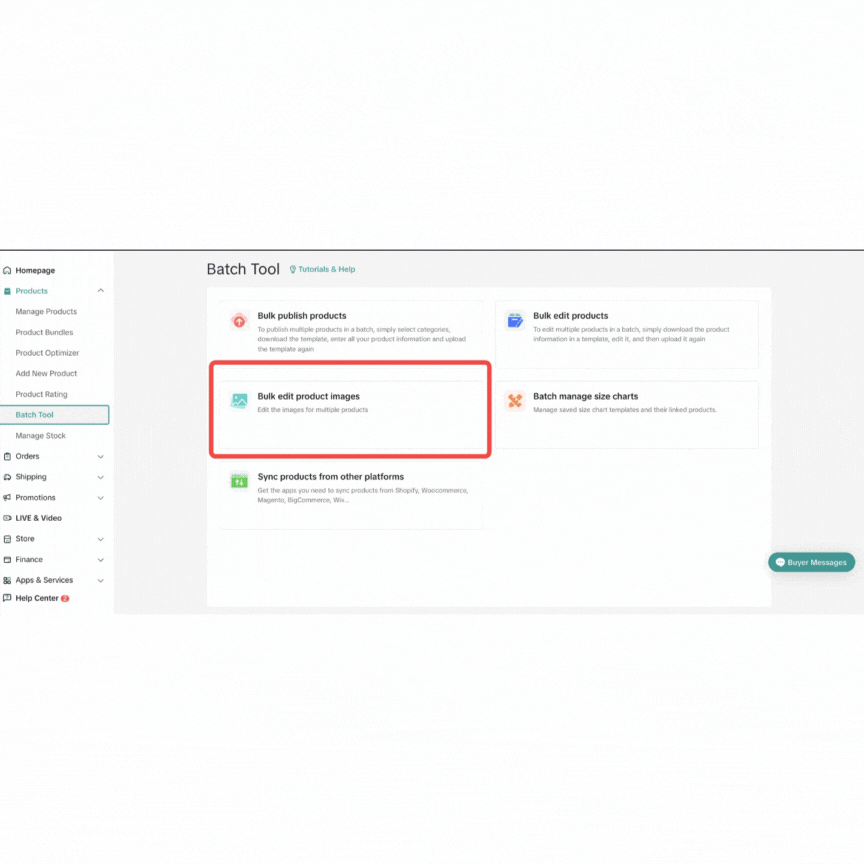 Select Products
- Product Status: Active/Inactive
- Product Categories
- Product Name/Product ID/Seller SKU
- Click single or multiple products
- Upload product materials in bulk:
- Product images
- product description
- Product video
- Product Variation's images
- Click “Publish”

Product Statuses
Manage your products that have been classified based on various product statuses which are separated by following tabs:
| All | Show all products with various statuses | Sellers can do:
|
| Live | Show all products that are visible online and can be purchased by customers | Sellers can do:
|
| Deactivated | Products that sellers make them offline | Sellers can do:
|
| Suspended | Products are being suspended due to some reasons. |
|
| Draft | Show products that the information has been filled with but not submitted yet | Sellers can do:
|
| Deleted | Show products that have been deleted by sellers and will not be displayed to customers | Sellers can return deleted products to the deactivated product list by clicking "Recover" |

FAQ
- How to fill in the product title?
- How to fill in the product attributes?
- Any requirements for uploading product images?
- How to manage product stock?
- What is "image URL"?
Here are some examples of an image URL:
https://example.com/images/picture.jpghttps://example.com/images.jpeg.abcd1234
- How can I get the image URL?
- If images are stored on your computer:
- For online images:
- Right-click on the image
- Select "Copy image address/URL/location" in your browser
- Paste the URL where needed
Anda mungkin juga tertarik
- 1 lesson
Avoid Incomplete Information violation
Best Practices for images, listing & titles to avoid Incomplete Information violation
- 1 lesson
Avoid Redirect Traffic
Avoid Redirect Traffic violation in listings & content

Platform Incentive Abuse
Platform incentive abuse occurs when a seller misuses incentives granted by us in order to gain a pe…

Adding Existing Products from TikTok Shop
Getting your products live is the first essential step to succeeding on our platform. While we offer…

Price Diagnosis
This feature will help sellers to review their product price competitiveness in TikTok Shop and full…
Trademark Infringement
Trademark Infringement TikTok Shop respects the intellectual property (IP) rights of others. TikTok…

Price Bidding
With this feature, sellers can have a view of the trending products on the market and get the chance…

Product Listing and Image Editor on Seller Center App
Image Editor The new product image editor enables sellers to take product pictures continuously and…

Inventory Management
This article will show you how to manage your product inventory, monitor its condition, and set aler…

TikTok Shop Anti-Counterfeit and Knockoff Policy
1. Overview TikTok Shop does not tolerate counterfeit or knockoff products. Products offered for sal…